Denny
Elite Cafe Member
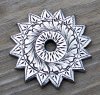
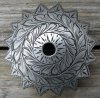
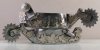
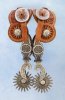
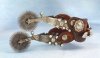
Here are a couple of pairs of spurs that I recently finished. I am still working hard to improve my engraving. Some days it feels like I am making a little progress, other days not so much. I do understand however that the key is just keep pushing forward.
Attachments
-
 highnoon2Resized.jpg86.9 KB · Views: 231
 -
 highnoon3Resized.jpg74 KB · Views: 240
")