
elkinssilver
Member
Here are a few pictures of some buckles that I have made. All of the letters and designs are cut out by hand with a jewelers saw. Please review and let me know what you think and the areas of improvement.
Attachments
-
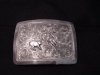 Cutter Buckle.JPG31.8 KB · Views: 237
 -
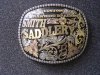 smith buckle.JPG72.8 KB · Views: 254
 -
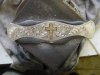 cross bracelet.JPG36.4 KB · Views: 235


