
You are using an out of date browser. It may not display this or other websites correctly.
You should upgrade or use an alternative browser.
You should upgrade or use an alternative browser.
Chase engraving
- Thread starter Mack
- Start date
carl bleile
Elite Cafe Member
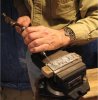
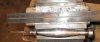
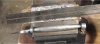
Mack, my handles are 4 3/4 to 5 1/4, the blades stick out no more than 3 in, if they are longer you would have to move around a lot more. In the pictures you can see a little of the way I work, the large tool is steel for heavier cutting, the smaller is alum. for lighter cuts.
The tools you showed have square handles these are good to feel if your angling the tool ( when your new to h&c )but after hours of engraving it's hard on the hand.
The tools you showed have square handles these are good to feel if your angling the tool ( when your new to h&c )but after hours of engraving it's hard on the hand.
Attachments
-
 h&c cut.jpg99.8 KB · Views: 218
 -
 untitled1.jpg48.7 KB · Views: 200
 -
 h&ctool.jpg53 KB · Views: 168
Roger Bleile
~ Elite 1000 Member ~
Mack,
Since you are new to H&C engraving, I need to ask you how you are holding your chisels. Are you using the "side hand" or "European" method that my brother is using in the picture above or you using the "Asian" method, as taught by Neil Hartleip, where you hold the chisel between the thumb and forefinger and cut toward yourself? The handles and chisels everyone has been describing to you are for the side hand method. The chisels and handles are much shorter for the Asian method.
CRB
carl bleile
Elite Cafe Member
Mack,
my brother has made a very good point, I wasn't thinking of the different styles.
A photo of what or how your cutting would be helpful.
Carl Bleile
southwest, Ohio
my brother has made a very good point, I wasn't thinking of the different styles.
A photo of what or how your cutting would be helpful.
Carl Bleile
southwest, Ohio
I hold the chisel in my left hand across my body and cut to the left. In other words I cut from right to left with the chisel in my left hand. I don't know why, It is just how I started since I am a wood carver and have always done it that way with wood. Mack
By the way, I have very small hands and my handles are about 4 inches long
By the way, I have very small hands and my handles are about 4 inches long
Last edited:
Roger Bleile
~ Elite 1000 Member ~
It sounds like you are using the more common (in the US and Europe) side hand method so all of the comments related to handles would apply to you.
CRB
CRB
Michael McGrew
Member
Hello Mack.
If you have access to a lathe (or you could probably just use a piece of hardwood dowel rod), my suggestion would be to buy a few of the GRS "QC" tool holders. I think that they are about $6-$7 each. Drill a hole large enough to accomodate the QC holder and epoxy it in place. They usually fit the 3/32 tool steel like the ones that GRS sells. If you want to use the less expensive 1/8" tool steel (readily availble from the tool vendors) it is easy to drill out the QC holder to accomodate these too. I just recently made up 6 walnut chisel handles with the afore mentioned QC holders in them. I used a 1/2" copper "cap" to reinforce the tool end of the handles. They work great. Hope this helps.
If you have access to a lathe (or you could probably just use a piece of hardwood dowel rod), my suggestion would be to buy a few of the GRS "QC" tool holders. I think that they are about $6-$7 each. Drill a hole large enough to accomodate the QC holder and epoxy it in place. They usually fit the 3/32 tool steel like the ones that GRS sells. If you want to use the less expensive 1/8" tool steel (readily availble from the tool vendors) it is easy to drill out the QC holder to accomodate these too. I just recently made up 6 walnut chisel handles with the afore mentioned QC holders in them. I used a 1/2" copper "cap" to reinforce the tool end of the handles. They work great. Hope this helps.
i do a bit of this work from time to time. my tools average- total length about 6". that's what is comfortable for me. i think you have to go first with what is best suited for you. start with a longer tool, and if too long, just cut it back to where it's better for you. i'm not sure there's a rule to follow here. just what's going to be most comfortable for your hand and vision.
Thanks very much for all the input. I have a wood lathe and a metal lathe, Drill press, power hacksaw etc. I now have some Ideas for making some handles and I am going to experiment with wood, aluminum, brass, steel and micarta and see how they feel. I will let you know. Mack
Michael McGrew
Member
Hello Mack:
I started out using a 3/8" piece of steel round bar for my handles. I cut knurling along their length to give me a better purchase. After watching Lynton's engraving videos I decided to make a "test" handle out of some rosewood that I had. The "feel" of the wood handle was much more pleasurable to use. I also made my handle fairly close to Lynton's "blueprint" he shows in the video. I even went as far as making some maple "caps" for my original steel handles to try to get the same feel. The handles that I just made started out as 1" X1" claro walnut. I bought 1/2" copper plumbing caps at the hardware store. I turned the blocks round to approx. 3/4" since that was comfortable in my hand. I then turned a tenon on one end to slip fit in the plumbing fitting. I bored a hole to accomodate the GRS QC holder in the copper cap on my metal lathe and used it to guide the drill into the wood. 5 minute epoxied the cap and holder into the wood. I stained the walnut and applied some wipe-on poly to protect the wood. I usually use my GraverMax for the major cut lines and for the fine shading lines. I use the H/C for all of the background removal. Another suggestion that may help: Buy a sharpening fixture. Doesn't really matter which one. With a sharpening fixture you can make subtle changes to the face and heel angles to find what works for you. Once you find what works you can repeat it every time. Being able to consistantly achieve the same angles on my gravers has helped me the most. I know that the masters can probably sharpen completely by hand/eye but I don't have that talent and can use all of the help I can get;-). Hope this helps. Michael
I started out using a 3/8" piece of steel round bar for my handles. I cut knurling along their length to give me a better purchase. After watching Lynton's engraving videos I decided to make a "test" handle out of some rosewood that I had. The "feel" of the wood handle was much more pleasurable to use. I also made my handle fairly close to Lynton's "blueprint" he shows in the video. I even went as far as making some maple "caps" for my original steel handles to try to get the same feel. The handles that I just made started out as 1" X1" claro walnut. I bought 1/2" copper plumbing caps at the hardware store. I turned the blocks round to approx. 3/4" since that was comfortable in my hand. I then turned a tenon on one end to slip fit in the plumbing fitting. I bored a hole to accomodate the GRS QC holder in the copper cap on my metal lathe and used it to guide the drill into the wood. 5 minute epoxied the cap and holder into the wood. I stained the walnut and applied some wipe-on poly to protect the wood. I usually use my GraverMax for the major cut lines and for the fine shading lines. I use the H/C for all of the background removal. Another suggestion that may help: Buy a sharpening fixture. Doesn't really matter which one. With a sharpening fixture you can make subtle changes to the face and heel angles to find what works for you. Once you find what works you can repeat it every time. Being able to consistantly achieve the same angles on my gravers has helped me the most. I know that the masters can probably sharpen completely by hand/eye but I don't have that talent and can use all of the help I can get;-). Hope this helps. Michael
Sponsors


