First flair/transition attempt - Advice welcome

RyanCol

Member
Joined
Jan 12, 2008
Messages
22
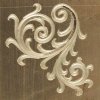
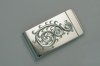
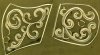
Decided to try my hand at some "flair/transition cut" style engraving. I've seen some posted on this forum and would appreciate any constructive criticism, or direction that would help me along the way. I know there's some obvious imperfections. Any input is appreciated.
 

Attachments

  • flair01.jpg
    flair01.jpg
    30.2 KB · Views: 397

KCSteve

~ Elite 1000 Member ~
Joined
Jun 19, 2007
Messages
2,882
Location
Kansas City, MO
I see a couple of minor elbows and some wobbly central lines but all in all it looks better than my last try. :)

I'd say you've got the idea and just need to get the smoothness. It seems to me to work better if don't slow down - it is a naturally fast style.
 

D.DOUGLAS

Elite Cafe Member
Joined
Nov 10, 2006
Messages
296
Location
Princeville,ILLINOIS
My advice is to work on the scroll layout a little more. Try and come off the main stem a little smoother and keep the eye moving along. You seem to have a grasp on the cutting end. Just keep at the practice. Thats not a bad first atempt.
 

Roger Bleile

~ Elite 1000 Member ~
Joined
Oct 4, 2007
Messages
2,988
Location
Northern Kentucky
I agree with D.Douglas above. Go back to my tutorial to understand how a flair cut scroll is formed. I have mentioned this here before but will say it again: Beginners should avoid the "C" scroll. Those are the scrolls that look like a capital letter C. All beginners (including me years ago) seem to want to make C scrolls. They are of very limited use in a design and require a skilled designer to incorporate them correctly.

Here is the link to the tutorial in case you didn't see it: http://www.igraver.com/forum/showthread.php?t=3203

Good luck and keep at it,

CRB
 

RyanCol

Member
Joined
Jan 12, 2008
Messages
22
Thanks for the tips everybody. I do struggle with scroll layout on large pieces like this. I'm a goldsmith. Most of the engraving I've done is on rings, and mostly the edges at that. So, when I've got more than a few millimeters to work with, I'm a bit out of my element.
I'm looking into doing a bit more with money clips, maybe some simple pocket knife engraving to add some alternative, lower price point items to the inventory.
I liked the look of the flair cut and the speed at which it could potentially be done. Are there any other practice exercises you can recommend to improve my technique?
 

Roger Bleile

~ Elite 1000 Member ~
Joined
Oct 4, 2007
Messages
2,988
Location
Northern Kentucky
I don't know what kind of engraving tools you use but it is my opinion that flare cut is best done with a power assisted graver. It is too difficult to hand push in anything but the softest metals and then on a very small scale like the side of a ring. I believe that trying to do flair cut with H&C would show too many progress marks for all but the most highly skilled. The key is to make each cut in one pass if possible so that it is very smooth. This is not always possible on guns since things like recoil shields and breech balls (detonators) will get in the way of your hand as you go around. I try to design around this as much as possible.

As far as the graver itself is concerned, I prefer to use a square graver with a Lindsay parallel heel but the work in the tutorial was done with a traditional heel on a square graver. Some people prefer to use a flat graver. I find them too hard to control but others have said the same about the square. I guess that part depends on what you are most comfortable with.

CRB
 

Ron Smith

~ Elite 1000 Member ~
Joined
Apr 6, 2007
Messages
1,455
Your work will improve aesthetically if you start with the basic spiral, get that right, then move on to how to add spirals onto spirals and leaves. Take each suggested phase and focus on one thing at a time. Study structure of elements first, then go on to composition. You have the idea of how to cut it, as I can see by your examples, but design is the key to acceptable layouts. Make this your path and you will get more out of your efforts. Proper beginnings begin with structure and accurate foundations. If you don't get that right, you will struggle for years, not understanding.

You might consider taking a scroll drawing class if you have the cash. It would save you a lot of heart ache and you would advance much quicker even if you don't think you have learned much in the class. Things will stick with you (little pearls of wisdom) that will be priceless in your learning to understand how to draw scrolls.

Hope this helps.

Ron S
 

RyanCol

Member
Joined
Jan 12, 2008
Messages
22
Thanks again guys. I'll try to implement your advice and post another plate.
 

RyanCol

Member
Joined
Jan 12, 2008
Messages
22
Second Try

Thanks again for the tips gentlemen. Here's my second try. Let me know what you think I could work on next.
Also, I used a 115 lindsay point on this. I know some people us a flat. What are the pros/cons. What do you think is best?
 

Attachments

  • flair02.jpg
    flair02.jpg
    41 KB · Views: 137

D.DOUGLAS

Elite Cafe Member
Joined
Nov 10, 2006
Messages
296
Location
Princeville,ILLINOIS
That is better. You could go along and true up the edges with a ninty degree graver kind of framing it so to speak. You are getting the hang of it. Sam has post a really good example for us to study. I also use a lindsay point but sam has shown that you can get excellent results with a flat . Just keep doing what your doing and each piece will improve.
 

Ron Smith

~ Elite 1000 Member ~
Joined
Apr 6, 2007
Messages
1,455
Wow!! What a leap of improvement!!! Both in design and execution. Now, I see there is considerable tearing of the cut on the outside curves. Flare wider, but cut shllower. This will improve the quality of the cut. Don't cut deeper than the facet is long on the belly of the tool and this lift geometry should be very short. No more than about 1 1/2 mm. or less.

You got it now with some refinements you are well on your way. You have to be pleased with that result. The possible advantage of the flat is that it does not cut as deep as readily as a pointed tool (square or 120 degree tool) if you get that geometry right. It is harder to control however. Shallower cuts takes a little more finnesse and focus, but I think that will solve the problem.

Ron S
 

John B.

Lifetime Pledge Member
::::Pledge Member::::
Joined
Nov 9, 2006
Messages
3,956
Location
Los Angeles area, California.
Ryan,
I really like your new design.
A very traditional scroll that fits this style of engraving well.
Please follow Ron's advise while doing the same design in this post over again.
I think you will be proud of the improvement you see.
Also take a little more care of how the outside cuts transition from the main scroll.
And please post it for all of us to see.
You made a major leap forward in this post IMO.

Best wishes, John B.
 

Roger Bleile

~ Elite 1000 Member ~
Joined
Oct 4, 2007
Messages
2,988
Location
Northern Kentucky
Ryan,

I have to agree with Ron and John. I don't think I have ever seen so much improvement in one leap! In one more try you will be giving me advice on how to improve:D

CRB
 

Roger Bleile

~ Elite 1000 Member ~
Joined
Oct 4, 2007
Messages
2,988
Location
Northern Kentucky
Ryan,

I think your money clip looks great. Customers for such an item are not going to analyze your scroll as long as it has good proportions and flow. That said, I will point out that the way I do it (as shown in the tutorial) is to draw the scroll backbone and bring my inside and outside leaves to that backbone line but I usually do not cut the backbone unless it is very small in overall proportion. I do it this way because the end result looks more delicate and it is difficult to make both left and right leaning cuts perfect around an entire backbone. Now, this is just my take on it and I am by no means the final authority on the subject.

Thanks for pointing out that Ron and I are spelling it differently. That had completely escaped me. The following definitions are from Merriam Webster's online dictionary:

FLARE: 1; A spreading outward ; also : a place or part that spreads. 2; Light resulting from reflection (as between lens surfaces) or an effect of this light (as a fogged or dense area in a photographic negative).

FLAIR: 1; A uniquely attractive quality. 2; Style <fashionable dresses with a flair all their own.

I believe that Ron is the person who gave this style of engraving it's name so I would defer to his spelling. I also think that the "spreading outward" definition is probably most descriptive. I'd like to hear from Ron and others so we can settle on the spelling.

CRB
 

Ron Smith

~ Elite 1000 Member ~
Joined
Apr 6, 2007
Messages
1,455
Hell, I don't even know how I spelled it. I'd have to look, but I think it would be Flare cuts. It was common to use this term especially in script engraving where you start with a point and "flare" the cut and come back to a point. Of course this is just a style of cut commonly used in script lettering. Of course it is a useful technique for other types of letters and line ornamentation. You simply "flare" or lean the tool gradually through the cut to produce this effect. So, "Flare cut sculpting" seemed to me to be a natural title for this style. It appears to be sculpted but it is an illusion. i guess you could call it bevel cut engraving also.
 

RyanCol

Member
Joined
Jan 12, 2008
Messages
22
Money Clip

Thanks Roger. You caught me. I posted the picture of the money clip, but then saw the latest advice that had been posted and decided to pull it off and post a new practice plate taking the advice given. But I'll post it again here. I should have that new practice plate up soon.
 

Attachments

  • flair03sizedb.jpg
    flair03sizedb.jpg
    28.8 KB · Views: 56

RyanCol

Member
Joined
Jan 12, 2008
Messages
22
New Practice Plate

Here's my latest practice plate. I tried to take Ron's advice to reduce the tear out and I think it really helped. Thanks Ron.
As always more constructive criticism is much appreciated.
 

Attachments

  • flare04.jpg
    flare04.jpg
    90.6 KB · Views: 55

Sponsors

Top