"transition Cut" Tutorial

Roger Bleile

~ Elite 1000 Member ~
Joined
Oct 4, 2007
Messages
2,988
Location
Northern Kentucky
Doug,

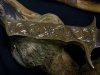
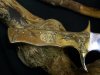
You are definatly getting the hang of it. I don't know why your 90 broke. I cut the whole tutorial with the same 90 without resharpening. Anyway it doesn't matter how the chips get on the floor. I did mention that this style is somewhat unforgiving as far as slips into the background. There is not much you can do to change anything due to the boldness of the cuts.

Thanks for posting pictures of your work Doug. We all like the posts with pictures.

RB
 

Ron Smith

~ Elite 1000 Member ~
Joined
Apr 6, 2007
Messages
1,455
Doug, it is pretty important that you make each cut with one stroke. Going over a line is next to impossible and will distort the effect, so practice making smooth cuts, although I don't see much wrong with what you have done. With a little shallower cut, you will get a little smoother job and speeding up the strokes will help with that.

Also, you definately have the idea. That looks good, and you mentioned that it should be more open and that is correct. Now just experiment with tool angles and leaf structures and expand your knowledge on how to put cuts together to construct different style leaves and then Katy bar the door. You got it. Post your progress.
 

ED DELORGE

Elite Cafe Member
Joined
Nov 17, 2006
Messages
384
Location
LOUISIANA
Hello Doug, I have a bracelett coming up also. I think that style would work on that project. It will be in silver that is not my favorite medium. We will see.

Your piddle looks very good.

Ed
 

Marcus Hunt

~ Elite 1000 Member ~
Joined
Nov 9, 2006
Messages
1,799
Location
The Oxfordshire Cotswolds, England
I am sorry, but I don't like it over traditional engraving. It is probably just me but I do not see enough "life" in this style. Wood carvers could easily reproduce this style, and I still would not like it. Maybe if it had more detail added. I don't know, but to me it is just a dead. There is something lacking that I cannot put a finger on. It is very 3 dimensional, but just not exciting to the eye. Or, at least my eye.

I think you may have missed the point of this style slightly, LRB. This style is not meant to be highly detailed. I'm still messing with it in the odd few minutes here and there and yes, I will agree with you that it lacks detail in the traditional sense. Instead it relies upon light reflections to give it shape and character and it does a fair representation of carving (it's a sort of trompe l'oeil).

Where it wins is pure speed. No cutting away background and no shading; both of which add detail but also add huge amounts of time to an engraving. It could almost compete with the 'mall mentality' and give it a run for it's money even though it's hand done.

In my opinion it shouldn't be compared with other styles of engraving but rather should be looked upon as a stand alone style with it's own place in the engraver's arsenal.
 
Last edited:

D.DOUGLAS

Elite Cafe Member
Joined
Nov 10, 2006
Messages
296
Location
Princeville,ILLINOIS
Thanks Ed, I hope you post your bracelet and any important tips when your finished. This piddleing stuff is becoming addictive. My biggest problem is knowing just how much to use on a given space. I like the flat for this work and then go in with the 120 and clean things up or ad an extra lobe here or there. I am working on another plate i will post when i am finished. Doug
 

Ron Smith

~ Elite 1000 Member ~
Joined
Apr 6, 2007
Messages
1,455
Doug,....Wow! This is getting exciting! It is great to see you guys enjoying this style. I thought you would. It does get kind of addicting, and it got me back into the game of enjoying engraving more. That high end stuff is tedious, and like I said, flared cut sculpting lets you loosen up a bit and breaks up that pressure. It can be quality, but it is rather easy to get onto.

Okay guys, let's see what you got? Don't forget to post your efforts.
 

Roger Bleile

~ Elite 1000 Member ~
Joined
Oct 4, 2007
Messages
2,988
Location
Northern Kentucky
I think you may have missed the point of this style slightly, LRB...
In my opinion it shouldn't be compared with other styles of engraving but rather should be looked upon as a stand alone style with it's own place in the engraver's arsenal.

My attitude exactly Marcus. None of us are going to give up the other styles and do only flare cut.

Hummm...I'm still pondering calling it The "Dead" C Scrolls:D ...nah, it makes me laugh but it just isn't as descriptive as flare cut.

Roger
 

Ron Smith

~ Elite 1000 Member ~
Joined
Apr 6, 2007
Messages
1,455
Marcus, that is exactly the point. You can compete with the "mall mentality" with it and it is fun and rather relaxing to boot. Just a little break in the tension, huh?
 

Robert Morales

Elite Cafe Member
Joined
Nov 11, 2006
Messages
220
Location
TRAVELING THE USA
Here's my attempt, and it has NO FLAIR! I see that I need to work on the width of my cuts, not to mention the "dog legs". I've never really tried wide cuts so this was a real challenge. Under the scope they looked big enough! I can't see how y'all do this with a 90. 1.75"x.75"x.125" Brass Key Fob, used GraverMax, 3/32 flat graver.
 

Ron Smith

~ Elite 1000 Member ~
Joined
Apr 6, 2007
Messages
1,455
Robert, this style might be a little hard to do under the scope. You need to be moving pretty fast and the dog legs might smooth out a bit. That is the beauty of this style, It is fast smooth cutting, more like the bright cut style of engraving. Those guys really cover ground, quickly.

You have the idea, but the hard part is getting used to hogging metal. If you are using a 120 degree, lean the tool over a little more. Same with the flat. The outside edges of your cuts are smooth (no tearing), just think Bolder cuts, but don't go much deeper than you are now. Test your tool to see how deep you can go without tearing the edges of the cuts, then drop back a little on your depth.
 

Roger Bleile

~ Elite 1000 Member ~
Joined
Oct 4, 2007
Messages
2,988
Location
Northern Kentucky
Robert, this style might be a little hard to do under the scope.

Good point Ron! The one thing I forgot to mention in the tutorial is that I have always done this using an optivisor. Even though I have a scope I don't think it is the way to go. For one thing the scope makes the size of your cuts look enormous when they aren't. By using less magnification you will get the perspective of how it will look to the casual observer. The scope is great for ultra-fine shading but these cuts have no shading. For those whose work is married to the microscope, I'm sure you can find a way to do it but it may take more time and effort.

Roger
 

KCSteve

~ Elite 1000 Member ~
Joined
Jun 19, 2007
Messages
2,882
Location
Kansas City, MO
When I did this under the scope I had it at minimum magnification.

I still wound up doing too much because it looked too open under the scope.
 

Peter_M

Elite Cafe Member
Joined
Jun 28, 2009
Messages
491
Location
BC, Canada
Roger ,
Thank you for taking the time and putting this tutorial together.

Had to give this a try yesterday and it sure is a lot of fun. I find it easier to cut from narrow to wide.

Peter

P1050362.jpg
 

Roger Bleile

~ Elite 1000 Member ~
Joined
Oct 4, 2007
Messages
2,988
Location
Northern Kentucky
Peter,

I'm glad the turorial was heplful.

As to which end of a cut to start with, I would guess I am in the minority going from the deep and wide end of a cut to the fine point. Of course when I am doing work with shading cuts I go the other way to get that ultra-fine point where I skid the graver on the heel for a thousandth of an inch before letting the tip bite in.

On the flare cut, I cut from thick to thin for two reasons. First, keep in mind that I do this with only a backbone line drawn on the work. By starting on the thick end of a leaf I am able to aim my cut to the point where I want it to transition into the backbone line. This works better for me than aiming the cut at some indistinct point in space.

Secondly, having watched other engravers go the other way while flare cutting, I noticed that at the end of the cut the graver has a rather large hunk of metal that has to be suddenly forced out of the work piece. Sometimes it does not come out cleanly and you must go back in and try to finnesse the cut. I think it is important that every cut in this style be made in one smooth, continuous pass of the graver. By starting on the thick end the chip just falls out cleanly at the end of the cut.

I do realize that one must develop a technique for starting on the thick end. It involves starting with the graver almost perpendicular to the work then biting in and twisting the hand as you lower the tool. Hard to explain in writing.

I may have written this before but for those who havent read it I will give my assessment of why engravers have always been taught to go from thin to thick for all cuts. It all started with the burin or push tool. When you are manually pushing you must start on the thin end to build up momentum to plow through the thicker part of the cut. At the end of the cut you pop out the chip unless the cut ends into another cut that allows the chip to break free. Also when pushing, if you end a cut on the thin end you have a far greater hazard of flying out at the end. All of this is pretty much true for H&C to a lesser extent.

With an air powered graver, one is not forcing the graver through the metal by muscle power and has much greater control which makes cutting thick to thin possible. So on the thin end of the cut the chip just falls free with no need for any "popping" action.

Really for most engraving with power assist it makes no difference which way you go. But because of the thickness of the cuts used for flare cutting and the need for one clean continuous cut from start to finish, I think power assisted is necessary except in soft metals where a burin can be used. So if I was to engrave silver or pure copper with a burin, I would have to cut thin to thick.

I hope I didn't confuse anyone there. Like everything else in engraving, it doesnt matter how the chips get on the floor if the work looks good.

RB
 

Jane

Elite Cafe Member
Joined
Oct 9, 2009
Messages
346
Location
NW Texas
First of all I have never posted like this with a reply so I hope I do this right and apologize if incorrect.

Heres my try at this style....I enjoy it because of the freedom you have in cutting it. I know I need to work on my control and have some dog legs and other mistakes.

Critique welcome and very much appreciated!

Thanks in advance....
 

Attachments

  • 121_2097.jpg
    121_2097.jpg
    57.5 KB · Views: 137
  • 121_2094.jpg
    121_2094.jpg
    57.3 KB · Views: 124

delder

Elite Cafe Member
Joined
May 5, 2007
Messages
135
Location
Murrells Inlet, SC
These cuts were made under a scope with a flat.I can see that they coud be much wider.I'm going to try it with an optivisor and a ninety. Can't imagine cutting thick to thin though . I'll let you know the outcome.
 

Attachments

  • DSC00189 (3).jpg
    DSC00189 (3).jpg
    119.9 KB · Views: 115
Top