
You are using an out of date browser. It may not display this or other websites correctly.
You should upgrade or use an alternative browser.
You should upgrade or use an alternative browser.
"transition Cut" Tutorial
- Thread starter Roger Bleile
- Start date
Dan Grubaugh
Member
Thanks Roger!!
Great information and very understandable! Thanks taking the time to put together a great tutorial!
It is much appreciated.
Regards,
Dan Grubaugh
Great information and very understandable! Thanks taking the time to put together a great tutorial!
It is much appreciated.
Regards,
Dan Grubaugh
ddushane
~ Elite 1000 Member ~
Thank you Roger for the outstanding tutorial, Like Big Un, my note book just keeps getting bigger & bigger, Dwayne
jlseymour
Elite Cafe Member
Thanks Roger, I needed that...
I save all the pic's to my doc's under your name so I can bring them all up at one time to study...
Thanks again,
Jerry
I save all the pic's to my doc's under your name so I can bring them all up at one time to study...
Thanks again,
Jerry
ED DELORGE
Elite Cafe Member
Hello Roger, execelent tutorial, I was wondering is is possible to progress this style of what apears to be sculptured scroll into a deep relief sculptured scroll similar to Phil cogans deep relief scroll? Or is this style best left as a less time consuming decrotive scroll on a flat surface? And if it can be deep relieved, should the relief be done after the pattern is complete or before?
Thanks Ed
Thanks Ed
KSnyder
Elite Cafe Member
Roger, its cool beans for sure! Gonna try some of it the week if possible.
The cuts are clean and easy to interpret.
thanks for showing & taking the time out of your schedule to post.
Kent
The cuts are clean and easy to interpret.
thanks for showing & taking the time out of your schedule to post.
Kent
Roger, thank you for this fine tutorial.
Your work is so clean and elegant.
And you have a masterful eye for the ballanced placing of the elements.
Just great, thank you.
Best, John B.
Your work is so clean and elegant.
And you have a masterful eye for the ballanced placing of the elements.
Just great, thank you.
Best, John B.
KCSteve
~ Elite 1000 Member ~
I came through the 'Tips' forum first so I've already saved both tutorials as single documents in the DeskTop Publishing software I use. They're printing out right now for ease of reference.
Roger Bleile
~ Elite 1000 Member ~
Hello Roger, execelent tutorial, I was wondering is is possible to progress this style of what apears to be sculptured scroll into a deep relief sculptured scroll similar to Phil cogans deep relief scroll? Or is this style best left as a less time consuming decrotive scroll on a flat surface? And if it can be deep relieved, should the relief be done after the pattern is complete or before?
Thanks Ed
Ed,
I thought about your question for a little while and it is my opinion that "you can't get there from here" (Phil's sculpted scroll from my flair cut scroll). In the flare cut we are creating the illusion of relief but to get real relief like Phil does you have to take down the background to start on the sculpting. If you remove the background around the flare cut style you would find that there really isn't all that much foreground (scroll) left.
RB
Last edited:
Roger Bleile
~ Elite 1000 Member ~
I received a question via PM that I thought I would share with everyone in case there is any confusion regarding my graver and how I use it:
...you said you cut with a 90 square...do you cut with the 'V' of the ninety or--are you grinding the square graver like for use in a bright cut and cutting on the 'flat' of the graver???
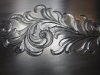
The answer is that my graver is sharpened like a reqular square graver that cuts on the point of the "V." That said, much of the cutting is actually done by the side of the "V" at the same time the point is doing it's work. By cutting in this way I seem to leave far less of a burr than doing it with a flat. I start by positioning the point where I wish to start the cut while holding the handle almost perpendicular to the work. I start applying power while I roll my hand left or right (depending on which side of the cut I'm on) and gradually lower the graver at the same time. As I move along I roll the graver to the center position so that it cuts less and less on the side and more on the point only. At the end of the cut I am only cutting on the point and gradually tapering the cut to a vanishing point.
I hope this clears up my method. It is different than Ron's method using a flat. Bright cutters may find using a flat easier to apply but for most of us who primarily cut with square gravers I think my method may be easier to get the control necessary. Try both ways and see what works for you. As has been said here so many times there is no ONE way to engrave.
Roger
...you said you cut with a 90 square...do you cut with the 'V' of the ninety or--are you grinding the square graver like for use in a bright cut and cutting on the 'flat' of the graver???
The answer is that my graver is sharpened like a reqular square graver that cuts on the point of the "V." That said, much of the cutting is actually done by the side of the "V" at the same time the point is doing it's work. By cutting in this way I seem to leave far less of a burr than doing it with a flat. I start by positioning the point where I wish to start the cut while holding the handle almost perpendicular to the work. I start applying power while I roll my hand left or right (depending on which side of the cut I'm on) and gradually lower the graver at the same time. As I move along I roll the graver to the center position so that it cuts less and less on the side and more on the point only. At the end of the cut I am only cutting on the point and gradually tapering the cut to a vanishing point.
I hope this clears up my method. It is different than Ron's method using a flat. Bright cutters may find using a flat easier to apply but for most of us who primarily cut with square gravers I think my method may be easier to get the control necessary. Try both ways and see what works for you. As has been said here so many times there is no ONE way to engrave.
Roger
I am sorry, but I don't like it over traditional engraving. It is probably just me but I do not see enough "life" in this style. Wood carvers could easily reproduce this style, and I still would not like it. Maybe if it had more detail added. I don't know, but to me it is just a dead. There is something lacking that I cannot put a finger on. It is very 3 dimensional, but just not exciting to the eye. Or, at least my eye.
Chas
Member
Roger--great explanation--this clears up my question-100%. Thanks a bunch, Charlie
Andrew Biggs
Moderator
Hi Roger
Fantastic tutorial. Thanks for taking the time to do that.
I want to live to a 1000 years old to try all this sort of thing out. (OK, maybe 150!!!)")
One of the nice things about all this is that these types of styles is that they can be a stand alone engraving or can be adapted into all sorts of work to add highlights, and variations within the overall design to add extra interest. Another feather to add to the arrow.
Cheers
Andrew
Fantastic tutorial. Thanks for taking the time to do that.
I want to live to a 1000 years old to try all this sort of thing out. (OK, maybe 150!!!)
One of the nice things about all this is that these types of styles is that they can be a stand alone engraving or can be adapted into all sorts of work to add highlights, and variations within the overall design to add extra interest. Another feather to add to the arrow.
Cheers
Andrew
Roger Bleile
~ Elite 1000 Member ~
I am sorry, but I don't like it over traditional engraving. It is probably just me but I do not see enough "life" in this style. Wood carvers could easily reproduce this style, and I still would not like it. Maybe if it had more detail added. I don't know, but to me it is just a dead. There is something lacking that I cannot put a finger on. It is very 3 dimensional, but just not exciting to the eye. Or, at least my eye.
Obviously I don't agree with your assessment of this style or I would not bother to do it much less create this tutorial. That said, when it comes to artistic taste one informed person's taste is as good as another's. That is why expierienced engravers work in a number of styles. I would not design or engrave a flintlock rifle in the same way as a Mauser or do an 1873 Winchester like a Westley Richards shotgun. People who are occupationaal engravers need many tricks in their bag to please a wide range of tastes and patrons and this style is just one of them.
RB
joseph engraver
Elite Cafe Member
Rodger, Excellent post and a correct riposte.
ddushane
~ Elite 1000 Member ~
Obviously I don't agree with your assessment of this style or I would not bother to do it much less create this tutorial. That said, when it comes to artistic taste one informed person's taste is as good as another's. That is why expierienced engravers work in a number of styles. I would not design or engrave a flintlock rifle in the same way as a Mauser or do an 1873 Winchester like a Westley Richards shotgun. People who are occupationaal engravers need many tricks in their bag to please a wide range of tastes and patrons and this style is just one of them.
RB
Roger, Like you said everyone is entitled to his or her opinion and some will not like this style. I love it myself and see a beautiful simple life exploding here, The older I get the more simple I desire my life to become. That being said I also love the very detailed and busy engraving that you have to look at over & over & over to see everything. I just love engraving and all other forms of art. I use to pipe line, I was a welder and at one time I was certified for 18 different oil companies to do code welding on fabrication, pipelines, plant work and a wide array of different welding applications. To me I found that I could make an art out of anything weather it be grinding out a bevel for a weld, cutting certain things that you couldn't get a grinder too, or just making a simple weld on a pipeline, I always put everything I had into making the most beautiful weld I could knowing as soon as x-ray was done it would be doped & taped, thrown into the ditch, covered up never to be seen again. I was taught if it was worth doing it's worth doing right. There's an art to living and loving. Engraving is part of the living that I love. Thanks for this awesome tutorial, I'll be trying this style out. May God bless you for your efforts, Dwayne
ED DELORGE
Elite Cafe Member
Hello Roger, I just finished my practice piddle of your design, and it looked almost as good as yours. What was interesting was that ,I did the scroll on the same practice plate that I was practicing a more complicated pattern that I was copying from a plastic molded floorplate that I bought from the engravers guild a few years ago that was engraved by Ron Smith. It is the floor plate with the lion head on it. Two distinctly different types of style, but both very attractive. By the way I used the 120 graver. It works well with those flare cuts.
One other thought, This style of engraving that you have demonstrated is what I believe Ken Hurst would call production work.
That was fun, thanks Ed
One other thought, This style of engraving that you have demonstrated is what I believe Ken Hurst would call production work.
That was fun, thanks Ed
Roger Bleile
~ Elite 1000 Member ~
Joseph and Dwayne, thanks for your positive comments. I want to thank everyone who has posted to this thread. Now let's see some pictures of what you can do with it. Don't be shy.
Ed, I'm really glad that you had a go at the flair cut. I'm sure our readers would like to see a picture of what you did. As far as using the 120. I think it may be an even better choice than the 90 but since I always did it in the past with a 90 I didn't want to chance messing up my tutorial plate by expiermenting with the 120. It makes sense that since the 120 cuts a wider line that it may be a better choice. Anyway I'm going to give it a try.
Roger
D.DOUGLAS
Elite Cafe Member
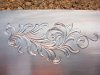
OK Roger here is a couple of pictures. I started with a ninty and snapped the tip off imediatly. Grabbed a flat and got aggresive. I think i designed this scroll a little to tight on the inside for this style. I have a large gold braclet to do for a customer that this would look great on! I noticed that there is not much going back and fixing any problems with the background. At least not in steel.
Doug
Doug
Attachments
-
 Dougs 018.JPG123.2 KB · Views: 214
 -
 Dougs 026.JPG112.9 KB · Views: 202
Sponsors


