
You are using an out of date browser. It may not display this or other websites correctly.
You should upgrade or use an alternative browser.
You should upgrade or use an alternative browser.
Transferring From Sam Alfano's Tips and Tricks
- Thread starter mdengraver
- Start date
holy cow ! that's the best yet on transfer. imho, it's all one would ever need to do transfer. tyvm
Ragnarok
Member
That was a really good read, and I made sure to save it for future reference. I use the Dammar/IPA/ Testors white paint mix for inkjet transfers. So far I've tried several HP, and Brother inkjet printers, and have had good luck with all of them. The HP printers using #60 or #61 ink really work well. I've been using generic transparency sheets I got at the Office Depot print desk so I wouldn't have to buy a whole pack to experiment with.
Both sides are slick, and Ive tried transfers with both sides, and it worked great. You just have to let the Dammar dry til it's barely tacky, and the transfer dry a little. I add another picture on the transfer so I can test it with my finger. If it just wipes off, it's not dry enough. I've let transfers sit out overnight, and they work fine the next day.
Both sides are slick, and Ive tried transfers with both sides, and it worked great. You just have to let the Dammar dry til it's barely tacky, and the transfer dry a little. I add another picture on the transfer so I can test it with my finger. If it just wipes off, it's not dry enough. I've let transfers sit out overnight, and they work fine the next day.
Dean
Elite Cafe Member
My Transfer Method
I am just starting out here and I have learned a great deal from everyone here, and I thank you all for that.
I had met an older gentleman in his 80s close to me that has been making knifes and engraving for many many years (Bob Gromley Knifes), he told me he uses KIWI white shoe polish on the item he will be engraving and then uses the blue carbon paper with the design on top and traces it.
It works but I wanted to mix some of the ideas I have read from here to see the results.
This method works for me at least, maybe some here will give it a try.
I wanted to test something out.
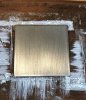
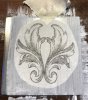
1. I cleaned and prepared my metal.
2. I put the KIWI white shoe polish on it. in this example I left a small edge with no white on it just to show how the white stands out on the metal.
3. Brushed it smooth.
4. Let it dry, then used some Damar varnish over the white polish from Michael's art supply straight from the bottle did not dilute it. *** Then let it try so it was just a little bit tacky and would still be able to see a light finger print image, and it stays a bit shinny.
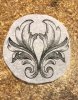
5. Got my image that I had printed onto the baking parchment paper ready and cut out.
6. Let the varnish dry to the point it was just tacky then placed my image on top.
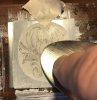
7. Then using just an old spoon burnished it in.
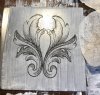
8. And when I could tell the image had released I removed the printed image,
*Note I left a small section at the top left corner and center right to show where the ink did not release.
** I would first use a marker to fix the areas that did not transfer. Then I sprayed a very light mist of hair spray over the entire image to prevent it from smearing
*** The printer I used was a HP Color Laser Jet Pro MFP M281fdw I first printed my design on regular paper, then cut out some baking parchment paper my wife had in the kitchen, placed it over the area that was just printed and taped the leading edge down with basic scotch tape so it would go through the printer and printed the image again.
I am just starting out here and I have learned a great deal from everyone here, and I thank you all for that.
I had met an older gentleman in his 80s close to me that has been making knifes and engraving for many many years (Bob Gromley Knifes), he told me he uses KIWI white shoe polish on the item he will be engraving and then uses the blue carbon paper with the design on top and traces it.
It works but I wanted to mix some of the ideas I have read from here to see the results.
This method works for me at least, maybe some here will give it a try.
I wanted to test something out.
1. I cleaned and prepared my metal.
2. I put the KIWI white shoe polish on it. in this example I left a small edge with no white on it just to show how the white stands out on the metal.
3. Brushed it smooth.
4. Let it dry, then used some Damar varnish over the white polish from Michael's art supply straight from the bottle did not dilute it. *** Then let it try so it was just a little bit tacky and would still be able to see a light finger print image, and it stays a bit shinny.
5. Got my image that I had printed onto the baking parchment paper ready and cut out.
6. Let the varnish dry to the point it was just tacky then placed my image on top.
7. Then using just an old spoon burnished it in.
8. And when I could tell the image had released I removed the printed image,
*Note I left a small section at the top left corner and center right to show where the ink did not release.
** I would first use a marker to fix the areas that did not transfer. Then I sprayed a very light mist of hair spray over the entire image to prevent it from smearing
*** The printer I used was a HP Color Laser Jet Pro MFP M281fdw I first printed my design on regular paper, then cut out some baking parchment paper my wife had in the kitchen, placed it over the area that was just printed and taped the leading edge down with basic scotch tape so it would go through the printer and printed the image again.
Attachments
-
 Test Plate 1.jpg171.7 KB · Views: 263
 -
 test plate 2.jpg215.1 KB · Views: 261
 -
 test plate 3.jpg143.3 KB · Views: 260
 -
 test plate 5.jpg178.1 KB · Views: 260
 -
 test plate 4.jpg168.6 KB · Views: 258
 -
 test plate 6.jpg156 KB · Views: 259
 -
 test plate 7.jpg148.9 KB · Views: 255
 -
 test plate 8.jpg170.9 KB · Views: 258
mdengraver
~ Elite 1000 Member ~
Looks good! Nice tutorial and the image is crisp
Dean
Elite Cafe Member
Thank you mdengraver, it works well for me and just starting out I need all the help I can get haha
mitch
~ Elite 1000 Member ~
- Joined
- Jul 23, 2007
- Messages
- 2,636
ok, Dean, a couple things- first, you're working too hard to make a useful transfer. no need for a white base AND damar varnish. just use the varnish and the transfer will show up just fine on metal. and there will be one less layer prone to lose adhesion or flake. on really clean metal (i use acetone) damar varnish is pretty tenacious.
second- use designs with only the main construction lines, not all the tiny shade lines. no matter how great your transfer method, those will not survive sufficiently intact to be useful.
second- use designs with only the main construction lines, not all the tiny shade lines. no matter how great your transfer method, those will not survive sufficiently intact to be useful.
Dean
Elite Cafe Member
Hey Mitch, will do. I will give that a try, thank you for the suggestion and advises as always, talk later.
Dean
Elite Cafe Member
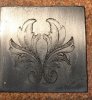
Hey Mitch had a few minutes before I head out, and this is without the white, I used the same design just so I could compare.
Works fine , thank you again and saves a step
Works fine , thank you again and saves a step
Attachments
-
 Test Plate o white.jpg207.3 KB · Views: 199
Borzzza
Elite Cafe Member
Great tips!
Btw did you try printing 2 (or even more) copies of your design on transparent paper, using first copy to cut main lines and then transferring second at the point when you need detailed small lines?
Sent from my iPhone using Tapatalk
Btw did you try printing 2 (or even more) copies of your design on transparent paper, using first copy to cut main lines and then transferring second at the point when you need detailed small lines?
Sent from my iPhone using Tapatalk
Sponsors


