borderbasser
Member
Hello, first time poster here. I want to start of by thanking Sam for this site and everyone who generously contribute.
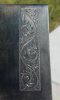
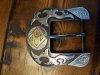
I am a law enforcement officer in South Texas. I have only been engraving for about two months now and am very green but about as handy as they come. I am on a pretty tight budget and don't really aspire to take this much further than a hobby that I have been interested in for years. I have thus far made my own gravers from files, planner blades and a allen wrench. My vise is a converted 4 jaw lathe chuck. I am mainly interested in western style bright cut engraving, and what some might call Texas style. I have a attached a pic of my first buckle in steel, nickel, and brass. It's obviously far from perfect in design and execution but I am proud of it given only two months of experience in brazing, and engraving and essentially being self taught. I also plan on making my daughters a buckle for Christmas.
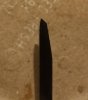
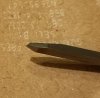
My first question to yall.....I have attached some pics of a couple new gravers I have made from some .125 HSS square and would like some input on the heels. My goal was to make them both with long "heels" based on many of the reccomendations here since I am push graving. The flat has been tapered to about 2.1mm with a 45 degree face and a radioused 15 degree heel. The other is a 90 degree square with a 45 degree face and a long 15 degree heel. Both gravers were sharpened with a homemade Lindsay type template. These are the first gravers that i have sharpened using some type of sharpening fixture and would like to know if I did the heels correctly...particuarly the square 90. It looks a little odd to me, but I am unsure how it should look. I would estimate the heel to be about 4mm long. I simply just ground it down more than the usual few strokes required for the short heel. My problem is I have seen a lot of long heel (or no heel) reccomendations for push graving, but not many pics of a what a square graver with one would look like to compare. Any help or suggestions y'all might be able to provide on either graver would be greatly appreciated!
Thanks,
T.J.
I am a law enforcement officer in South Texas. I have only been engraving for about two months now and am very green but about as handy as they come. I am on a pretty tight budget and don't really aspire to take this much further than a hobby that I have been interested in for years. I have thus far made my own gravers from files, planner blades and a allen wrench. My vise is a converted 4 jaw lathe chuck. I am mainly interested in western style bright cut engraving, and what some might call Texas style. I have a attached a pic of my first buckle in steel, nickel, and brass. It's obviously far from perfect in design and execution but I am proud of it given only two months of experience in brazing, and engraving and essentially being self taught. I also plan on making my daughters a buckle for Christmas.
My first question to yall.....I have attached some pics of a couple new gravers I have made from some .125 HSS square and would like some input on the heels. My goal was to make them both with long "heels" based on many of the reccomendations here since I am push graving. The flat has been tapered to about 2.1mm with a 45 degree face and a radioused 15 degree heel. The other is a 90 degree square with a 45 degree face and a long 15 degree heel. Both gravers were sharpened with a homemade Lindsay type template. These are the first gravers that i have sharpened using some type of sharpening fixture and would like to know if I did the heels correctly...particuarly the square 90. It looks a little odd to me, but I am unsure how it should look. I would estimate the heel to be about 4mm long. I simply just ground it down more than the usual few strokes required for the short heel. My problem is I have seen a lot of long heel (or no heel) reccomendations for push graving, but not many pics of a what a square graver with one would look like to compare. Any help or suggestions y'all might be able to provide on either graver would be greatly appreciated!
Thanks,
T.J.
Attachments
-
 20171031_211843.jpg58.2 KB · Views: 236
 -
 20171031_225008.jpg89.7 KB · Views: 239
 -
 20171012_114020.jpg118.6 KB · Views: 238