Update on my First big project

Rstripnieks

Member
Joined
Jun 18, 2016
Messages
91
Location
Austria
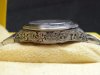
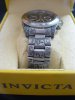
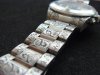
Hello cafe members, after few weeks of everyday engraving after work ,countless hours of frustration cutting stainless steels with bad quality hss my First watch and also my so far biggest project is finnished. I managed to dremel off the deepley engraved invicta sign ,Andrew suggested me to be really careful with that decision,it turned out good.
I Learned a lot from this project and even though engraving looks poorly executed im proud of it,
I tried to go es deep as I could and as accurate as I could , I have no idea how exactly people engrave stainless steel without sharpening gravers every 3 minutes ,I used Lindsay 96 degree template and I kinda eyebaled how far graver should go to give me steeper face angle so it helped,graver tip lasted 50 seconds longer ,even with shading.
I finnished it With Charbonell printmaking ink to darken it.What kind of ink or paint others use on watches?
I would really appreciate your harshest critique to improve my work in my second year of engraving.

All in all im not impressed with my work (becouse my graver let me down and I really could do better job with crisper lines but at the same time im blown away with result of this project 5 months ago I couldnt even tell the difference between wood carving chisels and metal engraving chisels not even talking about cutting simple line so im quite happy that all this hard work starts to pay slooowly off.
Thank You Monk,Vilts,and Andrew Biggs and other cafe mambers for giving me advices .
 

Attachments

  • received_1163637527115834.jpg
    received_1163637527115834.jpg
    54.7 KB · Views: 187
  • received_1163637633782490.jpg
    received_1163637633782490.jpg
    52.9 KB · Views: 188
  • received_1163637800449140.jpg
    received_1163637800449140.jpg
    56 KB · Views: 187

monk

Moderator
Staff member
::::Pledge Member::::
Joined
Feb 11, 2007
Messages
10,868
Location
washington, pa
you have proven your bravery. difficult to tell from the fotos, but my first would be the background. my eye tells me it lacks uniformity in depth and has an uneven texture.
second-- the shading lacks uniformity from one link to the next. this could be improved upon, as could the background. it would simply require a bit of diligence at the bench. maybe a good bit of time, as well. make another drawing of your design. refine it with pen or pencil. then go back to cutting, using the drawing as a guide.
the best engraver ever, as a beginner, would have fits and seizures trying to do this. in time, it will all come together.
 

Rstripnieks

Member
Joined
Jun 18, 2016
Messages
91
Location
Austria
I completely agree Monk ,the real learning for me just begins, but I still have to figure out more effective way to cut that stainless steel. Its nothing more annoying than blunt tool. Still a lot to invest too :better camera and lighting equipment are first on the list . Even theese pictures are edited in lightroom and if more beginners read this then I would advice to study photography and related programms becouse today I realised that im bad at it.
Till today I only engraved coins and they were easy to picture but watch with many surfaces is completely different
 

Crossbolt

Elite Cafe Member
Joined
Jun 22, 2016
Messages
335
Location
San Francisco Bay Area, California
Nice effort. You've got more nerve than me jumping into a a real world object fairly early, let alone a stainless one. To my eye one thing that could benefit from practice is the smoothness of the scrollwork. They look a little jagged or squished in places. Perhaps I'm biased by what I see as my own flaws but that seems like a common denominator for folks to work on.

Jeremy
 

gcmeleak

Member
Joined
Jan 23, 2015
Messages
48
You f finished it way to go I've experienced the same problem cutting on some knives. It just isn't any fun sharpening a Graver every 60 seconds or so but I guess it helps you get good at it got to look at the bright side job well done period skill comes from diligence
 

monk

Moderator
Staff member
::::Pledge Member::::
Joined
Feb 11, 2007
Messages
10,868
Location
washington, pa
I completely agree Monk ,the real learning for me just begins, but I still have to figure out more effective way to cut that stainless steel. Its nothing more annoying than blunt tool. Still a lot to invest too :better camera and lighting equipment are first on the list . Even theese pictures are edited in lightroom and if more beginners read this then I would advice to study photography and related programms becouse today I realised that im bad at it.
Till today I only engraved coins and they were easy to picture but watch with many surfaces is completely different

be more mindful of the face angle of the graver. learn to "dub" the point. going to a steeper face angle, combined with the dub,should reduce breakage. the 96 is a bit narrow for the material. go with perhaps a 116. make sure your heels are very short.try using a bit of lube. all these subtle changes will make for a stronger tool point. striving to go real deep aint always a good thing on work like you have here. a deep line will be wide. learning good tool control, combined with background work, can create the illusion of depth where none existd
 

vilts

Elite Cafe Member
Joined
Apr 8, 2007
Messages
512
Location
Estonia
Yes! Exactly what monk said.

Use wider graver (I used 116, now switched to 110). I like carbide (C-Max is nice) with polished heels and face. For contours and background cutting I also put a teeny-tiny radius on the V tip in addition to the point dubbing. Combination of all these will give you much stronger point. If I'm lucky then I break the tip on full stainless watch project maybe once or twice.

Also in time you will learn where the "danger zone" is during engraving where tips want to break... Hold the piece in the vise so it doesn't vibrate, and don't do any "in place" turning with graver, keep it moving.

One thing bothers me with design. The scrolls on the bracelet edge links are growing in oppsite direction. Elsewhere the flow seems correct, just there.
 

Rstripnieks

Member
Joined
Jun 18, 2016
Messages
91
Location
Austria
Thank You for Help, I tried all day to find out how to dub the point but still havent found it. Maybe somebody could quickly explain me that?
 

vilts

Elite Cafe Member
Joined
Apr 8, 2007
Messages
512
Location
Estonia
Thank You for Help, I tried all day to find out how to dub the point but still havent found it. Maybe somebody could quickly explain me that?

Something like this - https://youtu.be/2xFMtTeqaXM

In the beginning I polish the face and heels. Then I round the V-tip a little and the final move is the dubbing. Basically you just take off the very end of the tip making it much stronger. The stone is 10k grit ceramic and very light touch is needed.
 

Latest posts

Sponsors

Top