Hobo With Folded Ear

Jonathans

Elite Cafe Member
Joined
Jul 15, 2016
Messages
126
Location
Port Orchard WA
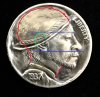
As per a suggestion from DocMark, I decided to try another with the ear properly located and bent over by the hat. I like the ear and the eye, but am still struggling with the hat and hair, and oh yeah, a smooth background!

IMG_0145.jpg
 

monk

Moderator
Staff member
::::Pledge Member::::
Joined
Feb 11, 2007
Messages
10,870
Location
washington, pa
the hair and hat look good to my eye. not too many nickel cutters have truly mastered that perfect background. steve ellsworth that tutored me on hobos advise to avoid doing anything to the background unless absolutely required. sound advice for sure.
 

Jonathans

Elite Cafe Member
Joined
Jul 15, 2016
Messages
126
Location
Port Orchard WA
My issue/question is, once you outline and undercut a feature such as the hat for instance, I need to relieve the background to the new depth of the cut. Do I gently slope the background to the original level, or flatten it level and leave a higher rim? If the proper way is to flatten to the rim then all the relief would need to be at the same level, and the areas off of the neck don't really require that. Perhaps I'm carving too deep to begin with. After watching a few Mrthe videos I think I'll make a sculpting punch and begin resting cut areas back to flat with that prior to stoning.
 

Sam

Chief Administrator & Benevolent Dictator
Staff member
Joined
Nov 6, 2006
Messages
10,491
Location
Covington, Louisiana
My issue/question is, once you outline and undercut a feature such as the hat for instance, I need to relieve the background to the new depth of the cut. Do I gently slope the background to the original level, or flatten it level and leave a higher rim? If the proper way is to flatten to the rim then all the relief would need to be at the same level, and the areas off of the neck don't really require that. Perhaps I'm carving too deep to begin with. After watching a few Mrthe videos I think I'll make a sculpting punch and begin resting cut areas back to flat with that prior to stoning.

I've done them every which way, and it's far easier to flatten the field all the way to the rim. However, that's the least desirable way in my opinion. Look at Billzach's hobos for examples of flawless fields. Also Ron Landis does a spectacular job and his coins look like they were minted that way and not carved. You will find that making a smooth field is time consuming work. Also be careful to keep the outside rim edge nice and sharp. I've seen too many hobos with rims that have been rounded over from sanding and polishing.

As for this coin, I don't think the folded ear works.
 

Jonathans

Elite Cafe Member
Joined
Jul 15, 2016
Messages
126
Location
Port Orchard WA
I've done them every which way, and it's far easier to flatten the field all the way to the rim. However, that's the least desirable way in my opinion. Look at Billzach's hobos for examples of flawless fields. Also Ron Landis does a spectacular job and his coins look like they were minted that way and not carved. You will find that making a smooth field is time consuming work. Also be careful to keep the outside rim edge nice and sharp. I've seen too many hobos with rims that have been rounded over from sanding and polishing.

As for this coin, I don't think the folded ear works.

Hi Sam,
You don't think the folded ear works because it's out of character, or I drew it poorly?
 

JOEYS CARVED ART

Elite Cafe Member
Joined
Nov 7, 2013
Messages
224
Location
West Virginia
Making some background punches in several styles will help a lot with your background. I stipple most of my backgrounds and it leaves a profile that is attractive (in my opinion) and it is faster than smoothing the background. I cut my background deep, I like a deeper style of carving. I think it helps with my layering. There are a lot of collectors out there, some like this and some like that, do your carvings however you feel comfortable doing them, having fun at it is the main thing. You will eventually get a hang of the different techniques and learn those "little tricks" that help along the way. Have fun and good luck.
 

monk

Moderator
Staff member
::::Pledge Member::::
Joined
Feb 11, 2007
Messages
10,870
Location
washington, pa
joey: i found that attempting "the perfect background" was an exercize yielding diminishing returns. to make them fun again, i bought a holder and some ceramic fiber abrasives from chris decamillis. they gave a nice textured finish, and no frustration. i never did try using any kind of punch to do the work.
 

Doc Mark

~ Elite 1000 Member ~
Joined
Nov 16, 2006
Messages
1,284
Location
Hampton, Virginia
I'm sorry that I mentioned the folded ear, as it is very hard to communicate this with this type of hat being so low in the crown. You have strayed from the proper ear positioning and size. It's far too large and too far down and forward. My Photoshop skills are no too good but I've tried to suggest a few corrections. Note particularly the size of the skull. (I got a bit carried away with the height of the skull but I didn't see it till after I posted the corrections.) A hat must be, by necessity, larger than the skull to some extent. Note also the re-positioning of the ear and it's approximate size. I know that my color lines are rather crude. The angle of the neck is also important. I've smoothed out the cheek a bit also. Again I'm not trying to be a nit-picker but you have shown that you really want to improve, so I truly want to help.
 

Attachments

  • Hobo-Nickel-unedited.jpg
    Hobo-Nickel-unedited.jpg
    192.2 KB · Views: 41
  • Hobo-Nickel-corrections.jpg
    Hobo-Nickel-corrections.jpg
    154 KB · Views: 41
Top