Critique Request Tear it apart

LVCIAN

Member
Joined
Sep 1, 2016
Messages
88
Location
St. Louis, MO
I've been practicing for a couple of weeks.
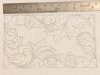
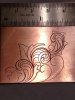
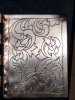
Here is the first thing I've engraved that wasn't "just a practice plate".

Hand push. 105° graver. Under an optivisor.

I'm obviously having some issues with skipping, and intersecting lines. To some degree I'm having trouble following my own lines.

What did I miss?
Any advice on how to improve from here?
 

Attachments

  • IMG_20160920_171654045_HDR.jpg
    IMG_20160920_171654045_HDR.jpg
    114.9 KB · Views: 385

dhall

:::Pledge Member:::
::::Pledge Member::::
Joined
Jan 1, 2008
Messages
144
Location
San Diego, California
Those look like fairly bold cuts for hand pushing. The more pressure and force required to make cuts, the more challenging it will be to control the graver, as you've experienced. You might try taking much lighter cuts. You'll have quite a bit more control, and for the cuts needing to be deeper/more bold, you can re-cut in the same groove, multiple times, even. I tell my students, when they first use a polished flat for bright cutting bezel set stones, to make a game of it; see how little metal you can remove at one time. Thin shavings, with the motion repeated numerous times, will reinforce muscle memory, and in fairly short order it's possible to achieve a nice, smooth bright cut. Granted, this is not exactly the same, but I think you'll find the principle has some merit, and you'll soon have quite a bit of control and have a very good sense of what you can expect to achieve with every cut you make. As you make progress, you can evaluate how much of a cut you can reasonably expect to control, and when it's best to break it down into multiple passes.

Best regards,
Doug
 

LVCIAN

Member
Joined
Sep 1, 2016
Messages
88
Location
St. Louis, MO
Those look like fairly bold cuts for hand pushing...

Though this raised a question I haven't found much information on.

What depth are you striving for? How do you know when you are there?

I know what your are engraving and the over all design will determine some of these things.

This morning I was attempting to compare the video of Sam Alfano's hand push demonstration with another video of Sam with the Graver Mach AT. Both on what looked like copper practice plates.

The end results appear to be the same depth and boldness. Certainly there is years more experince there, but can I expect that hand push will achieve the same boldness of a pneumatic tool?
 

monk

Moderator
Staff member
::::Pledge Member::::
Joined
Feb 11, 2007
Messages
10,868
Location
washington, pa
Though this raised a question I haven't found much information on.

What depth are you striving for? How do you know when you are there?

I know what your are engraving and the over all design will determine some of these things.

This morning I was attempting to compare the video of Sam Alfano's hand push demonstration with another video of Sam with the Graver Mach AT. Both on what looked like copper practice plates.

The end results appear to be the same depth and boldness. Certainly there is years more experince there, but can I expect that hand push will achieve the same boldness of a pneumatic tool?

it's all in the control you exercize while engraving. though the airtools will dig very deeply, your wrist will determine how the cut goes. with push work, one can go over cuts till the desired depth is achieved. the airtool does it more rapidly in one pass. much of the engraving you see that is deep, may be an illusion. i would concentrate on doing light, shallow cutting. in push cuts, slips occur with the increased pressure needed to force the graver thru all that metal. at least for me,pushgraving feels very smooth, with little resistance. also --remember to rotate your vise into the graver tip. your graver tip should remain pretty much in a fixed position.
 

monk

Moderator
Staff member
::::Pledge Member::::
Joined
Feb 11, 2007
Messages
10,868
Location
washington, pa
no attempt to be harsh, but you have a real need to work on drawing concepts. good cutting is wasted on poor design. both must go hand-in-hand. good design will usually overpower less than stellar cutting. it may take awhile, but the practice brings it's own reward.
 

Bluetickhound

Elite Cafe Member
Joined
Aug 4, 2016
Messages
208
Location
Atlanta Ga
This is some of the best advice you (or I) could get... I have really stepped away from the gravers for a bit and am spending a lot more time with my pencil... When I do spend time at the bench I have seen real improvement so I know it's sound advice.
 

LVCIAN

Member
Joined
Sep 1, 2016
Messages
88
Location
St. Louis, MO
Monk, ... and anyone else for that matter
Thanks for the advice. I have been drawing everyday, its been fun to see my own improvement.
Here is today's practice, Id love to hear your thoughts on design.

I drew the first half, printed, and traced to capture the symmetry.
 

Attachments

  • 9-22-16.jpg
    9-22-16.jpg
    68.3 KB · Views: 200
Last edited:

Brian Marshall

~ Elite 1000 Member ~
Joined
Nov 9, 2006
Messages
3,112
Location
Stockton, California & Taxco, Guerrero, Mexico
Go cut this, draw another, cut it and keep on goin' 'till about this time next year.

Make sure you date and sign (by engraving it) each practice plate. Automatic way to learn lettering skills at the same time.

I guarantee you - you will be amazed at where this simple routine will get you in 12 months.


Brian
 

monk

Moderator
Staff member
::::Pledge Member::::
Joined
Feb 11, 2007
Messages
10,868
Location
washington, pa
that looks much, much better than the first you showed. 2 books i have read show that all that complexity is just the correct positioning of just a few simple lines. learning the basic cutting of very simple lines will make this design sparkle. think of this design as just a bunch of simple lines, done one-at-a-time. after all, that's exactly how the cutting progresses.
 

LVCIAN

Member
Joined
Sep 1, 2016
Messages
88
Location
St. Louis, MO
Being able to see makes all the difference.

Thanks to Monk for the advice about taking it one line at a time.

I took him a little more literally than he intended and drew one line and cut one line so there are some design issues but I'm much happier with the result.
 

Attachments

  • IMG_20160927_194403388.jpg
    IMG_20160927_194403388.jpg
    102 KB · Views: 39
Last edited:

Sponsors

Top