If using the onglette graver with the hammer in the traditional way this were it gets tricky,the onglette must be perfectly sharpen on both sides because when cutting boards the graver will drift off course to one side or the other. Always test the graver on a practice plate to make sure the graver is not drifting. J.J.

You are using an out of date browser. It may not display this or other websites correctly.
You should upgrade or use an alternative browser.
You should upgrade or use an alternative browser.
Newbie Hand Push Progress Thread
- Thread starter canadianwuff
- Start date
Bluetickhound
Elite Cafe Member
I will definitely want to learn to sharpen by hand but right now having a sure, repeatable thing like a powerhone will put me in position to actually be engraving practice plates with known geometries. I got the Meeks book recently and among the most memorable things I've learned is the part where he writes "learn to engrave by actually engraving, as often as possible" or words to that effect.
Just sharpened a new 96v graver. This one is in HSS though, not M42. I don't think it can cut as wide as the 116v graver, but I feel that it has alot more depth and feel to the cuts.
Here's a photo just randomly carving all over the copper.
Bluetickhound, I think once you get the an improved way to sharpen your gravers, you'll probably be able to get a good range from thin to thick lines! For the moment I'm using an optivisor with the DA-4 2x lenses.
View attachment 38734
these cuts look more consistent than the straight lines you did. going thin to thick is also good. it may be time to do a few simple scroll spines. you'll find going completely around a circle is a bit more challenging. don't worry about detailing them. just try to do the spine as cleanly as possible. 2 good books on scroll development-- lee griffiths, and didyoung sell them. these books show how just a few basic lines, properly arranged, can make for some great design
Crossbolt
Elite Cafe Member
As a fellow complete novice that is certainly my experience with onglettes. I'm marring plates by hand pushing at the moment and am playing around with various gravers to get a feel for how the parameters impact cut feel and texture, on the theory that getting a feel for that will eventually allow me greater confidence in practicing knowing I've got the right shape and that issues with practice "lines" are attributable directly to me ") The template onglette I'm using tends to rip up the metal on any sort of curve. The pre-formed ones and hand sharpened (or at my stage ..."hacked" ) ones do much better. I'm still trying to find the sweet spot on them though. I find them much trickier to get right than the typical "V" gravers. The Speitzer template, for me, is producing much better results out of the box and the standard V variants even more so. I just ground off my practice doodles to restart on the same plate so no images... but they were just a doodling mess anyway. The reduced surface area of the narrow Vs (60 or less) certainly makes pushing easier and to my eye produces a more pleasing narrow, detail cut so I'm trying to focus on them for initial hand push practice. .... Just some feedback from the bottom of the learning cliff.
The template onglette I'm using tends to rip up the metal on any sort of curve. The pre-formed ones and hand sharpened (or at my stage ..."hacked" ) ones do much better. I'm still trying to find the sweet spot on them though. I find them much trickier to get right than the typical "V" gravers. The Speitzer template, for me, is producing much better results out of the box and the standard V variants even more so. I just ground off my practice doodles to restart on the same plate so no images... but they were just a doodling mess anyway. The reduced surface area of the narrow Vs (60 or less) certainly makes pushing easier and to my eye produces a more pleasing narrow, detail cut so I'm trying to focus on them for initial hand push practice. .... Just some feedback from the bottom of the learning cliff.
Jeremy
The template onglette I'm using tends to rip up the metal on any sort of curve. The pre-formed ones and hand sharpened (or at my stage ..."hacked" ) ones do much better. I'm still trying to find the sweet spot on them though. I find them much trickier to get right than the typical "V" gravers. The Speitzer template, for me, is producing much better results out of the box and the standard V variants even more so. I just ground off my practice doodles to restart on the same plate so no images... but they were just a doodling mess anyway. The reduced surface area of the narrow Vs (60 or less) certainly makes pushing easier and to my eye produces a more pleasing narrow, detail cut so I'm trying to focus on them for initial hand push practice. .... Just some feedback from the bottom of the learning cliff.Jeremy
canadianwuff
Member
these cuts look more consistent than the straight lines you did. going thin to thick is also good. it may be time to do a few simple scroll spines. you'll find going completely around a circle is a bit more challenging. don't worry about detailing them. just try to do the spine as cleanly as possible. 2 good books on scroll development-- lee griffiths, and didyoung sell them. these books show how just a few basic lines, properly arranged, can make for some great design
Monk, thank you for the critique and suggestions! I actually got Sam's The Essential Guide to Drawing Scrolls - must admit I've been procrastinating actually drawing stuff after watching the video. Will defo get lee griffith's book down the line. In anycase, you mention drawing a few simple scroll spines and I took a design from Steve's website and did a heatless toner transfer and attempted to engrave it.
I am definitely going back to basics after this fun exercise
Just some glossy paper from a magazine to print the toner onto.

Sanded down the copper and degreased it.

After the toner has been transferred.

My horrendous engraving attempt.

Using a sharpie to blacken the insides lol.

I think I learnt alot about the graver doing this, but yeah, back to basics for now.
Bluetickhound
Elite Cafe Member
Ok... We need to have a talk about what constitutes a "simple" scroll design!! Seriously though, I like the idea of diving right on into the deep end there, even if just for a minute before going back to basics. I'm pretty sure I'll do the same sort of thing... If you learned from it, it wasn't wasted effort, I say!
Ok... We need to have a talk about what constitutes a "simple" scroll design!! Seriously though, I like the idea of diving right on into the deep end there, even if just for a minute before going back to basics. I'm pretty sure I'll do the same sort of thing... If you learned from it, it wasn't wasted effort, I say!
i think practicing on the more elementary shapes will allow you to "grow" into the more complicated design elements. if you don't nail the basic, the more complex work will surely suffer. no need for this to happen.
Bluetickhound
Elite Cafe Member
Having gotten my dual angle sharpener (my powerhone should be here tomorrow!) I sharpened a graver as Sam laid out in his video but instead of a 45' face and a 15' heel I used (as Sam mentioned in another thread I found here) a 25' face and a 17.5' (or as close to halfway between 15 & 20' as I could eyeball the scale!) and have had MUCH greater "success"... I have noticed that if I cut a thick center line and try to go progressively thinner on either side the lines to the right of center are pretty OK for a rank beginner but when I try to cut to the left of center the graver almost always slips... I am left handed (right eye dominant, oddly enough) and do several things right handed. Not sure what the cause of the slipping is. I will say that I'm using the DA sharpener on a flat Arkansas stone. Maybe when the powerhone gets here I can get a more accurate cut from the diamond wheels.
canadianwuff
Member
Hi bluetickhound!
Glad to hear things are getting better! I hope the powerhone will help out there. I'm curious how often push gravers actually have to resharpen their gravers? I've been using this HSS graver for several copper plates and it still _appears_ to work...
In other news, I received mrthe's hobo nickel dvd a few days ago, that'll be something to watch over the weekend.
In the meantime, I've been working on getting some curves in during my evenings.
Bluetickhound
Elite Cafe Member
I have wondered the same about sharpening frequency... My guess is if it starts slipping all over the place or stops tracking straight it's time to touch up the geometry. Your plates are improving! I haven't posted any of mine yet as I can look at them myself and see what's wrong! I am curious as to why all the slipping in one direction but fairly decent control in the other but until I get these puppies sharpened on the 'hone and am sure they aren't cattywhompus I'm writing it off to bad geometry. I'll know a lot more by this time tomorrow, provided FedEx holds their end of the bargain up!
Bluetickhound
Elite Cafe Member
Here's (I hope!) a shot of my first post Powerhone plate. No slipping and ok enough for a noob control... The line spacing leaves a lot to be desired but I was so happy about the much improved control I wanted to snap a quick photo and post it!
Attachments
-
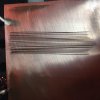 image.jpg80.7 KB · Views: 171
Bluetickhound
Elite Cafe Member
By the way, the graver is a tapered Glensteel 90' with a 25' face and 17.5' heel. It fairly glides through the copper now!! Thanks Sam for the tips!
atexascowboy2011
Elite Cafe Member
- Joined
- Feb 13, 2012
- Messages
- 997
Lightly scribe numerous lines and circles.
As it is now you are going all over the place.
When you finally get to actually engraving scrolls/images you will be forced to follow a drawn line or transfer.
As it is now you are going all over the place.
When you finally get to actually engraving scrolls/images you will be forced to follow a drawn line or transfer.
Bluetickhound
Elite Cafe Member
Will do. Having a line to follow should help train my eye away from the tip of the graver also...
Bluetickhound
Elite Cafe Member

It's not nearly as easy as Sam makes it look, that's for sure!! I tried to scribe equidistant lines and cut to the outside of them. Some turned out good, others not so much. I did get some practice cutting borders and back cutting also. I have a lot of work to do. Fun, extremely satisfying work, but work nonetheless! The marks outside the border are from the scribe but you can easily spot a few slips also inside the border...
canadianwuff
Member
Next in the book is to cut circles. It's so very difficult...
Applying some chinese white watercolour and gently marking some lines using a bow compass

Cuts

With the watercolour washed off.

Gonna be spending lots of time here, me thinks...
Applying some chinese white watercolour and gently marking some lines using a bow compass
Cuts
With the watercolour washed off.
Gonna be spending lots of time here, me thinks...
Mike_Morgan
Elite Cafe Member
Not that I should be giving advice here, but your circles look a lot like the ones I was cutting when I just started a few months ago. The things that really helped me to improve were:
1) Slowing down a little bit. The you-tube and instructional videos appear to be moving fast, and I naturally thought that was the correct pace, and it probably is for a more experience engraver. It wasn't the right pace for me, and may not be for you at this stage of the game. The speed naturally picked up for me when I could really feel the graver in the cut, and how it reacted to my actions with the vise and graver.
2) I learned to look AHEAD of the graver as I am turning the vise into the cut. This helped me a lot, and soon I was just automatically looking where I needed to.
3) I realized that I needed to draw lines to cut instead of free-handing it. This helped me to get accustomed to following the pattern lines, and I was able to get immediate feedback regarding the accuracy of my cutting. Additionally, I learned how to deal with occasionally not being on the lines and "cleanly" working my way back. A radical correction always looks like a mistake. I have found that a gradual smooth correction can be finessed into the design if needed.
I hope this helps!
Bluetickhound
Elite Cafe Member
Great advice! I have already figured out that slower is better. Kind of like learning a musical instrument... If you can't play a song slowly you'll never learn how to play it fast. Also, it has been said a zillion times but a truly sharp, geometrically accurate graver is imperative. Getting the Optivisor was also a huge leap forward. I have also started to get to the point where I feel like I'n actually graving lines instead of merely scratching them or worse, gouging them. This after essentially less than a week's time feels like a real accomplishment. Again, using the music analogy, take your gains, appreciate them and use them as building blocks to go further. Engraving, especially hand push, isn't for the "instant gratification" crowd but I think it's important for me as a beginner to go this route to establish a foundation before eventually stepping up to the pneumatic system. I'm just grateful that there is a resource like the Cafe to help flatten the learning curve. So many that went before me didn't have this luxury...
Last edited:
Crossbolt
Elite Cafe Member
Hi
As a fellow novice I'll second that. Going as shallow as I can, almost as slow as possible to a scribed line helps me immensely. To borrow a phrase "as slow as possible, as fast as necessary ".
Jeremy
As a fellow novice I'll second that. Going as shallow as I can, almost as slow as possible to a scribed line helps me immensely. To borrow a phrase "as slow as possible, as fast as necessary ".
Jeremy
Bluetickhound
Elite Cafe Member

Little by little.... Things are improving from laughable to atrocious to merely awful. The black sharpie lines represent the cuts before I tried shortening the graver in the burin from protruding almost 2 inches down to 1-1/2. It may not show in the photo but the difference was amazing. I still need to control consistency of angle and not let it fan out along with line to line spacing but I feel much greater control after this one seemingly minor adjustment... Slowly, the light is coming on.
Sponsors


