Garaga News : Back to Work

Lee

~ Elite 1000 Member ~
Joined
Nov 17, 2006
Messages
1,047
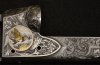
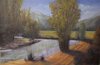
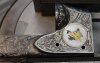
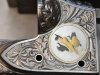
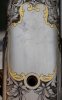
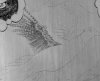
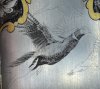
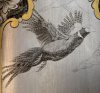
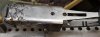
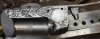
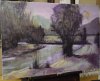
A model 21 in the works and a painting I've started. With the painting I'm still refining values and composition but never fear the purple will eventually give way to other colors. I just hope the colors-to-come will make sense.
 

Attachments

  • DSC_0087.jpg
    DSC_0087.jpg
    44.6 KB · Views: 60
  • DSC_0089.jpg
    DSC_0089.jpg
    59.6 KB · Views: 61
  • DSC_0088.jpg
    DSC_0088.jpg
    46.7 KB · Views: 62
  • DSC_0091.jpg
    DSC_0091.jpg
    96.3 KB · Views: 60

Lee

~ Elite 1000 Member ~
Joined
Nov 17, 2006
Messages
1,047
Here is the latest update..
 

Attachments

  • DSC_0093.jpg
    DSC_0093.jpg
    63.6 KB · Views: 52
  • DSC_0092.jpg
    DSC_0092.jpg
    53.2 KB · Views: 53
  • DSC_0095.jpg
    DSC_0095.jpg
    45.3 KB · Views: 52

Lee

~ Elite 1000 Member ~
Joined
Nov 17, 2006
Messages
1,047
Another two hours on the painting and a few more than that on the 21. I see a couple of things that the duck needs. Onward with the tweaking.
 

Attachments

  • DSC_0109.jpg
    DSC_0109.jpg
    84.8 KB · Views: 47
  • DSC_0115.jpg
    DSC_0115.jpg
    74.8 KB · Views: 48

Lee

~ Elite 1000 Member ~
Joined
Nov 17, 2006
Messages
1,047
In the beginning.......of the scene on the other side:fastgraver:
 

Attachments

  • DSC_0116.jpg
    DSC_0116.jpg
    88.8 KB · Views: 44
  • DSC_0117.jpg
    DSC_0117.jpg
    123 KB · Views: 45

Lee

~ Elite 1000 Member ~
Joined
Nov 17, 2006
Messages
1,047
Thank you for the comments and I mean it sincerely. Some days are all fetch and no pat not the head and do not hesitate to offer suggestions. I can take it.

Here is the basic layout. The degree of difficulty is significantly increased when multiple figures or birds in this case are used especially when some are in flight and others are on the ground. Perspective becomes a real technical challenge was well as proportion. I've taken some liberties in compressing the perspective but I think it will work. As engravers working on such small canvases, we deal with constraints and do our best with these constraints.
 

Attachments

  • DSC_0120.jpg
    DSC_0120.jpg
    83.3 KB · Views: 44

Lee

~ Elite 1000 Member ~
Joined
Nov 17, 2006
Messages
1,047
The wing has begun to take flight. My primary focus is on making sure the form and values are correct. These are more important than detail. I am using lines on this scene. This photo may not be clear enough to see the lines but in the next photos I started using a tripod-duh- and you will see the lines.

I am using long parallel lines the length of the feathers leaving a small space for the quill. The markings are made by digging in and coming back out in a scooping motion. Where the feathers are short the lines become shorter and in some cases may appear as a "stick and pick"-thank you Sam W..

I rarely outline my animal as I have done here. In this case I did it so you could see the layout. I will burnish and sand some of these outlines and others I will cut over to give a ragged edge. The reason for not outlining is that with the exception of antler/horns almost nothing on an animal is a hard line. The edges are defines by feathers or fur, neither of which is a hard edge.
 

Attachments

  • DSC_0122.jpg
    DSC_0122.jpg
    69.4 KB · Views: 42

Lee

~ Elite 1000 Member ~
Joined
Nov 17, 2006
Messages
1,047
I believe this to be a better photo for seeing lines. Where the wing attaches to the body you can see a small area that was diagonally crosshatched. This is an efficient way to depict small feathers. For the body I cut random lines more or less parallel to each other. Stagger the lines and points where they begin and end. Be careful to not make it too uniform. Remember these are not 4H birds. No one has taken the time to groom them and shampoo the feathers. The shadow area on the belly is cut much deeper. For years I cut only with an optivisor and such is still the case with scroll and much of the scene work. With the passage of time my eyes are not what they once were and a microscope is grudgingly being transitioned in. I dial in at 5-6 power when I use the scope. It's a real temptation to zoom in tight but the disadvantage is the ability to see the whole animal or scene and keep the values and overall scene in harmony. Crosshatching is a valuable technique. The crosshatching may be perpendicular or at a variety of angles. Horizontal lines will appear darker than vertical lines.
 

Attachments

  • DSC_0126.jpg
    DSC_0126.jpg
    154.4 KB · Views: 40

Lee

~ Elite 1000 Member ~
Joined
Nov 17, 2006
Messages
1,047
I stress again the importance of values-darks and lights- and how they create form. Details are not as important as the values and form. Details are often not present in shadow areas or at the most a mere suggestion. I am working on disguising the outline I cut by nicking edges and adding extra lines at the tips of the outermost wing feathers. This is especially effective and necessary if one want s to create the illusion of movement. Notice the ragged edges of the tail feathers. Time for breakfast.

Wish I had time to work on the painting but I haven't touched it in several weeks. Something about taxes, family, bills, ...............etc.
 

Attachments

  • DSC_0131.jpg
    DSC_0131.jpg
    135.3 KB · Views: 41

Lee

~ Elite 1000 Member ~
Joined
Nov 17, 2006
Messages
1,047
Here is a closeup of the hen. Notice how sketchy the outline is. Now look at the line forming the back of the neck starting at the head and moving down to where the wing attaches. In the reference material it will probably appear as a smooth swooping curve. If you engrave it as a smooth swooping curve the line will be concave. To engrave a stronger more natural appearing bird/animal this swooping curve needs to formed by a series of straight/convex lines. Look again at the line of my bird and you will see a series of short straight or slightly convex lines. When it is viewed with the naked eye it will have the appearance of the swooping line but it will be stronger and more natural.
 

Attachments

  • DSC_0155.jpg
    DSC_0155.jpg
    79.3 KB · Views: 41

Lee

~ Elite 1000 Member ~
Joined
Nov 17, 2006
Messages
1,047
Second bird done. I will go back and tweak all of the birds at the end when I see how the values for the whole scene are working.
 

Attachments

  • DSC_0156.jpg
    DSC_0156.jpg
    86.1 KB · Views: 43

Lee

~ Elite 1000 Member ~
Joined
Nov 17, 2006
Messages
1,047
Finally back on the model 21.
 

Attachments

  • DSC_0199.jpg
    DSC_0199.jpg
    82.2 KB · Views: 14

Lee

~ Elite 1000 Member ~
Joined
Nov 17, 2006
Messages
1,047
Two more photos hoping one is acceptable.
 

Attachments

  • DSC_0203.jpg
    DSC_0203.jpg
    79.2 KB · Views: 17
  • DSC_0202.jpg
    DSC_0202.jpg
    81.8 KB · Views: 17

Latest posts

Sponsors

Top