Some "stick and pick" work in progress

SamW

:::Pledge Member:::
::::Pledge Member::::
Joined
Jan 31, 2007
Messages
2,430
Location
Castle Valley, UT in the Red Rock country
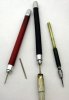
Here is a current project. I use the "stick and pick" term , which I got from Eric Gold long ago, because for the dot shading I use a simple scribe point in a "stick and pick" fashion instead of a graver/bulino tool.

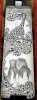
I usually have some kind of theme in mind when I make up scenes and with this one, while momma lion is intent on a tender morsel for lunch, papa lion is wondering what has gotten the attention of momma long neck. So...have the hunters become the hunted?
 

Attachments

  • S&P e.jpg
    S&P e.jpg
    168.7 KB · Views: 541

JJ Roberts

:::Pledge Member:::
::::Pledge Member::::
Joined
Nov 10, 2006
Messages
3,459
Location
Manassas, VA
Sam,Beautiful detail and anatomy,whats your favorite geometry for stick & pick? J.J.
 

SamW

:::Pledge Member:::
::::Pledge Member::::
Joined
Jan 31, 2007
Messages
2,430
Location
Castle Valley, UT in the Red Rock country
Well JJ, it is basically just a needle point. A sharp pointed scribe made from the shaft of a 1/16" long shafted cobalt drill bit. I have always really liked the Excel rubber coated handles for the Exacto blades and one day the thought came to me that by hand drilling a slightly undersize hole in the center of the holder that it would make a nice pin vise...and it has become my very favorite pin vice. And it still works just fine for the Exacto blades. I hold it just like a pencel and..."stick and pick".
 

SamW

:::Pledge Member:::
::::Pledge Member::::
Joined
Jan 31, 2007
Messages
2,430
Location
Castle Valley, UT in the Red Rock country
OK, no mystery here. The red handle on the left is the S&P tool, a simple scribe point. Next is a small tool blank made into a burnishing point to use in small areas. The sharp front edge also makes a good scraper for small concave areas. I also made a very small scraper to use in tight corners.

The black handle shows the hand drill inserted to open up the center of the collet. I start with a #56 drill and follow up with a #53 drill. The 56 is small enough to get started and the 53 just undersize so the collet grips the tool blank firmly. As I turn the drill bits I also tighten up on the collet so as to pinch against the drill bit until it cuts as much as it can. The pin vise on the right is my preferred scribe point for drawing designs onto the polished metal (well worn 600 grit) before cutting.

After I opened up the collet for the 1/16" tool blank I took the collet out of the handle and clamped the threaded end into my vise so I could run a 1/16" drill bit all the way through and thus use longer tool blanks. with the collet opened up to its normal shape, the 1/16" drill bit does not cut any off the clamping surface, at least if you are careful. The handle is still quite capable of using Exacto blades still.

Boy, the day is going fast...here I am an hour behind time already. Must be because I forgot to get up at 2 AM to reset my clocks!

PS...I forgot to mention, one can make the 1/16" blanks into graver shapes if wanted...all be it small ones.
 

Attachments

  • stick & pick tools.jpg
    stick & pick tools.jpg
    83.5 KB · Views: 241
Last edited:

monk

Moderator
Staff member
::::Pledge Member::::
Joined
Feb 11, 2007
Messages
10,868
Location
washington, pa
ummm. just like hot apple pie ! just great to look at. nobody counts, but how many hours do you think you have in this project so far ? this is just too pretty to abuse in the field !
 

SamW

:::Pledge Member:::
::::Pledge Member::::
Joined
Jan 31, 2007
Messages
2,430
Location
Castle Valley, UT in the Red Rock country
Monk, I have about 65 hours on the floorplate and expect perhaps another 30 to 40 to complete the scenery. I find most full coverage fps will take 80 to 100 hours, and more with much gold inlay. And yes, I do count, though not necessarily to the minute.
 

Phil Coggan

~ Elite 1000 Member ~
Joined
Apr 2, 2008
Messages
1,147
Location
South Wales
Beautiful job Sam, I especially like the open scene parts and the scroll work is unmistakably yours, just like a signature.

The last magazine plate I engraved must have been in the 80's although Simon has done quite a few.

I have the exact small brass pin chuck as in your picture, they're really good for fine work, I looked around to buy a few more recently but without luck.

Take care,

Phil
 

Phil Coggan

~ Elite 1000 Member ~
Joined
Apr 2, 2008
Messages
1,147
Location
South Wales
The beauty of those brass pin chucks is the small chuck itself, The others are quite big in comparison.

Phil
 

zzcutter

Elite Cafe Member
Joined
Sep 19, 2011
Messages
326
Location
Berks Co. Pa.
Love your work Sam, and thanks for filling us in on your tools. Do you know how the floor plate will be finished.
 

SamW

:::Pledge Member:::
::::Pledge Member::::
Joined
Jan 31, 2007
Messages
2,430
Location
Castle Valley, UT in the Red Rock country
Jon, the plan is rust blue followed by graying the scenes and touching up any damaged detail. I may try to get them to hot dip blue the floorplate but that is not definite. The last one I did that was rust blued, I discussed carding off with the bluer and he managed to mostly stay off the scenes and when I removed the rust blue I was very pleasantly surprised that only a few percent, if that much, detail was lost. So, it can be done.
 

rmgreen

Elite Cafe Member
Joined
Sep 3, 2009
Messages
338
Location
Washington
Sam when I have a scene that will be greyed out. I do not put any rusting solution on the area that will be grayed. It still of course discolors in the process but there is less damage to the scene than when solution is applied and of course staying off when carding. This will also give more of a coin finish (brighter grey) than when solution is applied.
 

Sponsors

Top