Searching for good practice material

Joined
Jan 23, 2016
Messages
6
I've just recently started engraving, and I noticed that I really lack control over line depth and following the ink, especially with smaller drawings.
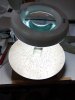
I tried using the magnifying part of the desk lamp in the attached image, but it turned out that it actually made me less accurate for some reason.

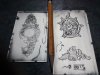
In the second image (drawings taken from google images, no idea who they belong to, sorry), the right-top drawing was done first, then the right-bottom was done with magnification, and finally the left drawing was done half-half, with the top part being with my eyes (it's hard to see because I took a bad picture, but the top part is a whole lot better than the rest, generally speaking what I engraved with magnification was really shallow).

I am using a Lindsay AirGraver Classic, with an HSS 120 degree graver, with air pressure at 40 PSI (are there recommendations for air pressure depending on what is engraved (material, depth)?)

Is there some recommended practice material (drawings, etc.) that I can work on?
I am assuming the instant reactions, considering the talented people here, would be to draw things for myself, but I never drew anything serious in my life, and I have no imagination or drawing skills.

Do people use microscopes when engraving small-but-not-tiny stuff?

Thanks!
 

Attachments

  • IMG_20160130_165309.jpg
    IMG_20160130_165309.jpg
    61.7 KB · Views: 159
  • IMG_20160130_184454.jpg
    IMG_20160130_184454.jpg
    104.9 KB · Views: 157
Last edited:

D Fulwood

Member
Joined
Jun 14, 2014
Messages
29
Location
Macon, GA., USA
I'm sorta new here too, but I think you need more magnification to start with. I use a #7 Optivisor for the main engraving lines, and a #10 for the shading lines. You can get cheaper visors than the "Optivisor" brand but they have plastic lens which scratch easily. The Optivisor uses a more durable lens. The lens are interchangeable so you can get by with a single headband with multiple strength lenses. I equipped my headband and lenses with snaps from Tandy Leather to make it so I wouldn't have to unbolt the lens each time I needed to swap them.

From my limited experience I can still say you need to go very slow, making sure you have very good lighting and can focus intently on the cutting tip of your graver at all times. You are not doing badly considering your experience level. I have been an artist for 50 years in various mediums and engraving is the most difficult and time consuming one to master. It takes YEARS of good effective practice at both drawing and at cutting. Don't just cut for the sake of cutting. Practice with a goal in mind. Practice making uniformly straight lines of consistent width and depth. Practice curved lines that taper from thin to thick. Thousands of them. Then you can move on to lettering, etc., etc.
 

thughes

:::Pledge Member:::
::::Pledge Member::::
Joined
Sep 28, 2010
Messages
838
Location
Nashville TN
Your having the same problems that everyone else has (most of us any way). It's just a matter of practice. And you have to practice drawing as well as cutting.

Todd
 

oiseau metal arts

Elite Cafe Member
Joined
Jan 18, 2012
Messages
381
Location
TN
you are right about the upcoming suggestions of keep drawing.

the problem you seem to be asking about here though seems to fall under "operator error" (ive got tons of practice plates full of those) its just part of the learning curve. getting a feel for the tools/different materials, and muscle memory, and developing fine control of microscopic details. I had a bunch of the GRS practice plates.... bought a sheet of mild steel and brass from hardware and craft stores, and drew/engraved on whatever I could get my hands on.

keep drawing the scrolls on paper, and start filling a few plates with straight lines, curved lines, some thicker, thinner, practice rolling the graver to each side.

one thing I'm seeing in your plates, which I noticed whit my engraving after I got my microscope, your lines seem shallower with magnification. this can help with controlling the graver since youre not moving as much material.

pay attention you what your graver hand is doing. turn the work into the graver, and try not to push or turn the graver. this can also cause the graver to run away, or drift off from where you want it to go. maybe adjusting stroke speed. cut some faster, and some slower and see if one is more comfortable to control.

hope this is helpful.
 

mdengraver

~ Elite 1000 Member ~
Joined
Apr 10, 2007
Messages
3,607
Location
Rockville, MD
Go to the iGraver tutorials at the top of the page, Sam has shared a lot of useful info for all of us there.
 
Last edited:

Boomhower

Elite Cafe Member
Joined
Dec 14, 2015
Messages
179
Location
Seymour, Mo
Hello and welcome
It won't take long you will be going to town with your tool just takes practice. Here is a link to some practice drawings. The one document is just simple lines and they are very good to start on
http://www.engraversstudio.com/apps/documents/
For your questions on microscopes there is alot uses them and alot use Optivisor. I am using a Optivisor my self but will soon get a microscope
 

Boomhower

Elite Cafe Member
Joined
Dec 14, 2015
Messages
179
Location
Seymour, Mo
If you watch some videos you will see that you roll the graver to one side or the other to give depth to your work that was the hard part for me cuz I use hammer and chisle
I get my practice steel and brass at the hardware store for brass I get the kick panles for wooden doors they are good practice but you have to take the antitarnish off of them. I just use 400grit sandpaper
 
Last edited:

Latest posts

Sponsors

Top