Critique Request Bulino, attempt no 2

Dani Girl

~ Elite 1000 Member ~
Joined
May 6, 2012
Messages
1,110
Location
NSW, Australia.
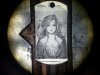
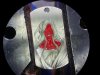
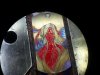
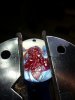
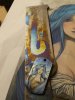
Here's my second go at trying to do real bulino.

Please pick it apart and let me know how I can improve. Tear it to shreads please.

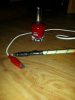
Titanium pendant. 33x17.5mm overall.

Anodized using nail polish as the resist. Cleaning salt stuff from bunnings as the solution.

One of my most successful anodizing jobs to date. I tried a new nail polish and found it rubbed off too easily when set so went back to the older one and only had a tiny leak where blue got under the polish onto her neck and the feathers got changed but that's ok.

I'm happy to explain anything you want to know in length.

Design isn't original but it's just for me to wear so I think that's ok.


Dani Girl

~ Elite 1000 Member ~
Joined
May 6, 2012
Messages
1,110
Location
NSW, Australia.
More photos

Progress photos.
 

Attachments

  • 20160104_172416-resized-2048.jpg
    20160104_172416-resized-2048.jpg
    113.2 KB · Views: 353
  • 20160108_154417-resized-2048.jpg
    20160108_154417-resized-2048.jpg
    106.2 KB · Views: 353
  • 20160108_160138-resized-2048.jpg
    20160108_160138-resized-2048.jpg
    99.4 KB · Views: 352
  • 20160108_161839-resized-2048.jpg
    20160108_161839-resized-2048.jpg
    83.8 KB · Views: 351
  • 20160108_163910-resized-2048.jpg
    20160108_163910-resized-2048.jpg
    75.7 KB · Views: 354

SalihKara

Elite Cafe Member
::::Pledge Member::::
Joined
Dec 18, 2014
Messages
184
Location
Turkey
perfect,

May I ask how did you paint them in color and what was the red thing ?
 

Dani Girl

~ Elite 1000 Member ~
Joined
May 6, 2012
Messages
1,110
Location
NSW, Australia.
Red was nail polish to resist the electricity being passed through the wood end of a paint brush that has a wire wrapped through and around it back from the tip covered in electrical tape. That is dipped in anodizing solution and then applied to the metal using batteries or a power supply to control the voltage. 5-120volts seems to work, only need 1 amp.

So the anodizing isn't paint or anything put onto the metal but it's a coating that the titanium builds up itself when electricity is applied. The thickness of the coating changes the colour the light reflects off the metal as.
 

Boomhower

Elite Cafe Member
Joined
Dec 14, 2015
Messages
179
Location
Seymour, Mo
That is just plum awesome stuff
Thank you for explaining how it is done I had in my head it was done with heat that is some cool stuff
I guess I thought it was from heat cus I welded some at my old job and it turned colors if the argon wasn't flowing right
Awesome job on it
 

mitch

~ Elite 1000 Member ~
Joined
Jul 23, 2007
Messages
2,636
i'm amazed at how far your work has come in such a short time!
 

Brian Trace

Member
Joined
Dec 20, 2012
Messages
12
Location
Blockley, Gloucestershire
Stunning work on Attempt 2; a captivating smile and great shading. Can I assume that the Titanium strip in the background of your photograph is your colour test bed so that you can find the correct voltage to use or do you already have a voltage equals colour idea? Perhaps a naive follow-up question, I can see your initial engraving before colourisation but did you apply the bulino shading in the hair, face, neck, shadows and pleats either before or after colouring?
 

speeedy6

Elite Cafe Member
Joined
Sep 16, 2013
Messages
271
The shading makes it ! Great job. The wolf looks much better with color. Maybe next time you do an animal ,make it in action. A posed animal just doesn't look right.
 

celticjohn

Member
Joined
Jan 21, 2010
Messages
94
Location
Ireland
They both look great and I'll go along with Mitch's comment, you've come a long way in a relatively short time period.
Take a bow.
 

Tsu

Member
Joined
Sep 22, 2014
Messages
33
Amazing, never seen this technique before!

Sent from my MotoG3 using Tapatalk
 

Doc Mark

~ Elite 1000 Member ~
Joined
Nov 16, 2006
Messages
1,284
Location
Hampton, Virginia
This is, by far, the best colorized titanium work that I've seen to date! I also enjoyed how you modified the original drawing to make it more your own. By changing the cloak on the original figure to be more of a continuation of her blue "hair", this better "frames" the entire composition. Kind of reminds me of the movie "Tangled".
 

NicGregson

Member
Joined
Apr 22, 2011
Messages
66
Location
Leura, Australia
That is so amazing!!! I love all the different tones you've achieved.
What are using as the power source, normal rectifier? Also can you please send a photo of the cleaning salts from Bunnings? I'll have to pick some up :)
 

Dani Girl

~ Elite 1000 Member ~
Joined
May 6, 2012
Messages
1,110
Location
NSW, Australia.
Ok, so all engraving was done before colouring started. I had to keep blackening it to see what I was doing, I'm going to make myself a shallower template and see if that makes the cut look blacker. Anyhow before anodizing I washed all that would come out of the cuts out with acetone and cleaned the metal well. Then I anodized her face being careful not to go near the eyes or teeth. Then nail polish over that... go to the next highest voltage colour you want, anodize that, next highest colour, anodize that, nail polish over it.

You can see the test strip in the background shows the colour progression. So it went, face, shirt, feathers, hair, background got higher as it went down.

I'm using a power supply I was given... I'll take a picture of that and the salts tonight.

Thanks everyone. Your words are very encouraging. I needed that :tiphat:

If you're in america you can get something else to help too... I'll link it tonight
 

Dani Girl

~ Elite 1000 Member ~
Joined
May 6, 2012
Messages
1,110
Location
NSW, Australia.
This is the power supply I was given.

So my anodizing is fully saturated and some crystals still sit in the bottom. Friend said it's better to only have a tiny bit in the water.

Tricleanium is in the painting isle or something not with the cleaning stuff.

Dip or soak the wood in it makes it conductive enough. For even larger areas better to put electrodes in a glass dish and dip the piece in it.
 

Attachments

  • 20160109_195756-resized-1400.jpg
    20160109_195756-resized-1400.jpg
    45.1 KB · Views: 122
  • 20160109_195728-resized-1400.jpg
    20160109_195728-resized-1400.jpg
    58.4 KB · Views: 122
  • 20160109_195708-resized-1400.jpg
    20160109_195708-resized-1400.jpg
    70.4 KB · Views: 122

Dani Girl

~ Elite 1000 Member ~
Joined
May 6, 2012
Messages
1,110
Location
NSW, Australia.
That's Sally Hanson nail polish. Only tried a few though. Just have a go at whatever your wide has :)

Get the smallest brush your art shop had and just touch it to the end of the bottle brush which you will lift out when you need another brush full. Acetone to clean brush. Acetone will melt the paint off the brush but after the initial mess no one cares. Synthetic or Sable. Any questions.
 

Latest posts

Sponsors

Top