brightcut script lettering graver

Indy Joneds

Elite Cafe Member
Joined
Feb 13, 2014
Messages
214
Location
Derbyshire England
hi again all , hope your all well , practicing and studying here .

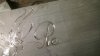
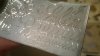
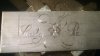
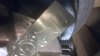
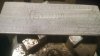
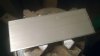
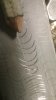
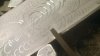
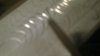
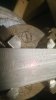
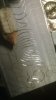
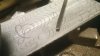
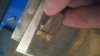
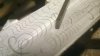
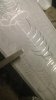
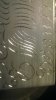
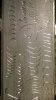
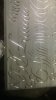
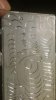
ive watched videos and practiced and sharpened and got sams video , i graver and all the rest . but i can NOT get a smooth nice deepish nice looking curve . i am a perfectionist but i know i can get do better than what im producing . i want to use this script cut in designs so i really want to master it . going slow is producing the better results but i must be missing something ? ive tried differnt angles and allsort. hope some of you can share a gem of information or two on the subject thanks . im using a HSS 40 face - 10 - 20 degree radiaused heel [by hand] ( 1/4 mm ) polished . i have not been tapering the sides usually but i did try and no joy. thanks
 

James Ashley

Member
Joined
Jun 22, 2015
Messages
89
Location
Tasmania, Australia
Maybe trying to cut too deep in one pass? Photo really needed. I'm no expert but have been cutting quite a bit of brighcut script myself lately for practice so its fresh in my mind :)
 

diandwill

Elite Cafe Member
Joined
Aug 10, 2008
Messages
864
Location
Eastern, Washington State
It sounds as if you are using a 40 flat with a 'western bright cut' radiussed heel. That should do a good job. I have noticed that the angle of attack is very important. Sometimes, instead of rotating the vise, i use my wrist to get that last little bit...and the edges of the cut get ragged, or I am slow in turning the vise, and get ragged cuts again. The angle that the cutting edge is in, in relation to the metal being cut, is very important.

Working with a practice plate, repeat the curve several times, side by side. Don't try to cut the lettering, just practice cutting the curves. Each curve is slightly different, in each letter, but are based on the same motion. Get that motion into muscle memory, and it will come easier.

Good luck and keep practicing. Will
 

speeedy6

Elite Cafe Member
Joined
Sep 16, 2013
Messages
271
Indy,
I have had a terrible time with my lettering too. I'm a beginning engraver. I cut a money clip for a friend and was satisfied with all except the small lettering. So much so I ended up going over all the letters with my rotary tool. My friend was happy with the clip but I was thoroughly disappointed with the lettering.
I've struggled with lettering all along but last night I had one of those "ah-ha" moments. I was cutting an aluminum handle Buck knife and went over the logo expecting another disappointing result. I turned my magnification to max, started with a wide flat graver and went agonizingly slow. I made 2-3 passes on the wide parts where the pro's go one pass and I was surprised by how good it looked !
I realized that where I started my lettering in the past with a single pencil outline I'll start now with a pattern showing the entire letter as it should look. That will give me a border to cut to. I'll turn my magnification all the way up and cut very, very slowly and carefully. I realze now I've been watching experts cutting in one pass and fairly quickly and I'm nowhere close to that speed or talent.
By the way, I found some inexpensive but nice, knives to engrave instead of practice plates. My engraving isn't good enough to sell but it's certainly good enough to give away to some of my customers and friends. They seem to appreciate them and gives me some real world practice . I use a variety of knives ,right now I'm cutting a Buck # 721 " Slimline ". Hope this helps.
 

Indy Joneds

Elite Cafe Member
Joined
Feb 13, 2014
Messages
214
Location
Derbyshire England
thanks guys , I get better results going shallow with the bar cutts and such , it just doesnt look right to me being shallow on a curve . deeper looks much better to my eye . the heel is polished and I get a nice finish . Speedy i have realised going slow preoduces better results in all cutts , Strraight lines especially too , and curves , but as you say .. it is Painfully slow .. like too slow for it to actually be the normal speed . even as impatien as i am at times and see masters like sam cutting the script curves on his lettering dvd fast and fluid , we cant actually have to go at one like 2 hammer hits a second pace do we ? I will go sharpen a fresh 40/20 by hand and and go do a few hours of cutting and load my pictures up after , good or bad . does anyone do the scooping motion with the wrist , or just turn the vice and twist the graver over with wrist in a stationary position as such. does anyone dub the flat gravers ? or radius the graver left to right to achieve a sort of flat gouge .

chujybear , shallow is ok , but as soon as i want to take a decent chunk out ... it goes **** up

di and will - i will try positioning the curve to follow the naturalcurve or the turn table if that makes sense if thats what your sugesting. i have the graver turned(twisting the hand inwards ) over at about 45 degress when im attempting a deepish cutt and less for shallow . and the back end of the graver raised about 25 degrees roughly . i will post pictures of that if i dont get any better results . thanks again
 

Indy Joneds

Elite Cafe Member
Joined
Feb 13, 2014
Messages
214
Location
Derbyshire England
older script cuts

here is some of what ive done . MY phone is crap for photos , and its a bstard at focusing. i have took 5x as many blurry photos of everything. just rubish but funds and all, blah blah. im uploading the ones ive done to night next
 

Attachments

  • WP_20150923_055.jpg
    WP_20150923_055.jpg
    61.9 KB · Views: 458
  • WP_20150923_053.jpg
    WP_20150923_053.jpg
    47 KB · Views: 454
  • WP_20150923_054.jpg
    WP_20150923_054.jpg
    76.8 KB · Views: 454
  • WP_20150923_033.jpg
    WP_20150923_033.jpg
    52.3 KB · Views: 450
  • WP_20150923_037.jpg
    WP_20150923_037.jpg
    75.1 KB · Views: 448
  • WP_20150923_059.jpg
    WP_20150923_059.jpg
    67.9 KB · Views: 447
  • WP_20150923_050.jpg
    WP_20150923_050.jpg
    42.1 KB · Views: 443
  • WP_20150923_049.jpg
    WP_20150923_049.jpg
    41 KB · Views: 446
  • WP_20150923_038.jpg
    WP_20150923_038.jpg
    70.1 KB · Views: 442
  • WP_20150923_048.jpg
    WP_20150923_048.jpg
    47.1 KB · Views: 447
  • WP_20150923_034.jpg
    WP_20150923_034.jpg
    52.9 KB · Views: 440
  • WP_20150923_036.jpg
    WP_20150923_036.jpg
    71.5 KB · Views: 443
  • WP_20150923_047.jpg
    WP_20150923_047.jpg
    53.6 KB · Views: 440
  • WP_20150923_032.jpg
    WP_20150923_032.jpg
    63.9 KB · Views: 443
  • WP_20150923_046.jpg
    WP_20150923_046.jpg
    42 KB · Views: 439
  • WP_20150923_045.jpg
    WP_20150923_045.jpg
    43.5 KB · Views: 439
  • WP_20150923_044.jpg
    WP_20150923_044.jpg
    33.1 KB · Views: 441
  • WP_20150923_035.jpg
    WP_20150923_035.jpg
    66.3 KB · Views: 438
  • WP_20150923_051.jpg
    WP_20150923_051.jpg
    45.4 KB · Views: 442

Brian Marshall

~ Elite 1000 Member ~
Joined
Nov 9, 2006
Messages
3,112
Location
Stockton, California & Taxco, Guerrero, Mexico
Looks to me like you aren't far off...

Just invest some more time and be sure your are relaxed and not all tensed up. Let the tool do the job. Just guide it.

When it all comes together you'll "know".


Ummmm... dubbing a flat graver? Sounds more like screwdriver tip geometry than something useful to cut with?


Brian


Also helps to hold your mouth in the proper position while cutting. Keep your tongue outta the way...
 
Last edited:

Indy Joneds

Elite Cafe Member
Joined
Feb 13, 2014
Messages
214
Location
Derbyshire England
start - what i got done before the tip broke and showing

sharpened and started , tip broke , pics of few cutts i did do.
 

Attachments

  • WP_20150923_062.jpg
    WP_20150923_062.jpg
    54.9 KB · Views: 218
  • WP_20150923_061.jpg
    WP_20150923_061.jpg
    49 KB · Views: 217
  • WP_20150923_060.jpg
    WP_20150923_060.jpg
    43.1 KB · Views: 216
  • WP_20150923_031.jpg
    WP_20150923_031.jpg
    54 KB · Views: 216
  • WP_20150923_030.jpg
    WP_20150923_030.jpg
    56.4 KB · Views: 217
  • WP_20150923_010.jpg
    WP_20150923_010.jpg
    32.8 KB · Views: 216
  • WP_20150923_072.jpg
    WP_20150923_072.jpg
    52 KB · Views: 219
  • WP_20150923_074.jpg
    WP_20150923_074.jpg
    67 KB · Views: 219
  • WP_20150923_071.jpg
    WP_20150923_071.jpg
    52.6 KB · Views: 219
  • WP_20150923_073.jpg
    WP_20150923_073.jpg
    51.7 KB · Views: 220
  • WP_20150923_003.jpg
    WP_20150923_003.jpg
    33.8 KB · Views: 220
  • WP_20150923_070.jpg
    WP_20150923_070.jpg
    22.3 KB · Views: 218
  • WP_20150923_068.jpg
    WP_20150923_068.jpg
    47.8 KB · Views: 219
  • WP_20150923_075.jpg
    WP_20150923_075.jpg
    57.7 KB · Views: 220
  • WP_20150923_069.jpg
    WP_20150923_069.jpg
    53.2 KB · Views: 220
  • WP_20150923_065.jpg
    WP_20150923_065.jpg
    58.6 KB · Views: 218
  • WP_20150923_028.jpg
    WP_20150923_028.jpg
    47.4 KB · Views: 217
  • WP_20150923_026.jpg
    WP_20150923_026.jpg
    52.3 KB · Views: 218
  • WP_20150923_064.jpg
    WP_20150923_064.jpg
    56.8 KB · Views: 218
  • WP_20150923_001.jpg
    WP_20150923_001.jpg
    34.6 KB · Views: 217
  • WP_20150923_025.jpg
    WP_20150923_025.jpg
    46.7 KB · Views: 219

Indy Joneds

Elite Cafe Member
Joined
Feb 13, 2014
Messages
214
Location
Derbyshire England
re sharpened and carried on

the tip actually broke again but i got the cutts done . SUPERB all round evening
 

Attachments

  • WP_20150923_076.jpg
    WP_20150923_076.jpg
    61.6 KB · Views: 217
  • WP_20150923_078.jpg
    WP_20150923_078.jpg
    52 KB · Views: 215
  • WP_20150923_079.jpg
    WP_20150923_079.jpg
    77.8 KB · Views: 214
  • WP_20150923_081.jpg
    WP_20150923_081.jpg
    48.3 KB · Views: 213
  • WP_20150923_077.jpg
    WP_20150923_077.jpg
    75 KB · Views: 213
  • WP_20150923_080.jpg
    WP_20150923_080.jpg
    68.9 KB · Views: 216

Indy Joneds

Elite Cafe Member
Joined
Feb 13, 2014
Messages
214
Location
Derbyshire England
sorry for the backwards order at times . you get the jist though im sure . tips and advice , i wanted to take a picture of how im holding the graver but my phone ran out of storage and i i ran out of patience about an hour before that . cheers in advance for tips and advice
 

dlilazteca

~ Elite 1000 Member ~
Joined
May 10, 2013
Messages
2,659
Location
Laredo, Texas
Indy,
I have had a terrible time with my lettering too. I'm a beginning engraver. I cut a money clip for a friend and was satisfied with all except the small lettering. So much so I ended up going over all the letters with my rotary tool. My friend was happy with the clip but I was thoroughly disappointed.

If you look at Meeks book and study the angle of your cuts and gain consistency on how you make your cuts, angle, you will begin to develop a rhythm, it does become easier with time. Take a minute and read that section again. Don't cut a specific letter for example different ways every time you do it, develop an agle of attack, Meeks book will help with that.


Saludos,
Carlos
 

Indy Joneds

Elite Cafe Member
Joined
Feb 13, 2014
Messages
214
Location
Derbyshire England
sam describes using a grs holding device and rocking it from angle A to angle B on igraver.com where he tells people to go in the lettering dvd I HAVE watched !
maybe you should watch it again before assuming brian !? .
 

Brian Marshall

~ Elite 1000 Member ~
Joined
Nov 9, 2006
Messages
3,112
Location
Stockton, California & Taxco, Guerrero, Mexico
My abject apologies.

I did assume something, but reading my written words and truly understanding what I meant are part and parcel. Guess I assumed too many things?


I have a couple of dust bunnies under my bench that have been begging for my attention for a week or two. Guess I better go take care of 'em before they do the Hokey Pokey and multiply.

You are on your own...


B.
 
Last edited:

atexascowboy2011

Elite Cafe Member
Joined
Feb 13, 2012
Messages
997
Looks to me there are quite a few chatter marks.
#1- Try cutting down the stroke/impact force.
This will help alleviate the Hammer and Chisel effect.
#2- Set the plate in "Bondo", available at auto parts stores.
This will absorb the vibration/shock of the impact tool.
#3- Make sure your graver point is well lubed.
This will help the point to slide through.

I like to pick an individual cut and practice it until it is where I want it quality wise. I see where you did this a few times and then lost focus and tried something else.
SLOW DOWN AND PERFECT EACH CUT, THEN ANOTHER AND ANOTHER !
Before too long you'll have mastered MANY cuts which you can assemble into a pleasing composition.
 

Sponsors

Top