Announcement: My new and improved stand

MICHAEL

Elite Cafe Member
Joined
Dec 14, 2009
Messages
339
Location
Harriman, Tn.
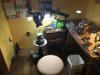
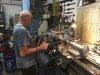
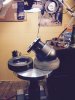
I was getting pm's about my engraving stand, so to save time I thought I would post pics while I throw back a couple of cold beers.:thumbsup: I will be happy to answer any questions in this post but please remember if i answer someone in a pm it only helps 1 person, if we discuss it here, it will continue to help the many. :thumbsup:
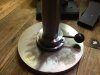
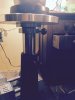
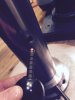
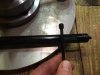
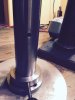
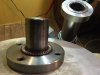
the table is the biggest piece of scrap I had to make a table, it's 11.5 inches across. Turned on the monarch. I kept the drill press base and inner sleeve. The inner sleeve had a weld seam I had to grind out. Used a harbor freight 1/4" die grinder with carbide cylinder burr. The top knob controls the drag on the table and the lower knob controls the height. I have an 80 pound Air cylinder to assist in raising and lowering my work. I turned a copper setscrew that is lock tighted into a hex-head screw. The key to smooth rotation of the table is the solid steel post turned to fit perfectly into the sleeve that I ground the weld seam out of. I spent most of a day getting this fit perfect. Had to use a lapping compound that a machinist friend has that breaks down as you use it. Regular lapping compound won't work because it doesn't break down and the post gets stuck, due to irregularities in the tube. Didn't have a boring bar or a drill long enough to make this sleeve. Just realized I didn't get pics of thrust bearing, washers and post. Better post what I have so far before I lose it. :)
 
Last edited:

MICHAEL

Elite Cafe Member
Joined
Dec 14, 2009
Messages
339
Location
Harriman, Tn.
Adding pics
 

Attachments

  • image.jpg
    image.jpg
    84.3 KB · Views: 605
  • image.jpg
    image.jpg
    94 KB · Views: 600
  • image.jpg
    image.jpg
    98.3 KB · Views: 599
  • image.jpg
    image.jpg
    94.2 KB · Views: 599
  • image.jpg
    image.jpg
    135.2 KB · Views: 598
  • image.jpg
    image.jpg
    80.7 KB · Views: 598
  • image.jpg
    image.jpg
    115.3 KB · Views: 596

MICHAEL

Elite Cafe Member
Joined
Dec 14, 2009
Messages
339
Location
Harriman, Tn.
This piece is crucial also. I have a thrust bearing between two thrust washers. The plate that is bolted to the table, the post is tig welded to it. The ring with the drag adjustment knob is tig welded to the post. I suppose I Could have green lock tighted it on but welding is much more fun. Especially your friend welds better than you.:) I am 6 foot tall and made the height adjustment range between 19-24 inches. I've been engraving for two weeks with it and can really see it has helped me improve.
I realize not everyone has the access to these tools or the knowledge to use them, but my real point is that after you've engraved for a while you will start to see what you need to help make you a better engraver. That's when you plop down the money or find someone to help you make what you need. I just happen to enjoy making things. Hope this helps someone. :thumbsup::thumbsup:
 

Attachments

  • image.jpg
    image.jpg
    63.7 KB · Views: 588

MICHAEL

Elite Cafe Member
Joined
Dec 14, 2009
Messages
339
Location
Harriman, Tn.
I just had to include this pic. This is Julian, my machinist friend who retired from oak ridge national laboratories. We built this stand in his shop. He rebuilt my bridgport and helped me get it into the basement and now he's rebuilding a monarch lathe for me. This is when we spent half the day trying to fit that post into the drill press sleeve. If I was doing it over I would have ordered the sleeve and proceeded from there. It was that frustrating.
I forgot to mention that we cut out a sheet of 16 gauge metal and bolted it to the bottom of the stand to allow the air cylinder to have something to press against, other than my floor.
 

Attachments

  • image.jpg
    image.jpg
    123.6 KB · Views: 578

diandwill

Elite Cafe Member
Joined
Aug 10, 2008
Messages
864
Location
Eastern, Washington State
Thank you. Looks like a killer piece. I know that I need something much better, and keep looking for a non functional drill press, or something similar. Maybe a stool and one of the cast iron potter spinners...not sure, I just know I need something better and that money is a factor.
 

RDP

Elite Cafe Member
Joined
May 19, 2012
Messages
574
Location
Brisbane, Australia
Nice set up Michael, thanks for sharing your friends photo as well, that's a belt sander I have to make for my lathe,

Richard.
 

quickcut07

Elite Cafe Member
Joined
Jan 13, 2007
Messages
314
Location
Ontario Canada
I see a lot of effort and thought has been put forth. Michael thanks for taking the time to show your work and finished product. Many of us have been there when something just doesn't want to co operate. Usually time brainstorming and perseverance prevails oh and the help of a good friend. Great job, it will serve you well and greatly add to your quality of work.

Eric
 

don hicks

Elite Cafe Member
Joined
Mar 16, 2011
Messages
554
Location
Pictou,Nova Scotia,Canada
Very nice piece of machine work. Is the table stainless? Your machinist friend really knows how to get a smooth finish on his turnings. You must be spending more time at the bench now, even if you aren't engraving, you can sit and admire the table. Nice job . thanks for posting.
Cheers
Don
 

monk

Moderator
Staff member
::::Pledge Member::::
Joined
Feb 11, 2007
Messages
10,870
Location
washington, pa
slick looking job. i share your desire for making things one has a need for. none of my creations are as pretty as yours. but they do serve me well. thanks for showing your project. hopefully it will inspire a few others to learn the joy of creating something useful.
 

MICHAEL

Elite Cafe Member
Joined
Dec 14, 2009
Messages
339
Location
Harriman, Tn.
Thanks to all for the kind comments. Don, the table is made from scrap aluminum.
I couldn't have made this without Julian's help. He had me turn the parts down to a close diameter and then he would do the final cuts. The finish on the table was better but I was using a base we Made from a piece of lexan, and chips got caught on it and scraped some pretty deep grooves in it. I went back to using the tire from GRS. The tire works better now because of the stand being lower. Before I was always sitting at the top of my chair height and had to stretch to see properly. I've been lucky to have met so many people willing to help me and share their knowledge. I hope this post helps someone. I started on this forum before I knew anything about engraving, drawing, machining, grip making, gunsmithing and a ton of other stuff. I hope I can give something back.:thumbsup:
 

Attachments

  • image.jpg
    image.jpg
    141.7 KB · Views: 185
Last edited:

MICHAEL

Elite Cafe Member
Joined
Dec 14, 2009
Messages
339
Location
Harriman, Tn.
That's were I started. You just have to improve it as need arises. I'm sure I'm not done. There's always some tweaking to be done:happyvise:
I forgot to mention the lexan base we made. I am trying to keep from buying a positioning vise unless I'm positive I need it. I don't like the vise hanging over the sides of the table. With old setup, it fell off twice, with the tire, especially when working on frames and keeping centered in the scope. Didn't fall off with lexan but still overhangs a bit and scratches the table. We also cut out a perfect sphere and the vise ain't a perfect sphere. When I tip my vice over it will move when I engrave. Doesn't happen very much with tire. Any thoughts from anyone on positioning vice fixing my problem will be welcomed:biggrin:
 

Dave London

~ Elite 1000 Member ~
Joined
Nov 12, 2006
Messages
1,765
Location
Colorado
Put a piece of thin leather or carpet anti skid fabric between the ball and the lexan or the tire. More drag less ball float
 

MICHAEL

Elite Cafe Member
Joined
Dec 14, 2009
Messages
339
Location
Harriman, Tn.
Put a piece of thin leather or carpet anti skid fabric between the ball and the lexan or the tire. More drag less ball float

Thx dave, I thought of that also but because the lexan picks the chips up so easily, it scratches the al- table up pretty bad, so I went back to the tire and it's working. The big problem is the vice when turned on its side. To keep the work in my field of vision, the vice goes to the edge. Even with the thrust bearing and the drag off, I get a different feel. I may be able to get used to it. Just wondered if a positioning vice would help. Would the positioning vice need to go as far out off the table? I'm thinking it would but I've never used one. At present I can move my vice with my left hand to keep work in my field of vision, just don't like the vice going past the edge. I may need to make a new top with bigger table and thrust bearing to distribute the weight better. Anybody use a table bigger than 11.5 inches. Wonder if 13 " would do the trick?:thinking:
 

Dave London

~ Elite 1000 Member ~
Joined
Nov 12, 2006
Messages
1,765
Location
Colorado
MTC that vise weighs 30 lbs if I remember right, it might be that much weight at the edge is slightly cocking the pilot shaft. I use a low profile dove tail vise 42 lbs on a Lindsay 10 in turn table and if I get over half of the vise over hanging the table it gets squirrley. So I re position the work closer to the center of the vise.
Beautiful machine work and a cool set up, you got
 

MICHAEL

Elite Cafe Member
Joined
Dec 14, 2009
Messages
339
Location
Harriman, Tn.
Dave, the trouble starts when I'm cutting a model p recoil shield. The piece is viced up on its side. I have to turn it almost up and down, like in the picture, to see it through the scope to cut it. Maybe the trouble is that I'm trying to cut the gun 100% under the scope. Maybe I need to do this work with my optivisor?:thinking:
 

Doc Mark

~ Elite 1000 Member ~
Joined
Nov 16, 2006
Messages
1,284
Location
Hampton, Virginia
How about a different technique of holding the gun parts, so that the vice can be set in a more vertical manner? This would necessitate lowering the turntable to get the vice centered under the scope and in focus. But it would give you better balance of the heavy weight on the center of the turntable.
 

MICHAEL

Elite Cafe Member
Joined
Dec 14, 2009
Messages
339
Location
Harriman, Tn.
How about a different technique of holding the gun parts, so that the vice can be set in a more vertical manner? This would necessitate lowering the turntable to get the vice centered under the scope and in focus. But it would give you better balance of the heavy weight on the center of the turntable.

Doc, I've thought about what you said here for a while. Here are the two ways I hold a model p when engraving with slight variations of the vice. I don't know of any other way to hold this part to keep it centered in my microscope. Any suggestions will be appreciated. So far all i come up with is use my optivisor for a few of the cuts that cause this problem. I also experience this on the front section just under the area that houses the ejector rod. I have to use a 60 degree face with 55 degree heel to get the lift to make cuts meet in this area. I also have to use my optivisor as my hand blocks the scope.
Pictures are on the next page. Couldn't get them loaded to this post for some reason.
 
Last edited:

Latest posts

Sponsors

Top