Art Deco Rail Theme Coin Carving Set Steve Adams

Steve Adams

Elite Cafe Member
Joined
Jan 2, 2007
Messages
320
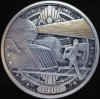
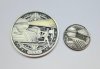
Here is a just completed Morgan carving and one nickel carving from 2010. Kind of thought it would make a nice set. I love Art Deco.
 

Attachments

  • IMG_0525.jpg
    IMG_0525.jpg
    170.9 KB · Views: 325
  • IMG_0459.jpg
    IMG_0459.jpg
    73 KB · Views: 321

mdengraver

~ Elite 1000 Member ~
Joined
Apr 10, 2007
Messages
3,604
Location
Rockville, MD
Love it! Just curious, what defines it as art deco? Here's the definition I found from Wikipedia:

From Wikipedia, the free encyclopedia
Art Deco (/ˌɑrt ˈdɛkoʊ/), or Deco, is an influential visual arts design style that first appeared in France after World War I and began flourishing internationally in the 1920s, 1930s and 1940s before its popularity waned after World War II.[1] It is an eclectic style that combines traditional craft motifs with Machine Age imagery and materials. The style is often characterized by rich colours, bold geometric shapes and lavish ornamentation.

Deco emerged from the interwar period when rapid industrialisation was transforming culture. One of its major attributes is an embrace of technology. This distinguishes Deco from the organic motifs favoured by its predecessor Art Nouveau.

Historian Bevis Hillier defined Art Deco as "an assertively modern style [that] ran to symmetry rather than asymmetry, and to the rectilinear rather than the curvilinear; it responded to the demands of the machine and of new material [and] the requirements of mass production".[2]

During its heyday, Art Deco represented luxury, glamour, exuberance and faith in social and technological progress.
Attributes
Deco emphasizes geometric forms: spheres, polygons, rectangles, trapezoids, zigzags, chevrons, and sunburst motifs. Elements are often arranged in symmetrical patterns. Modern materials such as aluminum, stainless steel, Bakelite, chrome, and plastics are frequently used. Stained glass, inlays, and lacquer are also common. Colors tend to be vivid and high contrast.[13][14][15][36][37][38]
 
Last edited:

JOEYS CARVED ART

Elite Cafe Member
Joined
Nov 7, 2013
Messages
224
Location
West Virginia
Awesome carving, this kind of craftsmanship and the thought that I could ever come close to this level of work is what inspires me to learn as much as I can and to progress in the engraving arts. You are a true master at your craft!!
 

Martin Strolz

Elite Cafe Member
Joined
Dec 12, 2006
Messages
339
Location
Steyr, Austria
Looks great!
I guess you used a machine for parts of the job. There are several ways to achieve this, -I would be interested in your workflow, if this question is allowed.
Thanks, Martin
 

Steve Adams

Elite Cafe Member
Joined
Jan 2, 2007
Messages
320
Looks great!
I guess you used a machine for parts of the job. There are several ways to achieve this, -I would be interested in your workflow, if this question is allowed.
Thanks, Martin

Martin,
Yes, I will post something to show it better.
 

don hicks

Elite Cafe Member
Joined
Mar 16, 2011
Messages
554
Location
Pictou,Nova Scotia,Canada
Steve; The naked eye view of that train coin doesn't do justice to the fabulous detail you have it. You will have to sell that puppy with a free magnifier. Great job, thanks for posting.
Cheers
Don


.
 

Steve Adams

Elite Cafe Member
Joined
Jan 2, 2007
Messages
320
img508 (744x1024).jpg
Looks great!
I guess you used a machine for parts of the job. There are several ways to achieve this, -I would be interested in your workflow, if this question is allowed.
Thanks, Martin
I use a spring loaded tool on a pantograph or freehand with a polished carbide scriber to transfer the design. In step one I remove a substantial amount of the material you see darkened out with chisels and flex shaft , stone the background, then start modeling. I keep transferring the design for each layer, modeling along the way, using chisels, flex shaft, gravers, punches, micro gravers and sculpting tools and stones for smoothing. I make most of my tools including some of my own burs that are suited for sidewalls. I used a manual pantograph with a carbide cutter to cut a healthy amount of the design on the outside. I completed about 85% of it this way. If it is out in the open, the draft and width of the tool are not hindered, but in tight spots and near higher layers the draft of the tool would be a problem. Since the tool is round and about .010 wide, I then have to use hand tools for corners , small areas and areas near upper layers. There is one visual showing how corners in the outer design must be done by hand. The design areas further in are done by hand, a lot of punch work and stoning involved. The nice thing about a spring loaded tool is that after the transfer, you can follow the same lines with a graver. It is important to polish this tool so it rides metal more easily. I also used the pantograph for my name and year.
 
Last edited:

Martin Strolz

Elite Cafe Member
Joined
Dec 12, 2006
Messages
339
Location
Steyr, Austria
Steve,
Thank you for the time explaining your technique in detail! It was interesting reading to me and I find it amazing what you achieved here. Truly excellent pieces!
Once I made a spring loaded tool for scribing the main lines on copper or steel plates for engravings for intaglio prints. I should use it more often for my work in school...
I noticed small hints, especially near higher layers, which told me that you must have used a cutter with a profile angle. Thus it is clear that all corners must be reworked with a graver. For finishing fine machine engravings I often use a carbide cutter ground to a four-sided-pyramid, the tip very slightly rounded. This tool scrapes more that it cuts, but it is not as likely to break or quickly wear as a single-flute cutter.
Have you cut your stencils of thin aluminum sheets with a piercing saw then mounted them stacked on a plate with positioning pins? This way you could use each single stencil without loosing the centre. Additionally you must have had some smart way of aligning the piece again in your chuck after hand work.
Thanks, again, Martin
 

Steve Adams

Elite Cafe Member
Joined
Jan 2, 2007
Messages
320
Steve,
Thank you for the time explaining your technique in detail! It was interesting reading to me and I find it amazing what you achieved here. Truly excellent pieces!
Once I made a spring loaded tool for scribing the main lines on copper or steel plates for engravings for intaglio prints. I should use it more often for my work in school...
I noticed small hints, especially near higher layers, which told me that you must have used a cutter with a profile angle. Thus it is clear that all corners must be reworked with a graver. For finishing fine machine engravings I often use a carbide cutter ground to a four-sided-pyramid, the tip very slightly rounded. This tool scrapes more that it cuts, but it is not as likely to break or quickly wear as a single-flute cutter.
Have you cut your stencils of thin aluminum sheets with a piercing saw then mounted them stacked on a plate with positioning pins? This way you could use each single stencil without loosing the centre. Additionally you must have had some smart way of aligning the piece again in your chuck after hand work.
Thanks, again, Martin

Martin, I will add a little this evening about your comments above to explain my process a little more. Meanwhile, thank you everyone for your comments to the thread.
 

Steve Adams

Elite Cafe Member
Joined
Jan 2, 2007
Messages
320
Martin, I will add a little this evening about your comments above to explain my process a little more. Meanwhile, thank you everyone for your comments to the thread.
Response to Martin. The Morgan carving

There are cutter marks on the outside of the outward 2D design in the 11:00 position, and yes, I used a single flute. Although there is some clean-up and having to finish corners and tight spots, it really is advantageous. The marks you see below the light beam are from either a 3 or 4 sided bur on my flex shaft. I routinely use these in negative die work, so the technique seemed logical to me in the positive. I think a lot of my work has a medal look to it, and reflects what I do for a living.

I use clear rigid vinyl for patterns or stencils, as you say. Only one is needed, and because it is clear, you lay it over your art and engrave lines to be scribed. If you were to engrave an area like the outside 2D design, then your lines must compensate for the width of the tool.

I added two photos to this thread, one of my bench set up, and the other at the pantograph. At the pantograph, see that little piece of steel on the side of the coin chuck? As long as it touches the same jaw in the pantograph chuck each time, it will always be in the same spot. It has to be, otherwise, well, you'll ruin a lot of work. This is how I can go back and forth between the bench and machine all day long when working on dies. I do need to finish my table top pantograph arm, because most of the time my pantograph is tied up. At that point it's back to hand scribing or drawing on the coin. Most coins are done that way anyway.
 

Latest posts

Sponsors

Top