Satyr engraving

Tom Curran

Elite Cafe Member
Joined
Feb 18, 2007
Messages
451
Location
upstate New York
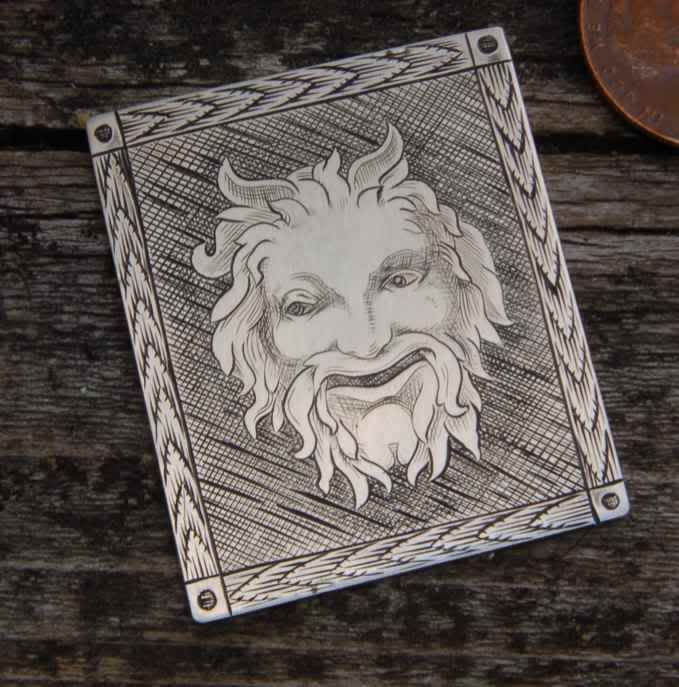
This is an exercise I have been working on for some time now.
I am trying to get the modeling of the face, the figure, and it does not come easily to me. Drawing helps a lot, I find, draw, draw, draw, all the time. Some of my shading, I was not sure how to do, some is too light, and some lines are too dark. I find the worst error is to cut too deeply.

Speaking of cutting too deeply, I am having trouble cutting silver. STeel is a breeze to cut. Do I need a more acute angle for sterling? I am using a 45 deg face angle, and a 20 degree heel angle. If I am not careful the tool wants to dive. Will a longer heel help resist the diving tendency?

Anyway, I hope you enjoy the subject.


Tom Curran

Elite Cafe Member
Joined
Feb 18, 2007
Messages
451
Location
upstate New York
Joseph, thank you for your response.

Shading:
Joseph, I write so I understand what you mean correctly. Do I have this right: I sculpt this in relief. Then I play light upon the surface to understand the light and shadow. Is that what you mean?

Tool geometry:

I had started with tools for steel(55 deg face angle), and they pushed metal ahead, like a snow shovel pushing snow. The metal just bunches up in front of the tool.

I then I ground some to a 45 deg face angle, and the metal curls out of the cut. Much better. I still feel that the metal could curl up and out of the cut more easily. It still feels like the metal is wedging its way through the silver. There are little pressure ridges on both sides of the cut. Then I have to sand the metal flat again.I'm not breaking any tips, so maybe a more acute face angle is still possible?

I apologize for the ramble, but I could use some help on tool geometry. I have a GRS Dual angle fixture.

Thanks, Tom
 

Andrew Biggs

Moderator
Joined
Nov 10, 2006
Messages
5,034
Location
Christchurch, New Zealand
Hi Tom

I think you are doing pretty good and on the right track. It's really hard when you see the photo enlarged as it tends to wash out the grey areas a bit.

From what I can see you need to darken some areas a bit. For instance the deeper areas on the face will have deeper shadows (eg: underneath the eyebrow area and inside mouth) so therefore they will be a bit darker.

You may also want to apply this to the hair roots and where the hair overlaps.

Try doing it with a pencil on a piece of paper and see what the different effects are.

I would highly recommend the Bulino DVD by Chris De Chamillas available on the FEGA web site www.fega.com

As for your tool geomatry your doing the right thing with experimenting with the different angles. Maybe you are forcing the tool a bit as well?

You're doing all the right things with drawing and studying and experimenting..............just keep it up and you'll get there. :)

Cheers
Andrew
 

Ron Smith

~ Elite 1000 Member ~
Joined
Apr 6, 2007
Messages
1,455
Tom, If you are getting pressure ridges, that indicates to me that you have a wedge for a point, displacing metal instead of shearing it. This is a critical point.......... Are you stropping the tool? If you round the edge of the tool the slightest bit, this is what you will get. That crisp edge that cuts cannot be any narrower than the metal just behind that edge if you know what I mean. The shearing action at its best, will cut like butter in silver. You can make or break an edge with a couple of misguided strokes, particularly if you are cutting by hand...........Hope this helps, but Joseph could be right. You are developing your sense of touch to microscopic proportions and that doesn't come easy................Ron S
 

Tom Curran

Elite Cafe Member
Joined
Feb 18, 2007
Messages
451
Location
upstate New York
Ron, I tried a tool with a 45 face, and 20 deg heel, nicely lapped to a mirror sheen on the GRS machine, and it worked like a dream. no pressure ridges. Ron, you hit it with the NO stropping. I think I did strop my first tool, the one that was creating the ridges. The last tool cuts clean and bright with full control.

Andrew, the object looks more righteous when not magnified. My eye blends all the little lines into shades of gray. I have darkened much of what you suggested, and it looks much better.

I will check out the Bulino style, but I am trying to emulate 18th and 17th Cent engraving styles for a jaeger rifle I am building. This satyr is just a practice piece to train in the style of the day.

Thanks so much for your help. This forum is a fantastic resource.

Tom
 

Marcus Hunt

~ Elite 1000 Member ~
Joined
Nov 9, 2006
Messages
1,799
Location
The Oxfordshire Cotswolds, England
Well I think what you've achieved here is excellent considering your graver geometry troubles. Believe me, with the sharpening fixture you are well on the way as there are tried and tested geometries which will work and that you can replicate. It took me years to learn hand sharpenning to a geometry that worked well for me.

As a constructive critisism, I personally wouldn't cut away a background as you have done without a lot more experience of graver control. What you have endeavoured to do is probably one of the most difficult and it looks messy and has detracted from the satyr head. Like most things the simplest are often the hardest to do well and a chequered background needs to have continuous lines of uniform width/depth to look half decent. In my opinion you'd have been better off cutting single point lines very close to one another to give a black background.

The head itself is not to bad but it's worth noting that often rounded shapes can be made to look round with straight cuts and how you overlap them. Look carefully at banknotes too and see how the engraver shapes the portaits with his graver.

The border too is well cut but lacks a little definition. If you'd cut 2 parallel lines to place the running wheat between this may have helped. At the moment they have no defining edge which is making it difficult for you to keep your shading confined so it sort of drifts into nothing.

I hope these pointers help. Keep up the good work.
 

JJ Roberts

:::Pledge Member:::
::::Pledge Member::::
Joined
Nov 10, 2006
Messages
3,459
Location
Manassas, VA
Tom...I suggest you get a book on the etchings of Rembrandt..you would get a better understanding of light and shadow. Rembrandt was the Master of the line. Keep experimenting it never ends. Keep up the good work.
 

Mike Cirelli

~ Elite 1000 Member ~
Joined
Nov 8, 2006
Messages
1,690
Location
Western PA
Tom if you are going in deeper than you would like try a 120 degree graver. A 90 degree graver will cut much narrower and deeper. Make your heel at whatever angle you feel comfortable with, but bring it back only .005 to .009".
 

Latest posts

Sponsors

Top