Steel/fine silver and Gold Saddle Horncap

spadebit

Member
Joined
Oct 24, 2009
Messages
82
Location
My home is in the central California mountains, a
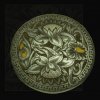
Just finished for a customer in Europe. Fairly large diameter all steel horn cap for a saddle. The engraving was to resemble the floral carving that we do on saddles, and the customer specified he wanted Watter-Lilly's. You can see that the seed pod centers on the Lilly's are inlaid fine silver, while the Lilly bud and leaf both sport bits of Gold inlay. I wrapped the Carlos Border around the outer edge, and broke the border in 2 places with the vine work as was requested. The entire pattern is back ground removed by first outlining with a 105, then remove the actual background using my modified negative rake 40 flat- foe me it just seems more intuitive while I also know many gun engravers would frown on doing such a thing. All the shade work, was done with a 75 degree Vee tool. I did not use my scope, for no other reason than I really don't like working under one. Just gott'a send a shout out to Shawn Didyoung for his great tutorial on cutting the border, even thought we both have a different look when done.(my fault)
 

Attachments

  • R2A-MARCEL-FINAL.JPG
    R2A-MARCEL-FINAL.JPG
    89.4 KB · Views: 305

Haraga.com

~ Elite 1000 Member ~
Joined
Jul 27, 2007
Messages
1,264
Location
Skiff
Spadebit, beautiful work. It's nice to see that you took the extra time and effort on the border.
 

Peter_M

Elite Cafe Member
Joined
Jun 28, 2009
Messages
491
Location
BC, Canada
Very nice, that Carlos border looks just like stamped, what is your way of doing it?

Peter
 

hsc

Member
Joined
Mar 29, 2009
Messages
22
very unique work, it complements your leather tooling very well, the inlay seed pods really add alot to piece.
steve
 

spadebit

Member
Joined
Oct 24, 2009
Messages
82
Location
My home is in the central California mountains, a
Peter-M, you ask about my carlos border. I mention that Shawn Didyoung from Montana posted a tutorial on youtube I think it was, all about how he cut this particular border. I watched that and proceeded to cut mine differently, I wanted a Carlos that more closely resembled that which we carve in leather. I cut outside/inside bands of the border to frame it, do my divisions to get the width size of each unit. I then mark center of each area. I then use my dividers and mark a line at 2/3 the width of the band- I do this from the inside line and again from the outside band line. These marks ring all around lightly between the bands. I cut with my 105,short heel, high polished and begin at the center mark and on the 2/3 line, cutting that smooth clean arc in one direction all around one way. Then come back and do the opposing cut the other way all around. Do the same to the cuts on the outer band now. I cut my center cut on my 2/3 lines- using a sharp-short heeled 50 flat. I make this cut in 2 directions and both meet as smooth as I can at the center. nOt sure any one can actually follow this, but that is how I do it.
 

Peter_M

Elite Cafe Member
Joined
Jun 28, 2009
Messages
491
Location
BC, Canada
Peter-M, you ask about my carlos border. I mention that Shawn Didyoung from Montana posted a tutorial on youtube I think it was, all about how he cut this particular border. I watched that and proceeded to cut mine differently, I wanted a Carlos that more closely resembled that which we carve in leather. I cut outside/inside bands of the border to frame it, do my divisions to get the width size of each unit. I then mark center of each area. I then use my dividers and mark a line at 2/3 the width of the band- I do this from the inside line and again from the outside band line. These marks ring all around lightly between the bands. I cut with my 105,short heel, high polished and begin at the center mark and on the 2/3 line, cutting that smooth clean arc in one direction all around one way. Then come back and do the opposing cut the other way all around. Do the same to the cuts on the outer band now. I cut my center cut on my 2/3 lines- using a sharp-short heeled 50 flat. I make this cut in 2 directions and both meet as smooth as I can at the center. nOt sure any one can actually follow this, but that is how I do it.

Thank you Jeremiah for describing your way of doing it. I will have to give that a try.

Peter
 

Latest posts

Sponsors

Top