Damascening an Elk with an Artisan

Barry Lee Hands

~ Elite 1000 Member ~
Joined
Feb 7, 2007
Messages
1,272
Location
Las Vegas
I posted this over on the engraving forum and thought you might like to see it. I used the Lindsay Artisan foot contol tool for most of it. The Artisan is designed for jewelers but works quite well for gun engraving, and its a pretty simple and inexpensive setup. I have the optional Tungsten piston in mine for heavier work, and the standard piston for lighter work.

1 Here are the parts and a photo I took of a mounted Elk.

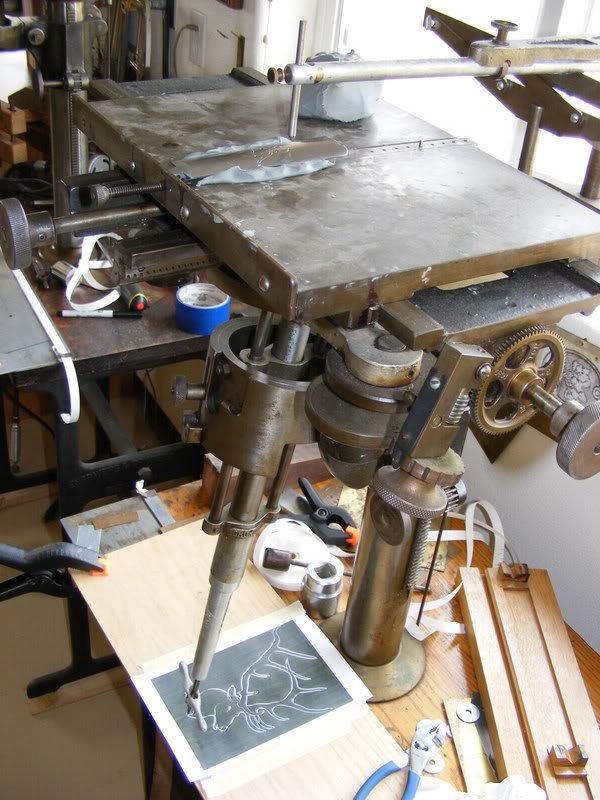
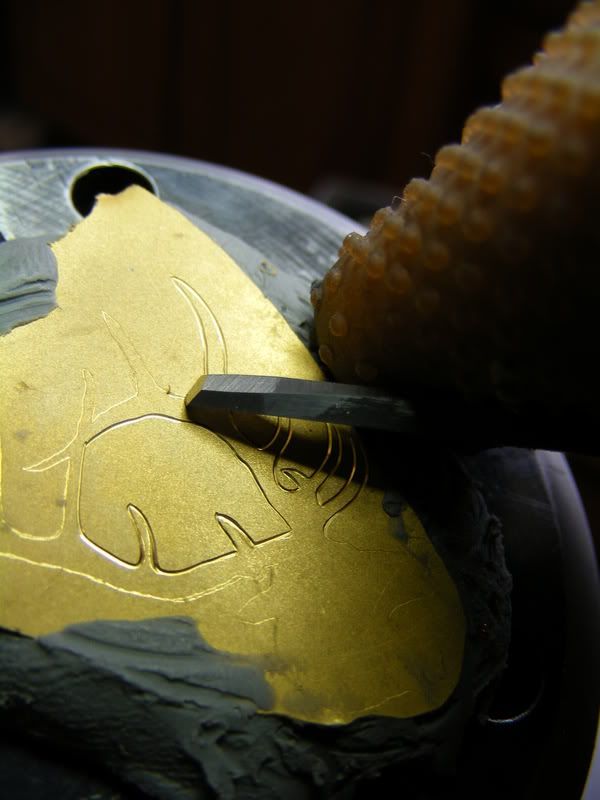
2 Next the Elk is scribed on with a pantograph, then modified for artistic merit with a scribe. Then I cut the outline with the Lindsay Artisan handpiece.

3 Next I scanned the outline which I cut and put the floorplate and the printed scan on the Pantograph to get the ratios correct so I can scribe it as I cut it, onto the gold.

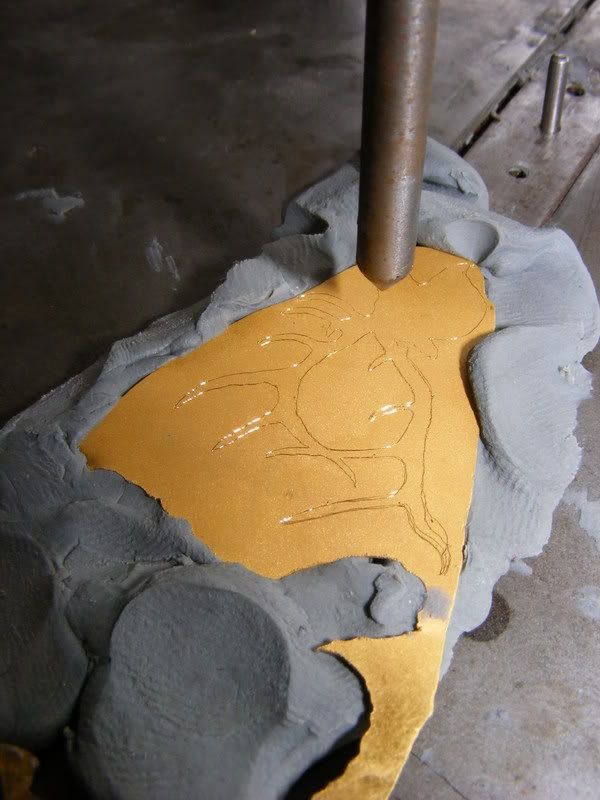
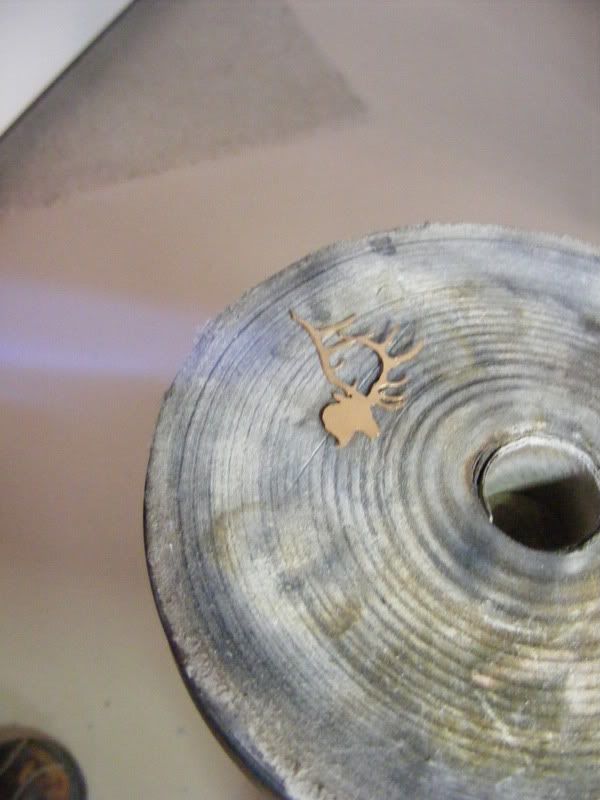
4 Then pantograph it on the 24k gold.

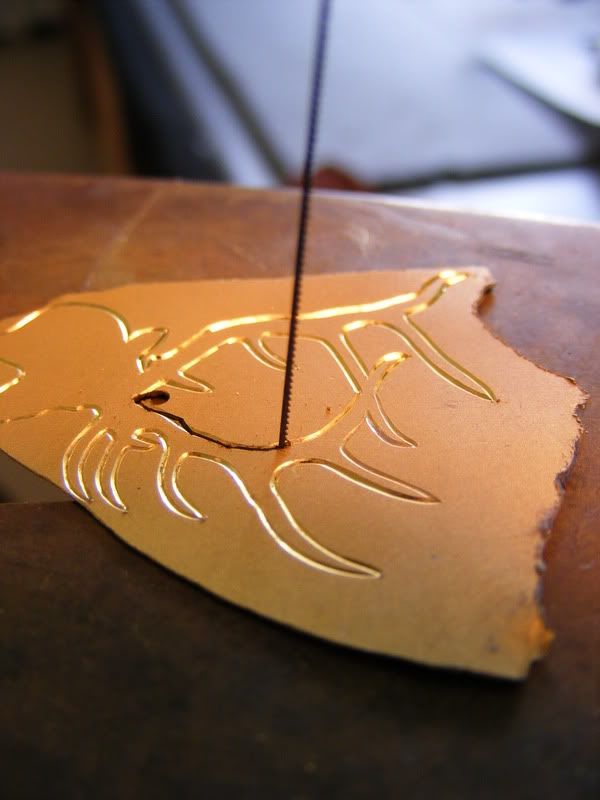
5 After that I cut a line around it to give the jewelers saw an easy path to follow.
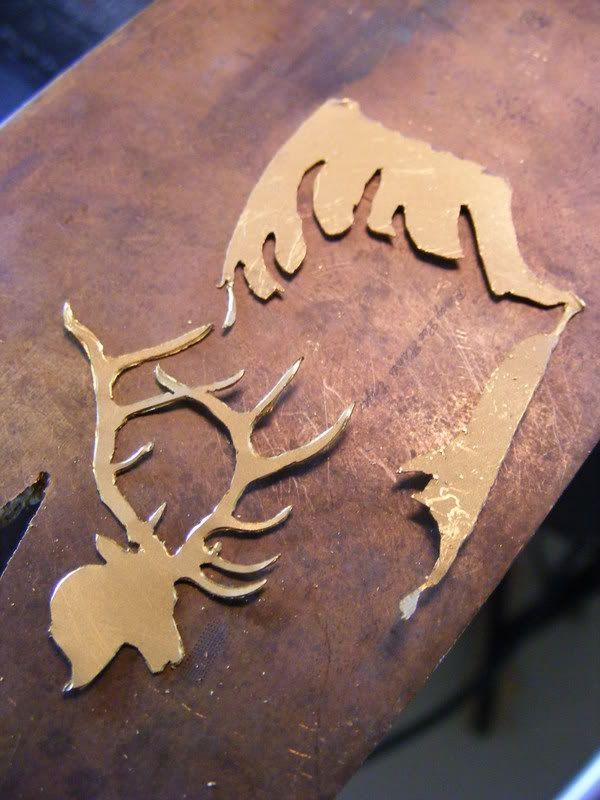
6 Next saw it out.

7 ready to be damascened.

8 raising a burr field inside the outline of the Elk.

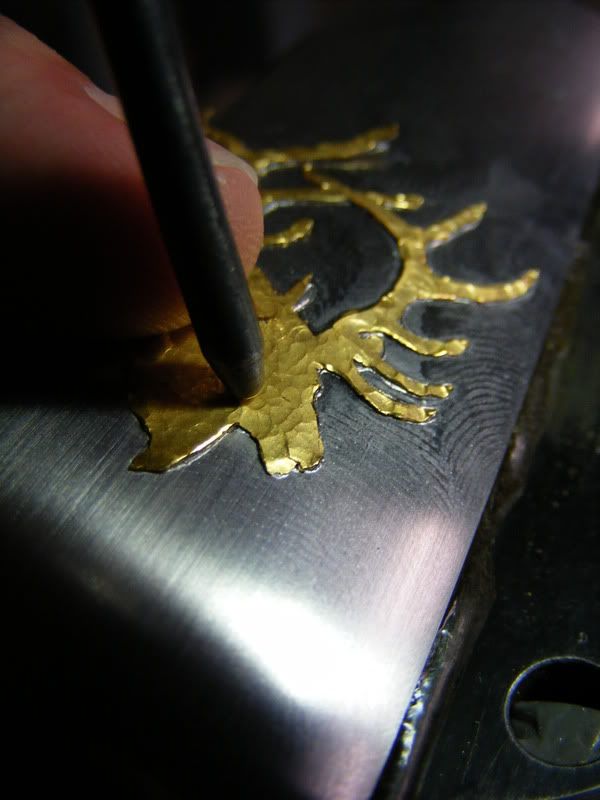
9 The gold is annealed.

10 I punch the Elk down, started at the farthest points, the antler tips etc, and work my way in, hammering away.

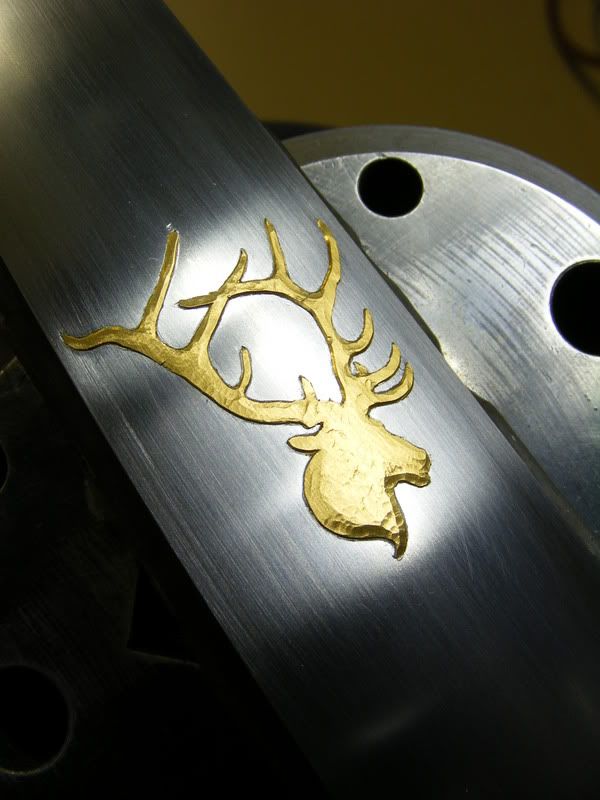
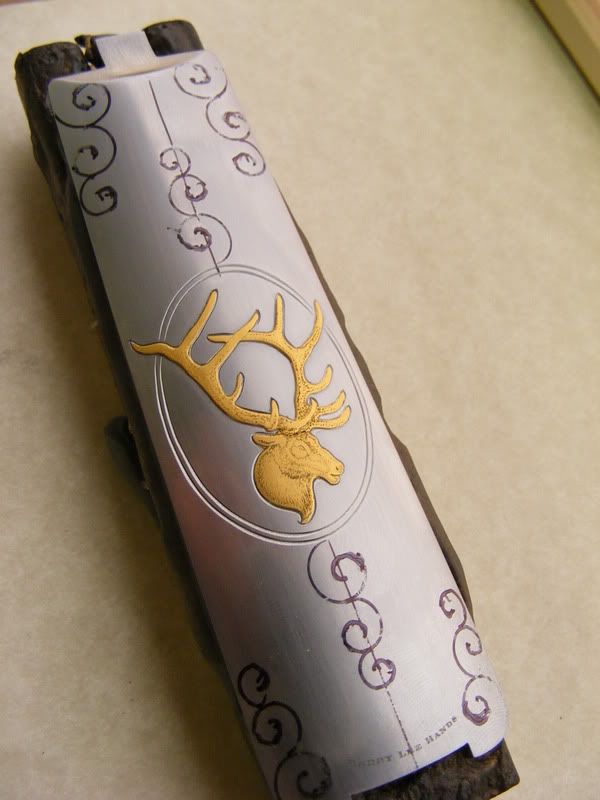
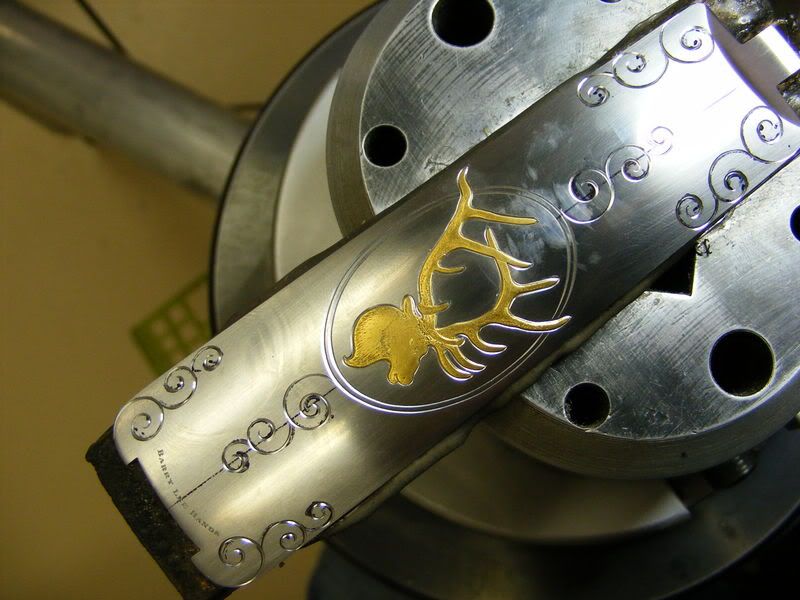
11 all punched down, next it is sanded with 600 grit backed by a rubber block.

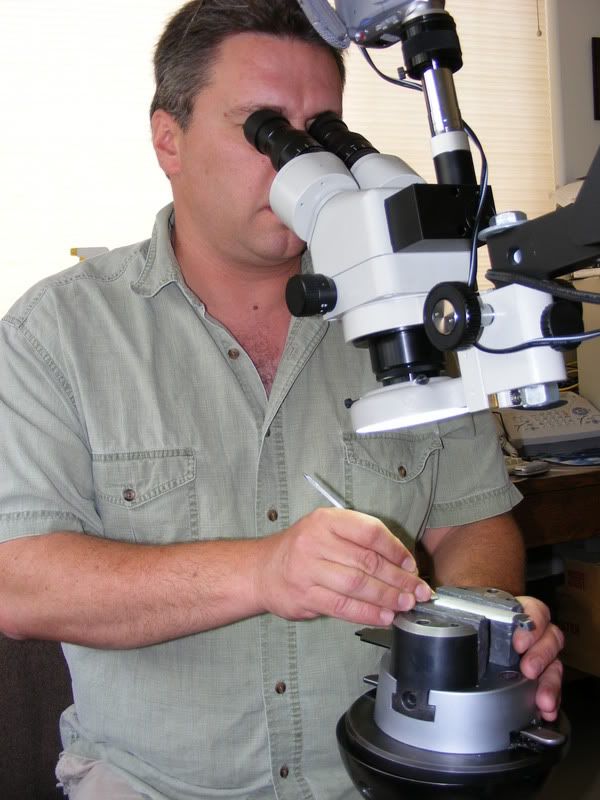
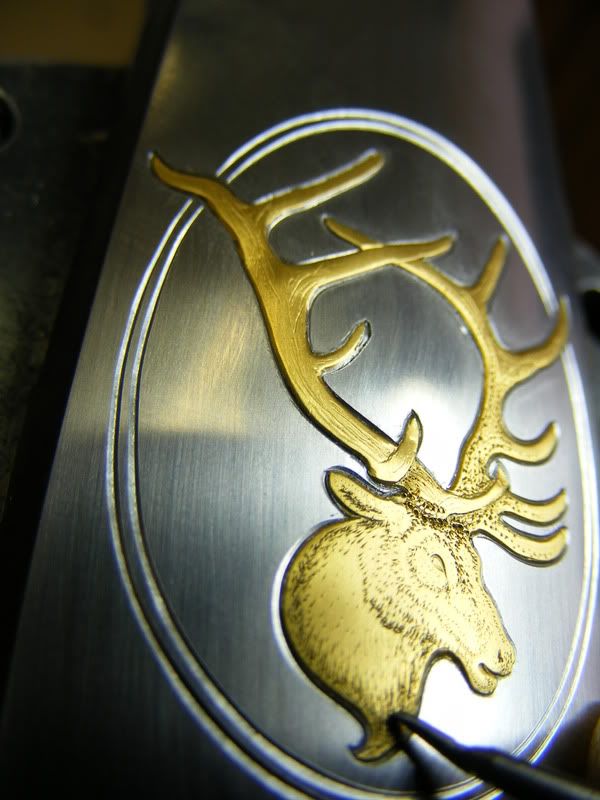
12 The Bulino is begun using a 70 degree tool with a lot of draft.

13 the scrolls are laid out.

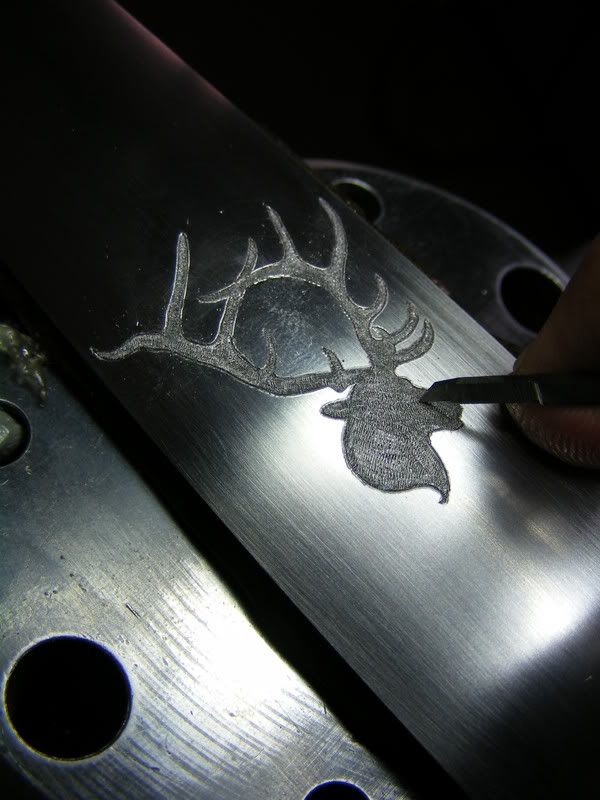
14 the scrolls are cut.

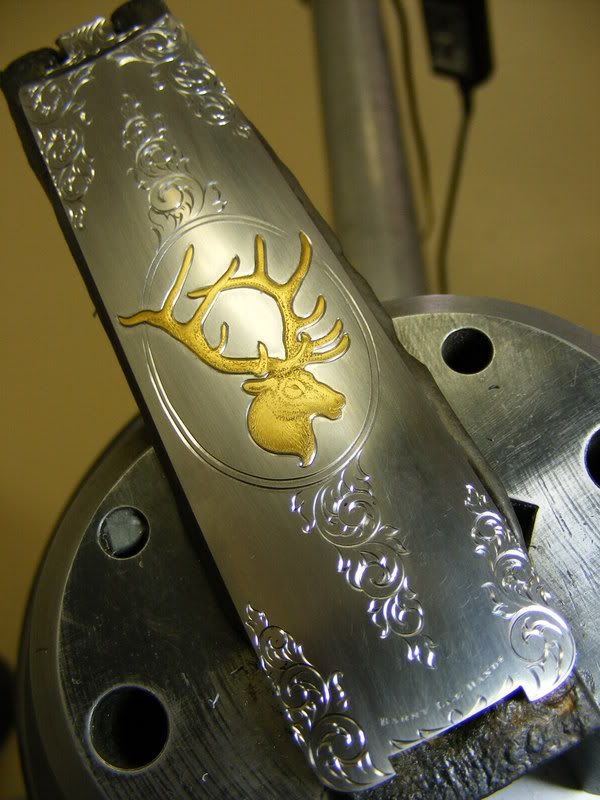
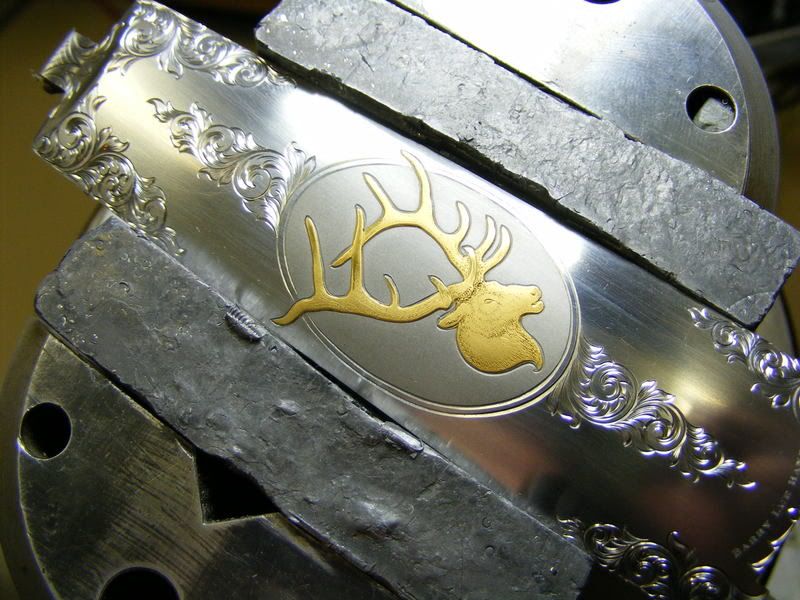
15 the leaves are cut

16 The backgound behind the elk is blasted with aluminum oxide.
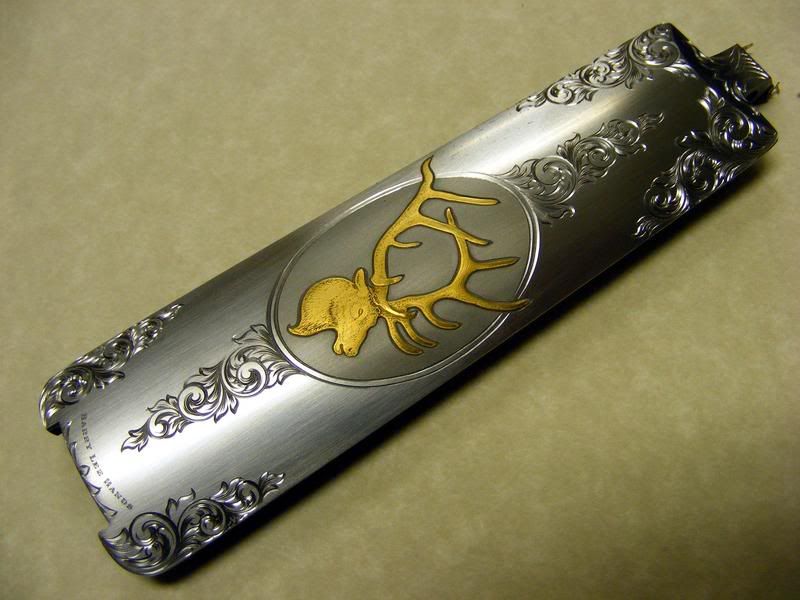
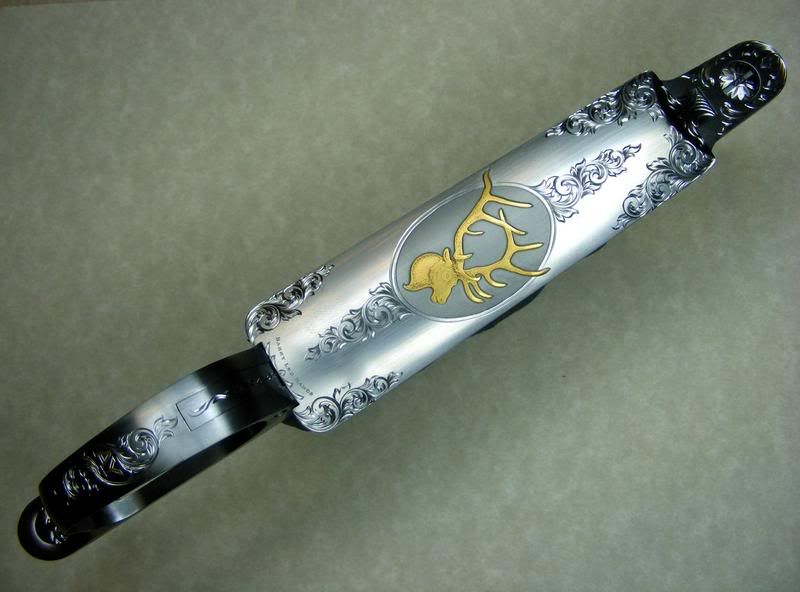
17 Finished.

18 The finished floorplate and triggerguard.
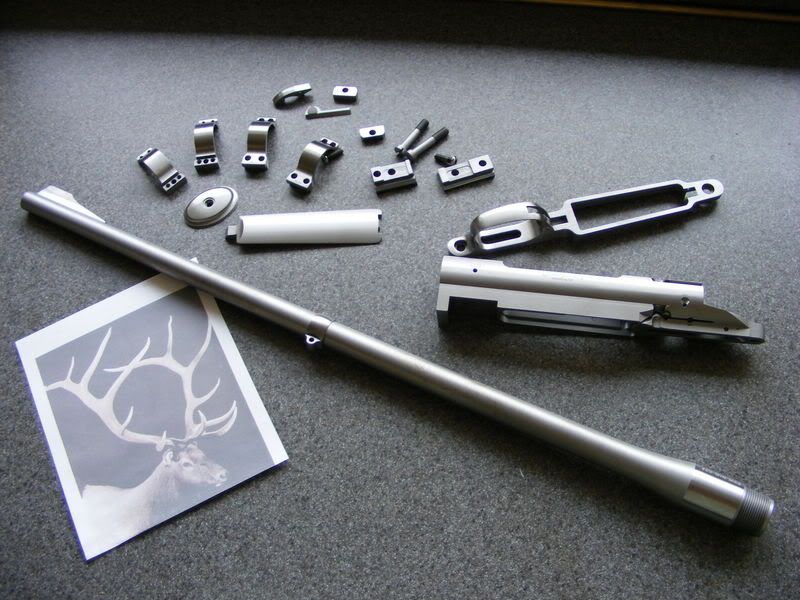


BrianPowley

~ Elite 1000 Member ~
Joined
Dec 7, 2006
Messages
1,805
Location
East Springfield, Ohio, United States
Barry....Great stuff! I appreciate the time it takes to set up for the individual "work in progress" photos.
I'm sure that added a ton of time to the project.
Thanks for taking the time to break it down for us!
Brian
 

Sam

Chief Administrator & Benevolent Dictator
Staff member
Joined
Nov 6, 2006
Messages
10,491
Location
Covington, Louisiana
Thanks for posting this series, Barry. I've added it to the Tips archive. / ~Sam
 

rod

~ Elite 1000 Member ~
Joined
Nov 19, 2006
Messages
1,609
Location
Mendocino. ca., and Scotland
Barry,

The excellent artistry and execution of your work is matched by the quality of your photography and your sense of what it takes to deliver a very fine tutorial. As has been said, the whole tutorial is like gold for us, thank you!

I notice your fine even cutting on curved surfaces. If you were cutting scroll backbones on a wide silver ring, say 20 mm diameter, and wish to maintain an even width of cut, what would be your graver shape of choice? When I use a 120 degree, I tend to get line width variation as I negotiate the rollycoaster ride of the scroll wrapping the steep curve. Do I just need more practice, or should I be trying, say, a 90 degree or other shape?

When I recycle gold left-overs, I usually melt them down in a hollow made in a charcoal block to form a small crucible, and follow an old tip of stirring the molten gold with a green twig fresh cut from a bush. Under the surface of the molten gold, the twig is yearning to burn, and it is said that it will draw oxygen from out of the gold helping to purify it. It is said the charcoal also helps keep the oxygen down. Using a green twig helps the wood to resist burning too fast above the surface of the molten gold. In my case I usually re-cast in a cuttle fish bone. Have you heard of the twig stirring thing? Do you think there is some merit in this?

Another idea, if you are ever working gold in the lathe. To save cleaning the lathe down meticulously so you can save the gold chips, I finally just leave the lathe as it is, put a thin transparent plastic bag over the workpiece, pierce my turning tool through the plastic bag and look through the plastic bag, as I do the turning. The gold cuttings stay inside of the bag, and are eventually recovered with ease, for re-melting.

best wishes

Rod
 

Karl Stubenvoll

Elite Cafe Member
Joined
Mar 3, 2007
Messages
103
Location
Fish Creek, WI
Barry,

When I recycle gold left-overs, I usually melt them down in a hollow made in a charcoal block to form a small crucible, and follow an old tip of stirring the molten gold with a green twig fresh cut from a bush. Under the surface of the molten gold, the twig is yearning to burn, and it is said that it will draw oxygen from out of the gold helping to purify it. It is said the charcoal also helps keep the oxygen down. Using a green twig helps the wood to resist burning too fast above the surface of the molten gold. In my case I usually re-cast in a cuttle fish bone. Have you heard of the twig stirring thing? Do you think there is some merit in this?

Rod

When you melt the gold, Rod, try a bit of boric acid as a flux to cover the molten gold. That will serve as an effective oxygen barrier. Your theory in the use of a green twig is correct, but the boric acid provides a more complete cover while the charcoal block scavanges the oxygen. A common practice among the copper smelters in the Keweenaw was to throw an entire green log into the copper melt for the final oxygen reduction. Just imagine the danger of molten copper splattering as the steam blasted out of that log.
 

Barry Lee Hands

~ Elite 1000 Member ~
Joined
Feb 7, 2007
Messages
1,272
Location
Las Vegas
Thanks my friends, and Sam, you old renegade, I am thrilled and flattered you are putting this in the tips Archive.
Rod, At the moment, just for a change of pace, I am cutting everything with the Lindsay patent geometry.
When the Lindsay patent point was first mentioned to me I was dismissive of it. I had made similar tools and thought of them simply as tools for cutting straight lines.
Then when I tried one at Reno last year I was suprised to find I liked it, but perhaps a little bit difficult to sharpen accurately and quickly. I generally sharpen freehand, and have for 30 years, except for the face, where I use a DG3 fixture. I found freehanding the parallel point I would have a failure every fourth time or so, and have to reface it which was shortening the tool life. I have my old school engraving habits and dislike wasting tool steel.
Then I got a Hamler fixture and that helped the sharpening, and recently I began using a new sharpening fixture prototype which is being released soon called the Lindsay Universal. It is so simple to use I can resharpen a Lindsay parallel point in 20 seconds or so, face and belly.
To make a long story short, I am using the Lindsay Parallel for everything at the moment and if I was cutting a strongly radiused item, I would use it.
Someday I will probably get bored with the point I am using now and switch to something else, just for the challenge and fun of it. I used to cut my scroll lines with a Lynton style 90, then cut the leaves and veins with a flat and then cut the shading with a 70, and that approach still has merits.
I think in theory a 90 or 70 has some advantages for radiused things, but in application I can't recall having changed points specifically for that reason. The advantage of a 110 or 120 is that you can vary the width without varying depth much, and once you learn to control it, you might find, as I have that it is in fact easier and more versatile.
I have very crude methods of melting gold. Often I send the scrap to the mill and order new stuff, espescially with the standard alloys.
When I am remelting 24k or mixing an alloy for color, I just toss it on an asbestos or charcoal block and melt it with propane. If it is being difficult I take it to a jeweler friend and melt it in his ceramic crucible.
I have tried many ways, but never the green stick, if it works, use it.
Your lathe trick sounds good, I have not had occasion to turn gold on the Lathe.

Joe, the gold is .005, which is plenty thick for this type of work. Damascening is not equivelent to inlaying, you use thinner material generally.
 
Last edited:

Weldon47

~ Elite 1000 Member ~
Joined
Dec 9, 2006
Messages
1,412
Location
Welfare, Texas
Barry,

Excellent work! (As always!!) I appreciate you taking the time to shoot the pics while you are working. I know how much that can take & you sure did a fine job of it.
Thanks for sharing,

Weldon
 

John B.

Lifetime Pledge Member
::::Pledge Member::::
Joined
Nov 9, 2006
Messages
3,956
Location
Los Angeles area, California.
Another great tutorial together with fine pictures.
Thank you very much for freely sharing your skill.
And thank you Sam for preserving it in the archives for future study.
Best, John B.
 

Mike Cirelli

~ Elite 1000 Member ~
Joined
Nov 8, 2006
Messages
1,690
Location
Western PA
Very good Barry. It's nice to watch the work in progress. If you soldering block is an old asbestos one I think it's time to toss it even if you only use it for annealing.
 

Andrew Biggs

Moderator
Joined
Nov 10, 2006
Messages
5,034
Location
Christchurch, New Zealand
Hi Barry

Your mini tutorials are fantastic. Clear photos and really interesting. You seem to capture in a handful of photos a book full of words...................keep 'em coming.

Cheers
Andrew
 

Latest posts

Sponsors

Top