
Terrezar
Elite Cafe Member
Hello, everyboddy! At first, allow me to intruduce myself. I am a 18 year old knifemaker from Norway, and lately I have taken up engraving with the purpose of decorating my knives. I'll maby post some pictures of my work later, bot today I wanted to share some of my homemade toys with you, so here we go.
I guess I always did enjoy making things myself, and now I have discovered that I truly enjoy making my own tools. I take pride in using tools that I made myself, and of course, making tools yourselves is often a prosess that's kinder on funds than just buying them.
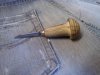
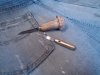
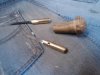
The first thing I want to show you is my graver. I only push-engrave, beeing as I was advised to learn that technique before I try air-assisted, it is also a queston of price, of course.
The handle is turned out of birch, and the burs are screwd into pieces of a brass rod with a set-screw. At the tip of the brass-pieces i have made a 120 degree angle to fit it in my dual angle shapening fixture (If you are new to engraving, do buy one of those. Tried to make one, did not end well.) The burs can easely be taken out of the handle and plased in the fixture to be resharpent, or to be replased by another bur.
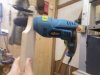
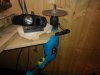
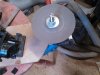
The second treat I got today is my homemade sharper. For a while I used stones, and recently I have used disks fitted in my drill press. However, a few days ago I grew tierd and desited to make my own sharper. I made the system by taking an inexpensive drill and fitted it in a plank in a way that ensured that the chuck runs evenly compared to the plank. Then I fitted a treaded bolt in the chuck and put a nut on the bolt. (Nuts are ofthen uneven. To even them, put a treaded bolt in your drill press and fasten the nut at the bottom of the bolt. Place abrassive paper on the litte "table" on the drill press and let the nut even itself against the table.) I used a 1,5mm brass plate that I made into a disk and plased it on top of the nut with the bolt running trough it. Onto the plate I put silver tape to make friction. The plate were fitted to the nut with tin.
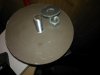
For discs I glued abrassive paper to CDs, being as it is cheap and good enough. I locked the CDs in place with a small disk fitted with several layers of tape for friction, and sealed it all with a nut.
If you at any point gets toss in the disk and it starts to wobble then here is what you should do: Take the disk and make sure it is smooth and even, If this is not the problem lay it directely on top of the drill-chuck and then put the bolt through it and into the chuck. Thighten the chuck and seal it all with a small disk with a little rubber tape on it, and thinhten it with a nut. The disk wil have more support this way, and wil wobble far less.
Final count of cost for the sharpener is a little below 400Kr, less than a tenth of what a power hone would have cost me. Still, my system has all the qualities of a hone, included variable speed.
Hope this can be helpful to some of you, and many thanks to all the posters. This forum realy is great!
I guess I always did enjoy making things myself, and now I have discovered that I truly enjoy making my own tools. I take pride in using tools that I made myself, and of course, making tools yourselves is often a prosess that's kinder on funds than just buying them.
The first thing I want to show you is my graver. I only push-engrave, beeing as I was advised to learn that technique before I try air-assisted, it is also a queston of price, of course.
The handle is turned out of birch, and the burs are screwd into pieces of a brass rod with a set-screw. At the tip of the brass-pieces i have made a 120 degree angle to fit it in my dual angle shapening fixture (If you are new to engraving, do buy one of those. Tried to make one, did not end well.) The burs can easely be taken out of the handle and plased in the fixture to be resharpent, or to be replased by another bur.
The second treat I got today is my homemade sharper. For a while I used stones, and recently I have used disks fitted in my drill press. However, a few days ago I grew tierd and desited to make my own sharper. I made the system by taking an inexpensive drill and fitted it in a plank in a way that ensured that the chuck runs evenly compared to the plank. Then I fitted a treaded bolt in the chuck and put a nut on the bolt. (Nuts are ofthen uneven. To even them, put a treaded bolt in your drill press and fasten the nut at the bottom of the bolt. Place abrassive paper on the litte "table" on the drill press and let the nut even itself against the table.) I used a 1,5mm brass plate that I made into a disk and plased it on top of the nut with the bolt running trough it. Onto the plate I put silver tape to make friction. The plate were fitted to the nut with tin.
For discs I glued abrassive paper to CDs, being as it is cheap and good enough. I locked the CDs in place with a small disk fitted with several layers of tape for friction, and sealed it all with a nut.
If you at any point gets toss in the disk and it starts to wobble then here is what you should do: Take the disk and make sure it is smooth and even, If this is not the problem lay it directely on top of the drill-chuck and then put the bolt through it and into the chuck. Thighten the chuck and seal it all with a small disk with a little rubber tape on it, and thinhten it with a nut. The disk wil have more support this way, and wil wobble far less.
Final count of cost for the sharpener is a little below 400Kr, less than a tenth of what a power hone would have cost me. Still, my system has all the qualities of a hone, included variable speed.
Hope this can be helpful to some of you, and many thanks to all the posters. This forum realy is great!
Attachments
-
 WP_000242.jpg74.4 KB · Views: 684
 -
 WP_000225.jpg100.5 KB · Views: 693
 -
 WP_000240.jpg37.4 KB · Views: 679
 -
 WP_000222.jpg62.1 KB · Views: 678
 -
 WP_000221.jpg73.2 KB · Views: 674
 -
 WP_000232.jpg70.4 KB · Views: 673
 -
 WP_000228.jpg84 KB · Views: 679
 -
 WP_000230.jpg87.6 KB · Views: 675
 -
 WP_000229.jpg68.3 KB · Views: 683
Last edited:


