KCSteve
~ Elite 1000 Member ~
Small Object Photography Tutorial
Steven L. Van Dyke
All right, here's the deal. You've got some small object (usually shiny just to make it tougher) that you want to get some decent pictures of. You go outside and lay it on some nice background to take a picture.

There are only two things that you need to control to get good pictures - the light and keeping things still.
The light was bright enough that a hand held shot was steady enough with my regular lens. Now I got lucky (both good and bad for my purposes) when I was taking the pictures for this tutorial in that it was overcast. That gave me the nice, even light you want to have when you do this rather than the bright sunlight you're more likely to have to deal with. That gave me better pictures but makes it hard to show you more of the problems. Ah well, I'm sure you've got some of your own where you couldn't shoot straight down on the object because your big fat shadow got in the way. So instead you got off to the side or one end to shoot and you had two big problems.
#1) It's not square anymore. This is called 'keystoning' and refers the the nearer part looking wider than the far end - your rectangle turns into the shape of the keystone of an arch. With digital pictures there's software that can help fix this for you if you can't avoid it.
#2) It's at least partly out of focus - sometimes a lot of it is out of focus. This is because when you focus your camera it's focused at a certain distance - they call this the 'focal plane' of the image. Ideally your object is complety in this focal plane and all lined up with it like these two lines: (camera's focal plane) | | (surface of the object). The camera is aimed at a 'point' (plane) but things a bit in front of and behind that point will still be in focus. This is good because often your small (shiny) object isn't flat so you get this: (camera's focal plane) | < (surface of the object). If the depth of field (how much in front of and behind the focus point is in focus) isn't as deep as the object then you have to choose what parts are going to be out of focus (or at least try to with a point & pixelate camera).
So as I said I was lucky enough to have a cloudy day with nice smooth light. Take my nice camera with my regular lens to get the pictures and get this:


Not too bad, but I can't fill the frame with the object. This lens won't focus closely enough. There's a hint of keystoning too but since I was shooting a bit from the left side (I rotated the images later) it's not as obvious as if I shot from the top or bottom.
So what can you do about all of this?
Lots
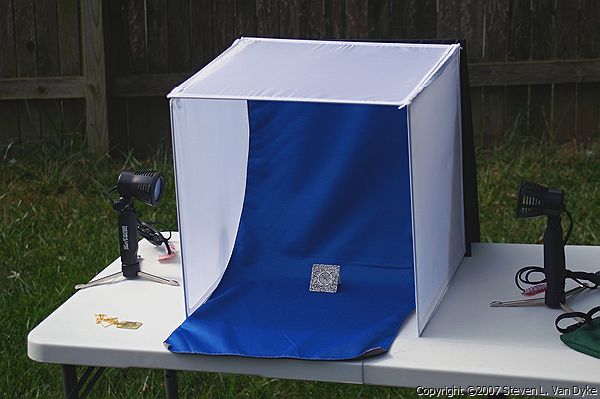
I hauled out some example gear to show some of the ways you can do these pictures 'right' (a highly variable goal). I've been doing photography for over 10 years now and I have an ever-indulgent wife so I've got lots of fun toys.

Steven L. Van Dyke
All right, here's the deal. You've got some small object (usually shiny just to make it tougher) that you want to get some decent pictures of. You go outside and lay it on some nice background to take a picture.
There are only two things that you need to control to get good pictures - the light and keeping things still.
The light was bright enough that a hand held shot was steady enough with my regular lens. Now I got lucky (both good and bad for my purposes) when I was taking the pictures for this tutorial in that it was overcast. That gave me the nice, even light you want to have when you do this rather than the bright sunlight you're more likely to have to deal with. That gave me better pictures but makes it hard to show you more of the problems. Ah well, I'm sure you've got some of your own where you couldn't shoot straight down on the object because your big fat shadow got in the way. So instead you got off to the side or one end to shoot and you had two big problems.
#1) It's not square anymore. This is called 'keystoning' and refers the the nearer part looking wider than the far end - your rectangle turns into the shape of the keystone of an arch. With digital pictures there's software that can help fix this for you if you can't avoid it.
#2) It's at least partly out of focus - sometimes a lot of it is out of focus. This is because when you focus your camera it's focused at a certain distance - they call this the 'focal plane' of the image. Ideally your object is complety in this focal plane and all lined up with it like these two lines: (camera's focal plane) | | (surface of the object). The camera is aimed at a 'point' (plane) but things a bit in front of and behind that point will still be in focus. This is good because often your small (shiny) object isn't flat so you get this: (camera's focal plane) | < (surface of the object). If the depth of field (how much in front of and behind the focus point is in focus) isn't as deep as the object then you have to choose what parts are going to be out of focus (or at least try to with a point & pixelate camera).
So as I said I was lucky enough to have a cloudy day with nice smooth light. Take my nice camera with my regular lens to get the pictures and get this:
Not too bad, but I can't fill the frame with the object. This lens won't focus closely enough. There's a hint of keystoning too but since I was shooting a bit from the left side (I rotated the images later) it's not as obvious as if I shot from the top or bottom.
So what can you do about all of this?
Lots
I hauled out some example gear to show some of the ways you can do these pictures 'right' (a highly variable goal). I've been doing photography for over 10 years now and I have an ever-indulgent wife so I've got lots of fun toys.