
rod
~ Elite 1000 Member ~
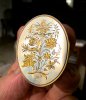
I am getting a bit better with this technique, and trying this time for some finer detail by interpreting a very nice 19th century line drawing with a gilded flare cut approach.
The photo is big enough to teach me some lessons on what to look for in my next attempt:
Notice that the photo shows very clearly, that I need to do just a little more top surface sanding (with 2000 grit paper). The surface is so shiny, it is hard to see the remaining gold, but it is very clear in the photo. You can also see small areas where the flare cuts were not deep enough to avoid the sand paper. It is essential to lap the silver plate truly flat, before you commence engraving, and I mean flat to .001 inches. This way, the nickel and gold gilding will be sanded off in a few moments, slightly non flat plates will need too much sanding and your flare cuts will be partly eliminated.
Most flare cuts are done with a bright inward inclining cut on the left, then another on the right to make a 'mountain ridge' with a sharp top, but actually the mountain ridge is all below the surface. Do not cut this so that the sharp top edge is exactly level with the top surface, otherwise your sanding will start to remove the ridge top. Instead.... and this is important.... overdo the lean and width of the bright cuts on each side, so they actually overlap. This ensures that the resulting ridge top is safely below the surface level, and so is safe from sanding which would otherwise remove the gilding on the ridge top. Similarly, with those scooped leaf cuts done with a round graver, make sure they overlap into the bounding bright flat cuts, then all the elements are low to the surface and the gilding will remain untouched.
Now, a word on the preparation of the silver oval:
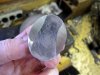
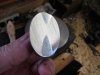
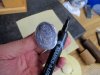
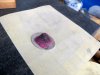
To flatten your oval plate, a good approach is to put a dob of modeling clay on the back side, as a hand hold, and lap it down on a 600 grit, 5 inch diamond disc lap, as used to sharpen your gravers. As you do this, have a smooth paint brush in contact with the wheel to sweep granules of silver clear. This prevents scratches. See some photos below showing the procedure. I then move to various grades of sand paper, down to 2000 grit, and this is done on my granite surface table. Using only sand papers on a glass surface will also do a good job. The flattening takes about ten minutes from start to finish.
The photos are not quite in order, but I think self explanatory. When you get down pretty flat, use a Magic Marker to blacken the surface, if the black can be sanded off, all over, in a few seconds, then the silver plate is very flat, and ready to engrave.
By the way, the border is made by a deep round graver cut, after which the same round graver is hand wriggled. If some of your flat graver wriggled cuts are not quite following the line you intended, have a try with this approach. Cutting the rounded ditch first, you can concentrate fully on getting an accurate line, after which the round graver wriggle is constrained to stay in the groove. But do not give up on smooth flat-graver wriggles!
Rod
The photo is big enough to teach me some lessons on what to look for in my next attempt:
Notice that the photo shows very clearly, that I need to do just a little more top surface sanding (with 2000 grit paper). The surface is so shiny, it is hard to see the remaining gold, but it is very clear in the photo. You can also see small areas where the flare cuts were not deep enough to avoid the sand paper. It is essential to lap the silver plate truly flat, before you commence engraving, and I mean flat to .001 inches. This way, the nickel and gold gilding will be sanded off in a few moments, slightly non flat plates will need too much sanding and your flare cuts will be partly eliminated.
Most flare cuts are done with a bright inward inclining cut on the left, then another on the right to make a 'mountain ridge' with a sharp top, but actually the mountain ridge is all below the surface. Do not cut this so that the sharp top edge is exactly level with the top surface, otherwise your sanding will start to remove the ridge top. Instead.... and this is important.... overdo the lean and width of the bright cuts on each side, so they actually overlap. This ensures that the resulting ridge top is safely below the surface level, and so is safe from sanding which would otherwise remove the gilding on the ridge top. Similarly, with those scooped leaf cuts done with a round graver, make sure they overlap into the bounding bright flat cuts, then all the elements are low to the surface and the gilding will remain untouched.
Now, a word on the preparation of the silver oval:
To flatten your oval plate, a good approach is to put a dob of modeling clay on the back side, as a hand hold, and lap it down on a 600 grit, 5 inch diamond disc lap, as used to sharpen your gravers. As you do this, have a smooth paint brush in contact with the wheel to sweep granules of silver clear. This prevents scratches. See some photos below showing the procedure. I then move to various grades of sand paper, down to 2000 grit, and this is done on my granite surface table. Using only sand papers on a glass surface will also do a good job. The flattening takes about ten minutes from start to finish.
The photos are not quite in order, but I think self explanatory. When you get down pretty flat, use a Magic Marker to blacken the surface, if the black can be sanded off, all over, in a few seconds, then the silver plate is very flat, and ready to engrave.
By the way, the border is made by a deep round graver cut, after which the same round graver is hand wriggled. If some of your flat graver wriggled cuts are not quite following the line you intended, have a try with this approach. Cutting the rounded ditch first, you can concentrate fully on getting an accurate line, after which the round graver wriggle is constrained to stay in the groove. But do not give up on smooth flat-graver wriggles!
Rod
Attachments
-
 pendant silver:gold.jpg107.5 KB · Views: 261
 -
 IMG_4507.jpg59.5 KB · Views: 256
 -
 IMG_4509.jpg45.5 KB · Views: 255
 -
 IMG_4510.jpg35.4 KB · Views: 254
 -
 IMG_4516.jpg44.7 KB · Views: 253
 -
 IMG_4511.jpg45.5 KB · Views: 252
Last edited:
")


