The importance of beveling cuts

Arnaud Van Tilburgh

~ Elite 1000 Member ~
Joined
Oct 3, 2008
Messages
4,221
Location
Belgium
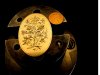
Sam , I'm working on that to find out. My experience so far is that using a 120° on a ring doesn't allow to make deeper cuts and leaving enough space for the shading at the same time. A 100° makes a lot of difference. Yes the main cuts are less wide and don't show much flair in the cuts, but there is more space for the shading and the cuts remain longer as they are deeper

arnaud
 

Chujybear

~ Elite 1000 Member ~
Joined
Nov 3, 2011
Messages
1,079
Location
Haida Gwaii
Sam, do you think this is also important on jewellery (small scrolls) as this way there is less space left for shading. I hope I make myself clear.

arnaud

Hello Arnaud,
You should have all the room that you have planned for shading
The reason: when you plan your cuts your tip is away from the outline of your leaf. The bevel rises up to meet the edge of your leaf. So what you lose is from your negative space (background).
Does that make sense? It is not like lining your whole desighn with a perpendicular grip. The tool turns to make those banking cuts, but (if I understand) the actual cuts shouldnt be signifficantly wider than cut straight. And Deffinately won't stray into the area reserved for shading.
I hope that's what you were wondering. That's a lot of words for a hunt and peck guy like me.
 

Kerry Bogan

Member
Joined
Nov 13, 2006
Messages
91
Location
Harmony, Maine
Jim Small does some beautiful high relief engraving. He cuts his outline and then does the background removal and stipples or lines or smooths the background. Then he re-cuts the bevel very slightly which leaves a crisp border where the bevel meets the background, it also removes any marks cutting the background might have left (as Sam Said). I do it this way now and it doesn't add much time but I like the contrast it gives between the background and the engraving.
Kerry
 

Arnaud Van Tilburgh

~ Elite 1000 Member ~
Joined
Oct 3, 2008
Messages
4,221
Location
Belgium
Chujybear, yes makes a lot of sense, it is about cutting to the line instead of cutting on the line, Indeed the deepest part of a cut is within the negative space.

arnaud
 

rod

~ Elite 1000 Member ~
Joined
Nov 19, 2006
Messages
1,609
Location
Mendocino. ca., and Scotland
[QUOTE
"how is exactly the " flare cutting" sorry but some technical words are difficult to understand for me sometime, someone can explain to me it maybe with a photo example?"

Paulo,

Flare cut is simply put, bright cut with a flat graver on the left side, then bright cut again from the right side. This give something like the ridge of a mountain, but all below the surface, however it looks like it is standing above the surface. I am sometimes gilding the result, gold plate everything, then use 2000 grit sandpaper to remove the gold from the top negative space.
In this photo of a practice plate, something went wrong with my gilding, on copper, but it gives you an idea?

All cuts with a flat graver, 40 front angle, 25 degree heel with a rounded underbelly extending about 3mm back.

This is a practice plate I did yesterday, an interpretation of an 19th century drawing I got from Sam W...thank you!


Rod
 

Attachments

  • rr.jpg
    rr.jpg
    67.4 KB · Views: 479
Last edited:

Mike Dubber

Elite Cafe Member
Joined
Nov 10, 2006
Messages
424
Location
Evansville, IN
This illustrates perfectly the very reason we included the Casting of the Steel Master Plates in the Dubber/Schowe Transfer Kits©. Advanced engravers understand the reasons for beveling the cut, and you can see the effect has on thier work. It is typical to see beginners cut "flat," the work has no sparkle, no life, and it falls short of expressing the artistic richness of the advanced engraver's work. When you include beveling with effective backgound and detail, the work begins to take on the look we are all striving for.

I also agree that the flat graver is a wonderful tool - but most of my beveling is done with the 120.
 

mrthe

Moderator
Joined
Oct 20, 2010
Messages
1,787
Location
Spain
Hey Rod! Thank you very much for your info,your plate look great,i will try this tecnique,thank you to take the time to show the photo!

Sam will be great have video tutorials about all this types of cuts,maybe this post can inspire another instructional DVD ? ;)

Like Mike say for advanced engravers is something simple to understand but for the beguinners will be great have a guide in how do better ours works!
 

unclejim1955

Elite Cafe Member
Joined
Jan 14, 2011
Messages
128
Location
Spanish Fork, Utah
Sam, thanks for the thread. Do you make straight cuts, blacken the background and then flare cut? I did a bracelet and the flare cut really made it pop, then when I blacked it, I just ended up with really wide black lines.
 

Sam

Chief Administrator & Benevolent Dictator
Staff member
Joined
Nov 6, 2006
Messages
10,491
Location
Covington, Louisiana
You're welcome, guys. :)

Rod: That's a beautifully done piece! That would look great framed an hanging on the wall.

UncleJim: Those are the initial cuts I make when engraving the design, not a re-cut done afterward. I stipple my backgrounds deeply and thoroughly so they hold blackening very well. Sometimes the flare cuts will blacken and require a bit a cleaning with a toothpick under the scope.
 

dlilazteca

~ Elite 1000 Member ~
Joined
May 10, 2013
Messages
2,659
Location
Laredo, Texas
Bringing this back for newbs like me...I love the search button! So much knowledge out there all you have to do is use the search button.

Carlos De La O III
 

Sam

Chief Administrator & Benevolent Dictator
Staff member
Joined
Nov 6, 2006
Messages
10,491
Location
Covington, Louisiana
I thought I'd bump this thread to the top since the discussion of character of cuts was being discussed in Phil Coggan's thread and I didn't want to hijack it.
 

Latest posts

Sponsors

Top