Help, please: Advice removing rust pits and bad design

Douglas

Member
Joined
Aug 18, 2010
Messages
88
Location
Nevada and Wyoming
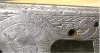
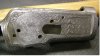
The gunsmith I use has 1873 Winchester, he asked me to clean up scrolls and Animal engraving. The gun has a fair amount of pitting from rust. He wants to make the deer that was engraved to look more like a deer than a stick figure, and the scrolls deepened. The gun is not complete so it will never be original some key pieces will be replaced. I’m looking for some advice on to how the remove the deer and some of the major pits.
 

JJ Roberts

:::Pledge Member:::
::::Pledge Member::::
Joined
Nov 10, 2006
Messages
3,450
Location
Manassas, VA
Doug,Some good pictures would help,this may be some thing you want to stay away from.J.J.
 

BrianPowley

~ Elite 1000 Member ~
Joined
Dec 7, 2006
Messages
1,805
Location
East Springfield, Ohio, United States
Sometimes, instead of sanding everything down to remove the rust:
I find it simpler to just use my 850 air grinder with a .5mm round bur to clean out the pit and then just inlay soft iron wire. Burnish/sand smooth.
Kinda like the way a dentist fills a cavity in your tooth.
I'm told that you might have to spot anneal the area to prevent the bluing salts from creating an off-color dot.
Engraving through the iron is pretty easy too.
 

Ed Westerly

~ Elite 1000 Member ~
Joined
Mar 16, 2011
Messages
1,224
Location
southern California
I have to agree with JJ on this one. I need to see pictures. (this is not to say that Brian is wrong, just that some things are better left alone if things have gotten too far from new.)
 

JJ Roberts

:::Pledge Member:::
::::Pledge Member::::
Joined
Nov 10, 2006
Messages
3,450
Location
Manassas, VA
Bruce,The question came up on the other forum about engraving through pitting and bluing, one would think that would be a no brainer.Newbies help is on the way,just ask.J.J.
 

Douglas

Member
Joined
Aug 18, 2010
Messages
88
Location
Nevada and Wyoming
These are the pictures of the 1892 he has but it has the same pitting and design
 

Attachments

  • 1892-2.jpg
    1892-2.jpg
    112.8 KB · Views: 350
  • 1892-1.jpg
    1892-1.jpg
    116.6 KB · Views: 346

JJ Roberts

:::Pledge Member:::
::::Pledge Member::::
Joined
Nov 10, 2006
Messages
3,450
Location
Manassas, VA
Doug,I would stay away from this pitted Winchester it's to far gone.The pitting is to deep.J.J.
 

Crazy Horse

Elite Cafe Member
Joined
Nov 9, 2006
Messages
580
Location
Philly
You might have to start with 80 grit emery. I'd think twice before taking on this relic.
 

GTJC460

~ Elite 1000 Member ~
Joined
Mar 24, 2010
Messages
1,327
Location
Tullahoma TN
Are you familiar with any good jewelers? Those cavaties and pits can be filled with a laser welder. Then you can either stone or sand down the surface.

It's going to take alot of time to fill all those pits. Plan your price accordingly!
 

JJ Roberts

:::Pledge Member:::
::::Pledge Member::::
Joined
Nov 10, 2006
Messages
3,450
Location
Manassas, VA
Just use it for paper weight,the time spent on this pitted gun is really foolish. Crazy Horse I think you may want to start with surface grinder.J.J.
 
Last edited:

tundratrekers@mtaonline.n

Elite Cafe Member
Joined
Oct 15, 2008
Messages
663
Location
alaska
That surface is so rough,i would bet it could be completely overlaid with fine gold sheet,with out cross hatching the surface.
Are you familiar with any good jewelers? Those cavaties and pits can be filled with a laser welder. Then you can either stone or sand down the surface.

It's going to take alot of time to fill all those pits. Plan your price accordingly!
 

Arnaud Van Tilburgh

~ Elite 1000 Member ~
Joined
Oct 3, 2008
Messages
4,221
Location
Belgium
Couldn’t it be an option to file and sandpapering it to remove the damage and then recutting that what is left?
I know it would take some time, so only worth if this is a valuable piece. The engraving doesn’t look like a nice engraving, looks more like a “stamp”. But the cuts can’t be that deep, sure deeper than the scratches itself.
Being a goldsmith I know what it is to remove scratches, can’t be that hard unless if you remove say 0.3 mm from the surface, the whole thing becomes too small.

arnaud
 

Crazy Horse

Elite Cafe Member
Joined
Nov 9, 2006
Messages
580
Location
Philly
From the looksof those pits it would take a very long time to draw file it down by hand. J.J. is correct; one would need to place it on a surface grinder to eliminate all of those pits.
 

Ed Westerly

~ Elite 1000 Member ~
Joined
Mar 16, 2011
Messages
1,224
Location
southern California
If the '73 is in the same shape, I would probably pass, as the side plates will be thin when you get done. Probably too thin. The '92 is more salvagable, but will take a lot of work, and you will have to charge what will seem like too much to be able to make your time worthwhile. This is a project that would be termed a "labor of love". In other words, the engraver or the owner has to have a deep emotional attachment to the piece to make it viable. The project probably has no commercial upside. Sorry.
 

Douglas

Member
Joined
Aug 18, 2010
Messages
88
Location
Nevada and Wyoming
Thanks all for the feed back
Because this project is a collaborative effort with the gunsmith and will use this as a learning lesson, the labor is not a concern, (this is not my day job) the time invested will be well spent. Learning the processes is my goal. I get request to do and help on various project and have turn them away in the past, but this project with the age of these guns I felt would be a challenge and fun.

I may add the 1873 is by far in better condition I have the side plates already complete and almost completed with 1 side of the receiver. The 1892 looked from the start to be more challenging piece.

When it’s complete I will post he before and after pictures
 

Christopher Malouf

~ Elite 1000 Member ~
Joined
Jun 19, 2007
Messages
2,037
Location
5mi from the nearest Dunkin Donuts in Tennessee
It's great that you can go forward with this project. Being able to afford to do it is a precious thing as an old shooter like this would most likely end up parted out or maybe even worse. A similar conversation, with a customer, indirectly through my gunsmith yielded the same financial sentiments previously stated ... basically, if it isn't documented to be the rifle used to shoot Lucky Ned Pepper in the meadow then it is better to let it go. :)

Here's a way to proceed to preserve as much of the original material as possible ....

Take a smoke pull of the engraving and possibly a casting to get the correct depth of the engraving. Not crucially important in this case but a casting will also reveal the hammer stroke marks left by the chisel if there are any visible.

Use finishing files to take the metal down evenly. Go down as far as you can to remove the light pitting. At this point there will be only a few really deep pits left and maybe 10 to 20 percent of the engraving remaining.

For the remaining deep pits, you can use either a jeweler's laser welder as mentioned previously or a TIG welder. For the laser welder, shave pieces of steel off the underside/inside of the upper/lower tang so the replacement metal to fill the pits is exactly the same. Use these pieces to melt into the pits with the jeweler's laser. If you use a TIG, use mild steel rod. Nickel steel rod if the gun of a later manufacture. Matching the steel helps in the ease of final finishing. If you don't have access to that equipment, burnish in the pits as the steel on these old guns is soft enough to move pretty far ... as much as 1/16" of an inch easily. If do you use a welder, case color or charcoal blue.

Use files again to bring everything flush then oil stones and bring to a 400 grit finish.

You can then transfer your pattern back on to the action and replicate it exactly after the wood has been refitted.

Someday they these oldies will be gone and every one saved from the rust and rot brings a piece of great American history back into circulation ... hopefully for another century of enjoyment. Best of luck .... Chris
 
Last edited:

Douglas

Member
Joined
Aug 18, 2010
Messages
88
Location
Nevada and Wyoming
Thanks Chris you actually answered what I needed to know. I was going down the path you laid out for the most part but I was not sure it was the best way.

The welding part I really never explored. Would a spot or tack weld work as well or is this not wise? Thanks again
 

Christopher Malouf

~ Elite 1000 Member ~
Joined
Jun 19, 2007
Messages
2,037
Location
5mi from the nearest Dunkin Donuts in Tennessee
That kind of welding is not going to help as you need to literally add metal rather than attach it. A tack weld will most likely break anyway if you had to burnish that area and there's a good chance you will need to as it is difficult to fill a hole perfectly. If you do find the need to weld, I'd suggest case coloring or charcoal blue as a final finish as hot bluing is something I've never attempted. The Winchesters I've done welding on will be case colored.

The year of your 92 will play a role in what you can do for finishing ... Winchester ceased offering casing on those in 1901 or 1904 (one of those years is correct if I recall).

Try to burnish in as much as you can as you file this down. Don't be concerned with saving the original engraving and focus more on using the higher metal to your advantage in filling the low spots. The burnisher I use is one from GRS with a slight modification to the edges (polished over). In the pneumatic handpieces it moves a lot of metal across the surface of these old guns. You may find that many of the pits become deep pinholes as you near the end of your filing work and I was able to save a lot of metal on my 73 simply by burnishing. That will be your best bet if you intend to hot blue. Just be sure all of the rust is out. It worked great on an old barrel and the surface was good after hot bluing with no evidence that it was burnished prior to stoning and sanding.

You'll just have to get in there and work it. Treat welding as a very very last resort and not a shortcut and you'll find that you may not need to do it at all. Everything that is learned along the way on this one will help you keep more of your shirt (rather than losing all of it :)) when a project of greater value comes along.

Have fun ...
Chris
 
Last edited:

Latest posts

Sponsors

Top