A Better French Gray

Beathard

~ Elite 1000 Member ~
Joined
Jun 22, 2011
Messages
1,476
Location
Paige, TX
I understand how to French Gray a pistol, but I'm seeing some results on the Internet that look much different than mine.

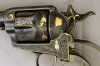
For example on http://www.nutmegsports.com/ at the biotin of the page is a pistol with silver inlay.

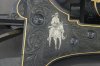
How does one keep the scrolls light gray while making the rest of the gun so dark.
 

Ray Cover

~ Elite 1000 Member ~
Joined
Nov 14, 2006
Messages
1,012
Location
Missouri
I just finished such a project.

Basically you only french gray the scrolls and leave the rest blued by masking it off. I use a traditional etchers hard ground. A lot of guys use lacquer or finger nail polish.

I took pics of the process to do a tutorial on EngravingLessons.com . Give me a couple weeks and I should have that up and running.
 

Jim B

Member
Joined
Feb 13, 2007
Messages
35
Location
Glenrock, Wyo.
What you use for a masking agent depends upon how fine the scroll. I have a couple of different etching grounds that I will use. One I will take a small brush and paint it on the area to protect. The other type of ground is poured over the area, heated and quenched. Then chipped out of the area that is to have the bluing removed leaving the background protected. With both of these you always have to be on look out for areas that did not get covered (masked off) that should be. This process of selective grey can get to be time consuming.

If the area to be selective grey has a border or strong division of some sorts. Wax or nail polish works great. Any more I like to use the nail polish whenever I can. It is cheap and easy to buy. You can get it in bright colors which helps when painting it on. It also dries quick. I use it more like a dam.

Sometime I will have to learn to post photos so I could show you.

www.jimblairengraving.com
 

Jim B

Member
Joined
Feb 13, 2007
Messages
35
Location
Glenrock, Wyo.
Yes that is how I accomplished the selective grey in that rifle and all the others. The blue needs to be removed before engraving. Polish bright to the finish that is needed. Engrave, blue and then selectively grey. All areas that you want to remain blue you have to mask off (protect from the chemical used to remove the blue).

The grounds, wax and finger nail polish all can be removed with lacquer thinner, acetone, alcohol. I prefer lacquer thinner.

When all finished and cleaned up, oil the parts. This will help protect and bring back the shine. Later I will use Renaissance Wax Polish on the gun.

Here are some photos of a Colt recently finished. The photos show the selective grey areas. Not hard to do just time consuming. The train was the quickest and easiest. There I used the finger nail polish to protect the blue outside the gold line borders. The finger nail polish is put down more like a dam. I will use a small brush dipped in my bluing remover to apply the remover inside the dam where I want to grey.
 

Attachments

  • CCA 2012 SSA Colt 001 auto adust.jpg
    CCA 2012 SSA Colt 001 auto adust.jpg
    120.9 KB · Views: 446
  • CCA 2012 SSA Colt 015 auto adjust.jpg
    CCA 2012 SSA Colt 015 auto adjust.jpg
    96.8 KB · Views: 440
  • CCA 2012 SSA Colt 008.jpg
    CCA 2012 SSA Colt 008.jpg
    90.3 KB · Views: 435

ETHELBERT

Elite Cafe Member
Joined
Dec 27, 2006
Messages
200
Location
minnesota
Very very nice indeed! I love the train also and the leaves on the revolver. There was another post on how a fella used fine line sharpies to keep the solution (whatever it is) where it was supposed to stay. I tried it on an old bluedpart and IT WORKS! very convieniant and easy to use. Sharpies of course can be purchased in a few different tip sizes. I used the ultra fine tip just to see what would happen....just draw a line on an old blued part and then put your solution down and it won't get thru the sharpie.
 

Mike Fennell

Elite Cafe Member
Joined
Apr 6, 2007
Messages
660
Location
Matteson, a south suburb of Chicago.
Jim and Ray, thanks for the informational posts. You guys don't post often, but when you do it is well worth reading.

Jim, I'm surprised that you are still considered a "Junior Member" just because you don't post often. I am sure you don't bother much about such things, as your work speaks for itself. But for the edification of new members and because you are such an accomplished master of the art of engraving, I would like to suggest that the moderators change that byline to "Elite Cafe Member" without delay. You deserve that appellation far more than someone like myself.

Again, thanks for the post and photos, and pardon me, all of you, if you think my suggestion is silly.
 

Sam

Chief Administrator & Benevolent Dictator
Staff member
Joined
Nov 6, 2006
Messages
10,488
Location
Covington, Louisiana
Jim, it's GREAT to see you posting here! I love your work and I'm going to put you on the spot...would you do a Cafe interview? / ~Sam
 

SamW

:::Pledge Member:::
::::Pledge Member::::
Joined
Jan 31, 2007
Messages
2,425
Location
Castle Valley, UT in the Red Rock country
mrthe, me too! Jim mentions Renaissance wax...if you mix just a little lamp black into some of the wax before using it, it will darken the cuts and detail adding a bit more contrast. I have done this with Liberon wax but it should work with the Renaissance as well. The lamp black gives a flat black which I find works really well. The same can be really easy to use for "inking" castings.
 

mrthe

Moderator
Joined
Oct 20, 2010
Messages
1,787
Location
Spain
i make the same using the Sam transfer wax and a black sharp qork well on my nickels ;)
 

Beathard

~ Elite 1000 Member ~
Joined
Jun 22, 2011
Messages
1,476
Location
Paige, TX
Why does one need to remove the blue prior to engraving? That one is throwing on this technique.
 

Ed Westerly

~ Elite 1000 Member ~
Joined
Mar 16, 2011
Messages
1,224
Location
southern California
The reason for removing all of the blue before engraving is that when you reblue, the old blue will not take the new bluing well, if at all!:eek: Your results will be blotchy at best. :(
 

Beathard

~ Elite 1000 Member ~
Joined
Jun 22, 2011
Messages
1,476
Location
Paige, TX
I know I probably sound stupid here, but why do you have to reblue at all? If you do not screw up the areas not engraved and selectively gray the areas you do engrave, why can't you go with the original blue and save some $$$? Am I missing something?

Sorry about all of the questions, I'm just trying to understand vs following instructions. I think through understanding the reasoning, I will grow as an engraver much faster.
 
Last edited:

Ed Westerly

~ Elite 1000 Member ~
Joined
Mar 16, 2011
Messages
1,224
Location
southern California
In theory you don't have to reblue, but in my experience even if you don't make any mistakes and all of your lines are cut perfectly the first time, the surrounding bluing takes a hit to a certain extent. On top of this, I prefer a more relaxed style of engraving ambiance, and don't like to engrave through the blue fearing that I might have a graver slip or the tip break, etc. I like a more gentle on the heart method of engraving freely, rebluing the gun, and selectively removing the blue from the areas I want French gray without the mental termoil! IMHO! :)
 

Beathard

~ Elite 1000 Member ~
Joined
Jun 22, 2011
Messages
1,476
Location
Paige, TX
Do you do your own reblueing? Sending it out seems like it would get expensive. If you do your own, what product do you use?
 

Latest posts

Sponsors

Top