How do you inlay a tapered element?

AndrosCreations

Elite Cafe Member
Joined
Jul 14, 2010
Messages
464
Can anyone give me some hints on how to inlay gold into a tapered element such as a scroll?

I tried my hand at it for the first time.

This is how I did it (and am hoping there's a better way).

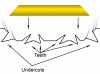
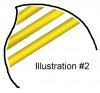
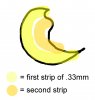
I only used one gauge of wire (28g or .33mm). I removed the area of the scroll/leaf (similar to removing background but not as deep)... then I undercut the entire perimeter of the element... then I made two undercuts and layed down one strip of wire against the outter edge... then I tried to make two more undercuts for the strip that goes next to the one I just did (which was nigh impossible being that the strip of gold I just laid down is tall and the area that I need to work on is so tiny, I just end up dragging and nicking up the gold).

Please see illustration to get an idea of how I did it...

After the second wire finally grabbed onto an undercut, I clipped the ends of the gold wire where I thought would be appropriate and hammered the crap out of the whole wad.

Would it be better to just use one single channel right down the center of the element and just use thicker and thicker gauge wire as the element widens?

I need some different options because doing it the way I did was kind of hit and miss.

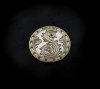
Thanks!... Also, here's the experimental piece.
 

Attachments

  • Inlay.jpg
    Inlay.jpg
    87.7 KB · Views: 137
  • 029 e.jpg
    029 e.jpg
    234.4 KB · Views: 208

AndrosCreations

Elite Cafe Member
Joined
Jul 14, 2010
Messages
464
Also... I'd like to learn to do tapered elements with wire at this point. SamW gave me some great advice on using sheet but I only have wire at the moment with no $$$ to purchase sheet.

Thanks!
 

Sam

Chief Administrator & Benevolent Dictator
Staff member
Joined
Nov 6, 2006
Messages
10,491
Location
Covington, Louisiana
crossways_inlay.jpg

I'm glad you asked. In nearly all cases I would inlay this shape with the wire going crossways as opposed to lengthwise. When done properly, it's a very tight inlay process. Tooth-up the cavity and lay the wire in and trim to fit. The teeth should stabilize it well enough to lay-in all the pieces, then drive them in with a textured punch. Be sure to trim each piece as closely as possible so it doesn't have to travel far to lock-in. Of course undercut the sides properly.

Your inlaid S is awesome! :beerchug:
 

AndrosCreations

Elite Cafe Member
Joined
Jul 14, 2010
Messages
464
Sam... you completely ripped off my scroll drawing!... :shock: :cool:

In all seriousness... do you mean that all I need to do is undercut the perimeter of the shape and then just raise a multitude of hearty teeth without having to cut more channels and undercuts?

I think I may just have to go play around with this concept right now... But am I understanding it right? Please elaborate as far as tools used to cut the teeth.

I wonder if this technique can be used with something as soft as the alloy in a nickel.

Thank you! :beerchug:
 

Sam

Chief Administrator & Benevolent Dictator
Staff member
Joined
Nov 6, 2006
Messages
10,491
Location
Covington, Louisiana
Of course I haven't seen the actual size, but in most cases I would undercut the sides as normal and tooth-up the bottom of the cavity. The toothing - when I do it - is used more to stabilize and grip the pieces of wire in place as I'm laying them in. I lay the wire across the cavity and trim off the other side with a flat graver and press (not hammer) them into place to keep them from shifting. I can trim at angles so I mitre each piece to fit the shape. This is a huge help, so don't just lop off a piece of wire and expect it to travel to fill a sloppy fit. Mitre each piece carefully and make 'em snug so when you start driving they lock into place very quickly. As for the teeth, I don't do anything special. I just raise them with a square graver in different directions. Anneal your wire first so it's dead soft. I've done this process on so many inlays I can't count them. It sounds complicated, but it's actually quite fast, and you can mitre to a nice point to fit the tips of leaves. Remember that if you hammer gold wire it travels lengthwise as it spreads. This technique makes use of that and puts the ends of the wire deep into the undercuts.
 

AndrosCreations

Elite Cafe Member
Joined
Jul 14, 2010
Messages
464
Thanks Jeff... I'll try a flat with no heal

Sam... I think I understand what you mean by mitering the wire... Is this illustration correct? or is Illustration #2 what you mean by mitering?

Thanks
 

Attachments

  • Sam Gold 1.jpg
    Sam Gold 1.jpg
    45.1 KB · Views: 90
  • Sam Gold 2.jpg
    Sam Gold 2.jpg
    161 KB · Views: 84

jerrywh

~ Elite 1000 Member ~
Joined
Jun 7, 2007
Messages
1,032
Location
Baker City , Oregon
If the cavity is large I would do it like Sam said. When they are very small I cut a piece of gold wire diagnally on one end with fingernail clippers and then just push it in the cavity after it is undecut. Another way that usually works
is to put a relatively large piece of gold in the big end and then just work the excess down into the small end with punches. for making teeth I use a 90° graver with no heal.
 

Sam

Chief Administrator & Benevolent Dictator
Staff member
Joined
Nov 6, 2006
Messages
10,491
Location
Covington, Louisiana
You got it, Andy. Your illustration is correct. Of course you don't want spaces between the wires but I'm sure that's just to show the individual pieces.

When you lay your wire into the cavity have a wide flat hand engraver in your right hand. Hold the graver on the wire at the edge of the cavity and then move the wire back and forth to break it off. Quite often the mitre you just cut will be perfect for the next piece in the sequence. If not, I lay the gold on top of my vise and shear it off with the flat graver to cut the mitre. A more sensible way would be to have a thin piece of brass attached to the top of the vise so you can shear off the end of gold wire without doing in on the steel vise jaws. I'm not very sensible, though.

The problem with doing it like your first illustration (long ways) is the way gold travels as it's hammered. While it will work, the method I use seems much more efficient. Of course ask 50 engravers how they inlay or how to tooth-up a cavity to receive gold and you'll likely get 50 different answers. I don't claim my way is better, but it works for me. Your mileage may vary. :)
 

Doc Mark

~ Elite 1000 Member ~
Joined
Nov 16, 2006
Messages
1,284
Location
Hampton, Virginia
Thanks Sam, I've been doing more gold inlay recently and have never considered "going across the grain" so to speak. It makes sense when you think about it. Where I'm having the most difficulty, is long very narrow (1mm or less) tapers. I'm having trouble making a small enough tool to make the undercuts prominent enough in the tiny channel, especially as you near the fine tip or the channel and not keep breaking the tools tip.

Andy, I think your design looks great!
 

Jane

Elite Cafe Member
Joined
Oct 9, 2009
Messages
346
Location
NW Texas
Andy, thanks for posting, I seem to learn quite a bit from the questions you ask, illustrations and feedback you receive. You do great work also by the way!
 

KCSteve

~ Elite 1000 Member ~
Joined
Jun 19, 2007
Messages
2,882
Location
Kansas City, MO
Doc Mark

For a long, narrow channel try cutting it with a flat graver (so you have nice, straight up & down side walls) and just teeth the bottom. I was taught to cut teeth from both directions. The straight sidewalls help hold the wire in place and the teeth lock it down.
 
Top