rod
~ Elite 1000 Member ~
In the attached photo, please ignore the unfinished condition of this piece..no border and perimeter not cut properly, etc.
Photographed with my emergency "flat light table" … open your lap top, get a blank white Photoshop canvas, tilt the screen angled towards you, and it gives pretty good flat lighting, with no hot spots.
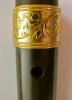
Got two flutes finished and into the mail to Switzerland and Germany, so snatching a few hours to try some ideas on the "flare cut" engraving, that might hold promise for flute application.
I have a drawer full of copper (cuts like silver) practice ideas for flute keys, and grabbed a half-finished one ( about 2 inches/50 mm long) to experiment with a contrast enhancement. Nothing is new very much over the centuries, yet I was new to flare cutting, and got generous nudges from a host of good souls …Diane S, Ron Smith, Sam A, Mike Dubber, Roger B, and more.
I will not be able to convince a flute player to have a little bling on their flute, unless it can be done for not too much additional cost over the already expensive flute.
So:
Flare cut is important for this idea, as it is all with knife edge mountain ridges, or scooped hollows, as in the flower petals, and all are "under water", as they say in the now defunct real estate business. Everything is below the surface pretending it is not. It cuts fast, and the idea is to get fast and good…still working on both of these! The advantage is ... no lengthy background removal. I have been using bead blasted silver, then bright flare, and that's all.
Now I am experimenting with gold plating the whole piece, afterwords, under the microscope, carefully sanding off the top surface to remove the gold from the negative space (the surface). Danger...do not lose those crisp edges! If I do my cutting with more skill than on the above test, I can sand down the gold ( gentle with 400 grit and flat backing behind the paper, then on down to 2000 grit) to reveal the nickel plating underneath, and using that as a witness mark, I sand more till the copper is revealed. By the way, nickel plating is advised if you are starting with silver, as it presents a firewall to prevent the gold atoms from diffusing into the silver to form an alloy at room temperature, hence diluting the top gold surface. In a real key, it will be silver, not copper. However, when you think about it, as the copper tarnishes darker, the contrast with the 24 K gold is actually enhanced, also you could sulfur-blacken the silver negative space, or bead blast it , etc.
In silver only, the busy flower cluster seems too busy, but now in gold, it appears bit better?
None of these steps is very time consuming.
Another promising approach, in theory, would be to bead blast the silver for that nice mat surface, wipe it with super glue as a mask to the gold plating, flare engrave the design and then straight to gold plating, hoping the now gold cuts will look crisp, but ...the super glue does tend to flake off locally at the edge of the engraving cuts, so the gold/non gold transition would be a bit ragged. Does anyone have any suggestions for a really tenacious, thin, and transparent coating that would not flake?
One might expect engravers who are masterful in gold inlay work on large commissions to yawn at this plating effect, understandably, however, don't sit around too long awaiting a big commission. Let's look for what jobs will keep our gravers busy, and maybe bring in some more modest income? I can get a lot of good learning in, trying to improve on these small jobs.
There is so much experience out there on the forums, please do weigh in on any aspect of this?
Best
Rod
Photographed with my emergency "flat light table" … open your lap top, get a blank white Photoshop canvas, tilt the screen angled towards you, and it gives pretty good flat lighting, with no hot spots.
Got two flutes finished and into the mail to Switzerland and Germany, so snatching a few hours to try some ideas on the "flare cut" engraving, that might hold promise for flute application.
I have a drawer full of copper (cuts like silver) practice ideas for flute keys, and grabbed a half-finished one ( about 2 inches/50 mm long) to experiment with a contrast enhancement. Nothing is new very much over the centuries, yet I was new to flare cutting, and got generous nudges from a host of good souls …Diane S, Ron Smith, Sam A, Mike Dubber, Roger B, and more.
I will not be able to convince a flute player to have a little bling on their flute, unless it can be done for not too much additional cost over the already expensive flute.
So:
Flare cut is important for this idea, as it is all with knife edge mountain ridges, or scooped hollows, as in the flower petals, and all are "under water", as they say in the now defunct real estate business. Everything is below the surface pretending it is not. It cuts fast, and the idea is to get fast and good…still working on both of these! The advantage is ... no lengthy background removal. I have been using bead blasted silver, then bright flare, and that's all.
Now I am experimenting with gold plating the whole piece, afterwords, under the microscope, carefully sanding off the top surface to remove the gold from the negative space (the surface). Danger...do not lose those crisp edges! If I do my cutting with more skill than on the above test, I can sand down the gold ( gentle with 400 grit and flat backing behind the paper, then on down to 2000 grit) to reveal the nickel plating underneath, and using that as a witness mark, I sand more till the copper is revealed. By the way, nickel plating is advised if you are starting with silver, as it presents a firewall to prevent the gold atoms from diffusing into the silver to form an alloy at room temperature, hence diluting the top gold surface. In a real key, it will be silver, not copper. However, when you think about it, as the copper tarnishes darker, the contrast with the 24 K gold is actually enhanced, also you could sulfur-blacken the silver negative space, or bead blast it , etc.
In silver only, the busy flower cluster seems too busy, but now in gold, it appears bit better?
None of these steps is very time consuming.
Another promising approach, in theory, would be to bead blast the silver for that nice mat surface, wipe it with super glue as a mask to the gold plating, flare engrave the design and then straight to gold plating, hoping the now gold cuts will look crisp, but ...the super glue does tend to flake off locally at the edge of the engraving cuts, so the gold/non gold transition would be a bit ragged. Does anyone have any suggestions for a really tenacious, thin, and transparent coating that would not flake?
One might expect engravers who are masterful in gold inlay work on large commissions to yawn at this plating effect, understandably, however, don't sit around too long awaiting a big commission. Let's look for what jobs will keep our gravers busy, and maybe bring in some more modest income? I can get a lot of good learning in, trying to improve on these small jobs.
There is so much experience out there on the forums, please do weigh in on any aspect of this?
Best
Rod
Attachments
-
 IMG_2846.jpg32.9 KB · Views: 258
Last edited: