Mario Sarto
Elite Cafe Member
This is a little pendant made of Sterling Silver. Its diameter is 31 mm. Background was removed, stippled and blackened by sulfur. It was difficult to take a photo of the front - the plate is rounded slightly.
Thank you for watching this!
Mario
Thank you for watching this!
Mario
Attachments
-
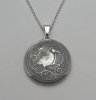 bird-silver-pendant-front.jpg154.8 KB · Views: 296
 -
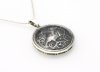 bird-silver-pendant-left.jpg151.5 KB · Views: 223
 -
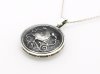 bird-silver-pendant-right.jpg166.9 KB · Views: 208