
A Little Shading Tutorial
by Martin Strolz
Classic Shading Technique
Engraved scenes and animals require a lot of shading. Cuts typically are
short and often tapered toward both ends. The advantage of such lines are
that they are best suitable to create variations of gray tones as well as to
depict different surfaces.
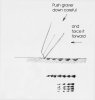
Mostly such lines are arranged in rows, starting short at one end, then
getting longer towards the center and becoming shorter at the other end too.
Crossed shadings have additional layers of such lines, executed in another
angle, depth or length.
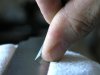
For engraving such lines the graver must be moved along the thumb in
vertical ellipsoid path. On its lower pass it will cut into the steel.
But there must be a second movement sideways, transforming the tool path
into a spiral movement. This can be done either by rotation of the vice
and/or hand. It is important, that the thumb is firmly pressed down on the
workpiece staying stationary. That makes the thumb resting point be the pivot.
For a second layer of lines change the placing of the thumb. Select the spot
perfectly in order to get the correct angle between shading lines. Always
carry out the whole layer at one time. It is quite difficult to continue
once the thumb has been relocated.
Another Shading Technique
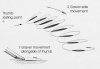
Often it is necessary not to get a smooth line or uniform looking surfaces,
for example in backgrounds. Using the graver very steep, -much steeper than
normally- can help create new and different expression. If the graver is
used in an angle of attack far beyond its normal angle of attack, it is not
be possible to regularly cut lines. By positioning the thumb behind/under
the graver, the graver can be levered forward with the index finger. This is
not possible if pushed down too firmly. As the graver is moved forward
stick-slip will occur. Thereby interrupted lines will be created. Properly
done the small chips are removed perfect.
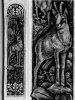
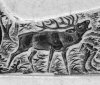
The examples shown are the work of Johann Singer, which he did during
his lessons in school in Ferlach. The red stag is 25 mm in size.
by Martin Strolz
Classic Shading Technique
Engraved scenes and animals require a lot of shading. Cuts typically are
short and often tapered toward both ends. The advantage of such lines are
that they are best suitable to create variations of gray tones as well as to
depict different surfaces.
Mostly such lines are arranged in rows, starting short at one end, then
getting longer towards the center and becoming shorter at the other end too.
Crossed shadings have additional layers of such lines, executed in another
angle, depth or length.
For engraving such lines the graver must be moved along the thumb in
vertical ellipsoid path. On its lower pass it will cut into the steel.
But there must be a second movement sideways, transforming the tool path
into a spiral movement. This can be done either by rotation of the vice
and/or hand. It is important, that the thumb is firmly pressed down on the
workpiece staying stationary. That makes the thumb resting point be the pivot.
For a second layer of lines change the placing of the thumb. Select the spot
perfectly in order to get the correct angle between shading lines. Always
carry out the whole layer at one time. It is quite difficult to continue
once the thumb has been relocated.
Another Shading Technique
Often it is necessary not to get a smooth line or uniform looking surfaces,
for example in backgrounds. Using the graver very steep, -much steeper than
normally- can help create new and different expression. If the graver is
used in an angle of attack far beyond its normal angle of attack, it is not
be possible to regularly cut lines. By positioning the thumb behind/under
the graver, the graver can be levered forward with the index finger. This is
not possible if pushed down too firmly. As the graver is moved forward
stick-slip will occur. Thereby interrupted lines will be created. Properly
done the small chips are removed perfect.
The examples shown are the work of Johann Singer, which he did during
his lessons in school in Ferlach. The red stag is 25 mm in size.
Attachments
-
 5.jpg31.6 KB · Views: 1,319
 -
 4.jpg32.9 KB · Views: 1,409
 -
 3.jpg28.1 KB · Views: 1,408
 -
 2.jpg92.3 KB · Views: 1,341
 -
 6.jpg93.5 KB · Views: 1,326


