
I was practicing yesterday on this capper and decided to try going without a boarder. Being boarderless doesn't look TOO bad on the back but the front would have certainly benefited from a boarder IMO. Perhaps the difference lies in the fact that the back has a soft rounded edge and the front has a hard square edge??? A boarder on the back would have just magnified the fact that the finial veers off to the left and is WAY off center .
.
Cody
. Cody
Attachments
-
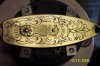 capper1.jpg51.4 KB · Views: 241
 -
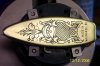 capper2.jpg50.5 KB · Views: 221


